Death Star Sensor -- Photoshop-ing Booleans Tutorial

BOOLEANS SUCK.
When you use boolean operations on your mesh in 3dsMax, verts are invented out of thin air, topology gets jacked up. Or you could try modeling the entire thing Zbrush with Dynamesh, topology be damned, but here’s a more flexible, less destructive workflow.
Using Photoshop, heightmaps can rapidly iterate hardsurface meshes that have hard-to-model insets and outcroppings. I’m also using 3dsMax, Xnormal and Zbrush.
The Model:
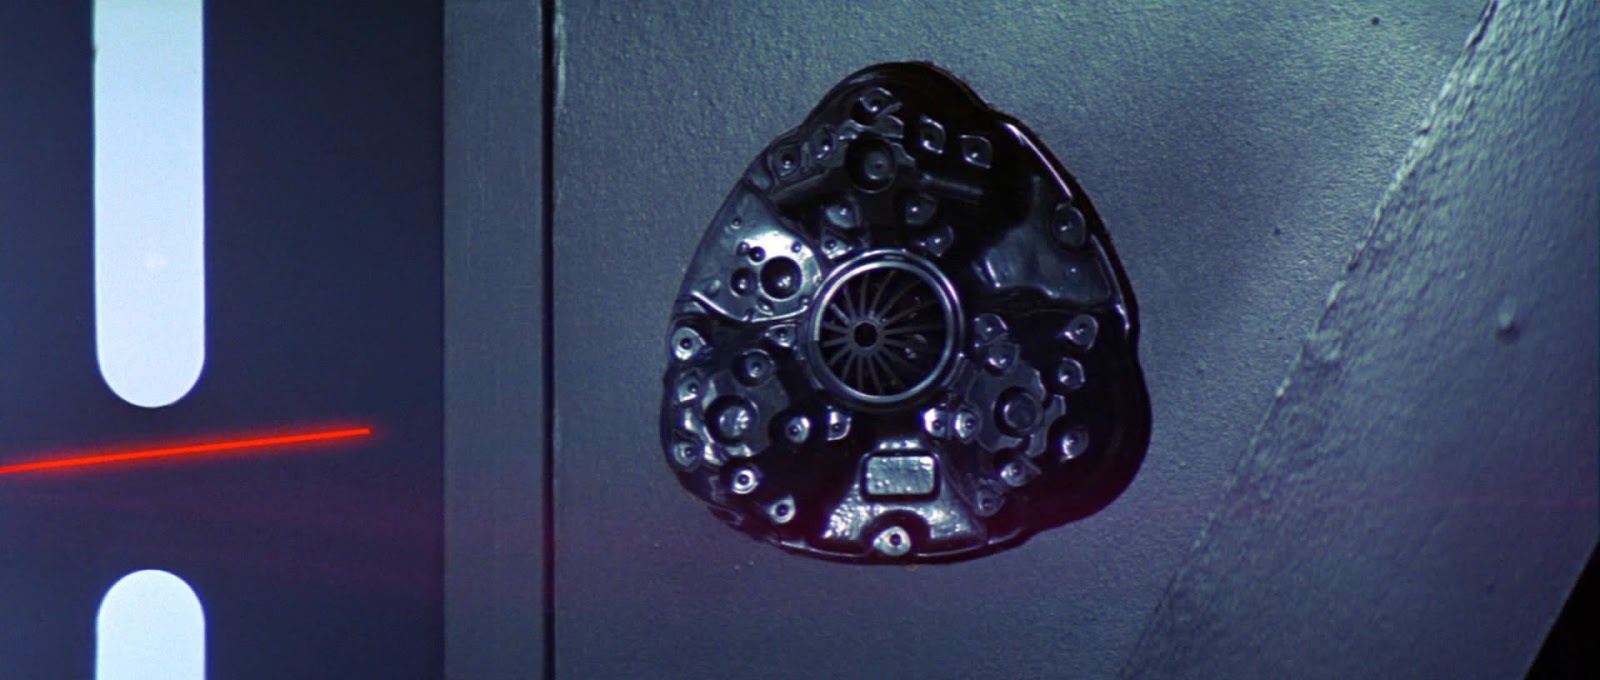
In Star Wars, when they’re on the Death Star, there’s this scene where our heroes shoot everyone and everything in the room, including this sensor. I thought it looked neat.
This prop was vacuformed in a mold, like a real-world heightmap. A heightmap would be easy for me to manipulate in Photoshop vs. trying to model booleans in 3dsMax. I can bake the major shapes out to an image and then Photoshop in parts that i want to boolean.
I started out by baking out a highpoly block-in template to work off of once I started doing photoshop work. There’s a floater off of the mesh, I’m going to use that in photoshop to push in and out of the heightmap.

I baked my displacement map to a plane in 3dsmax. At first it game me trouble because I’m used to working in XNormal. They both offer heightmap baking options and both are equally valid. Xnormal gives you a dialog automatically to tune black/white values and gives you a live preview of the heightmap, so it’s better when you’re starting out with this process. 3dsMax has similar options you have to know to preselect, but then you don’t have to export those OBJs and can keep it leaner, meaner, and less files littering your folder structure.

SETTING UP VIEWPORT DISPLACEMENT PREVIEW
Displacement mapping is nothing new. 3dsMax has it built in as a World Space Modifier. To use it you have to add your heightmap to a material, then apply “Displace Mesh (WSM)” to a plane with at least 25x25 subdivisions. Turn on “Custom Settings” under “Displacement Approx” and you get your live preview.
3dsMax doesn’t care if you use your working PSD file instead of a tiff or targa or what-have-you, so iterations will be quick!

HAND-TWEAKING THAT HEIGHTMAP
Now that I have my basic shapes baked out, I can start manipulating them.
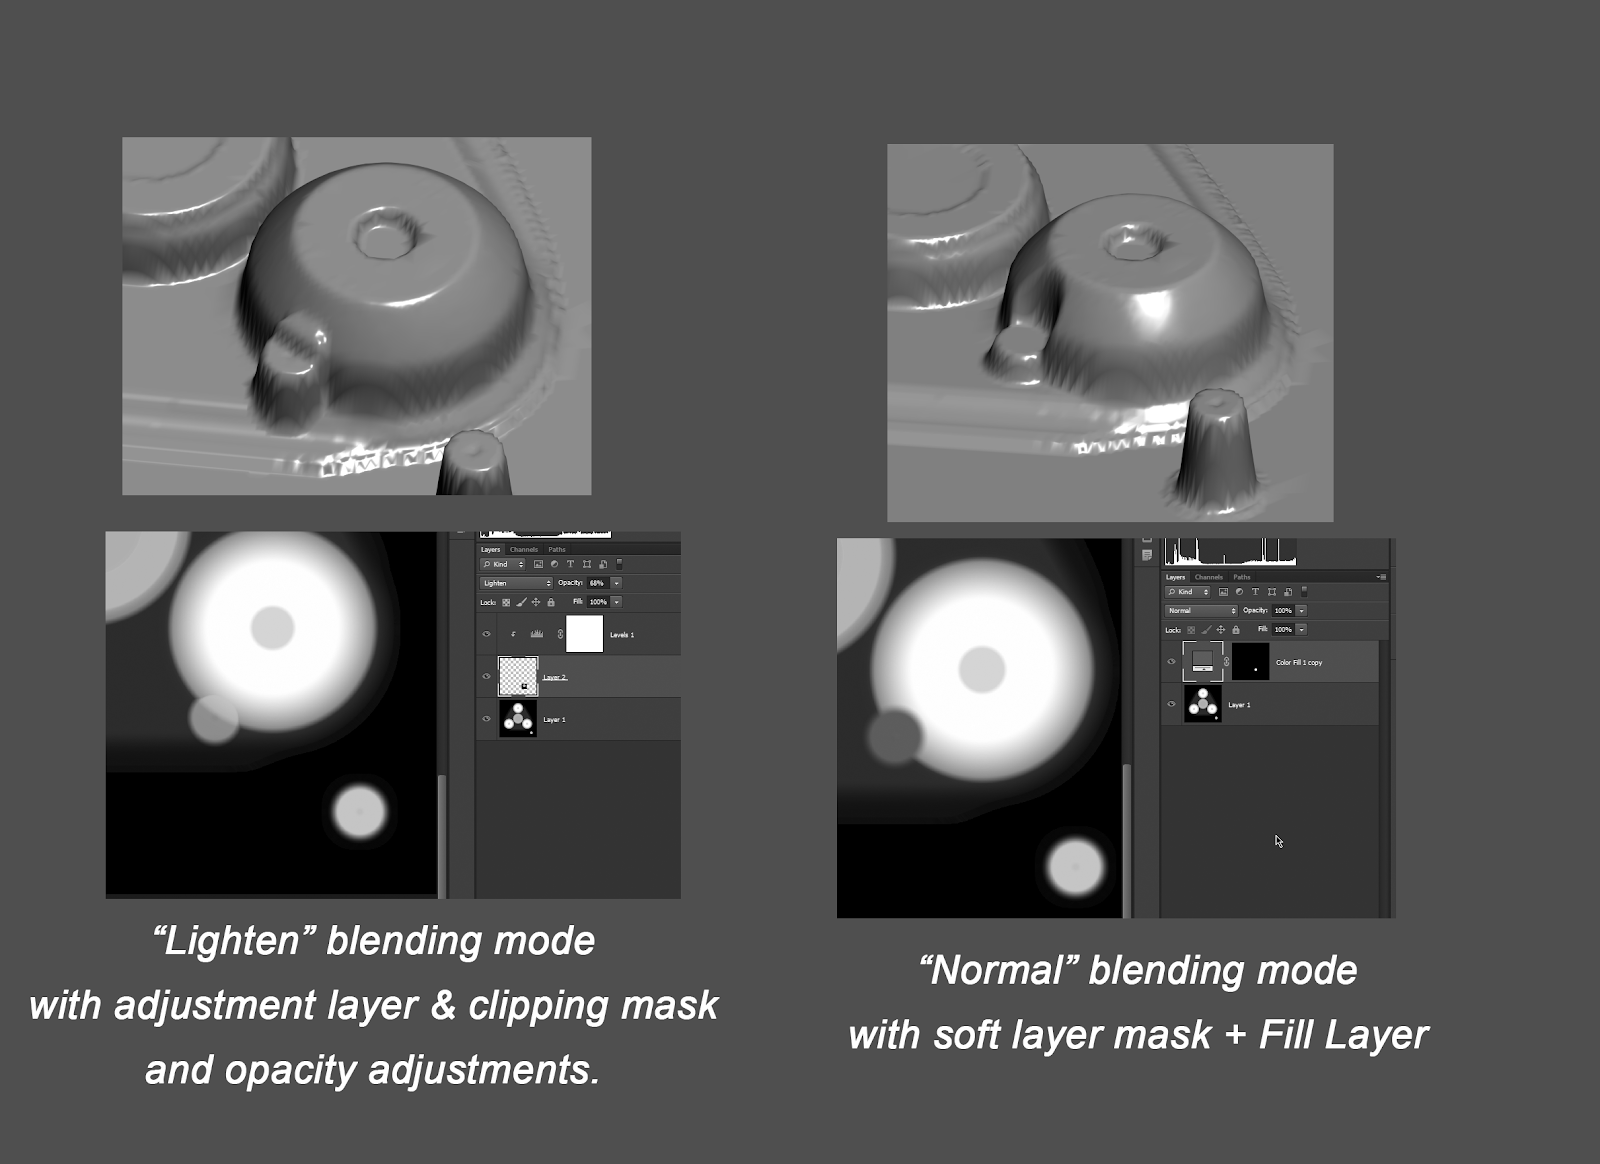
Using blending modes “lighten” and “darken”, we can take the floating geo that we set aside earlier and mold it into our heightmap with 1/10000th the pain it would take to do so in Max or even Zbrush. Save in Photoshop, click “Update Mesh” in Max, and you get as close to a live preview as you can get.
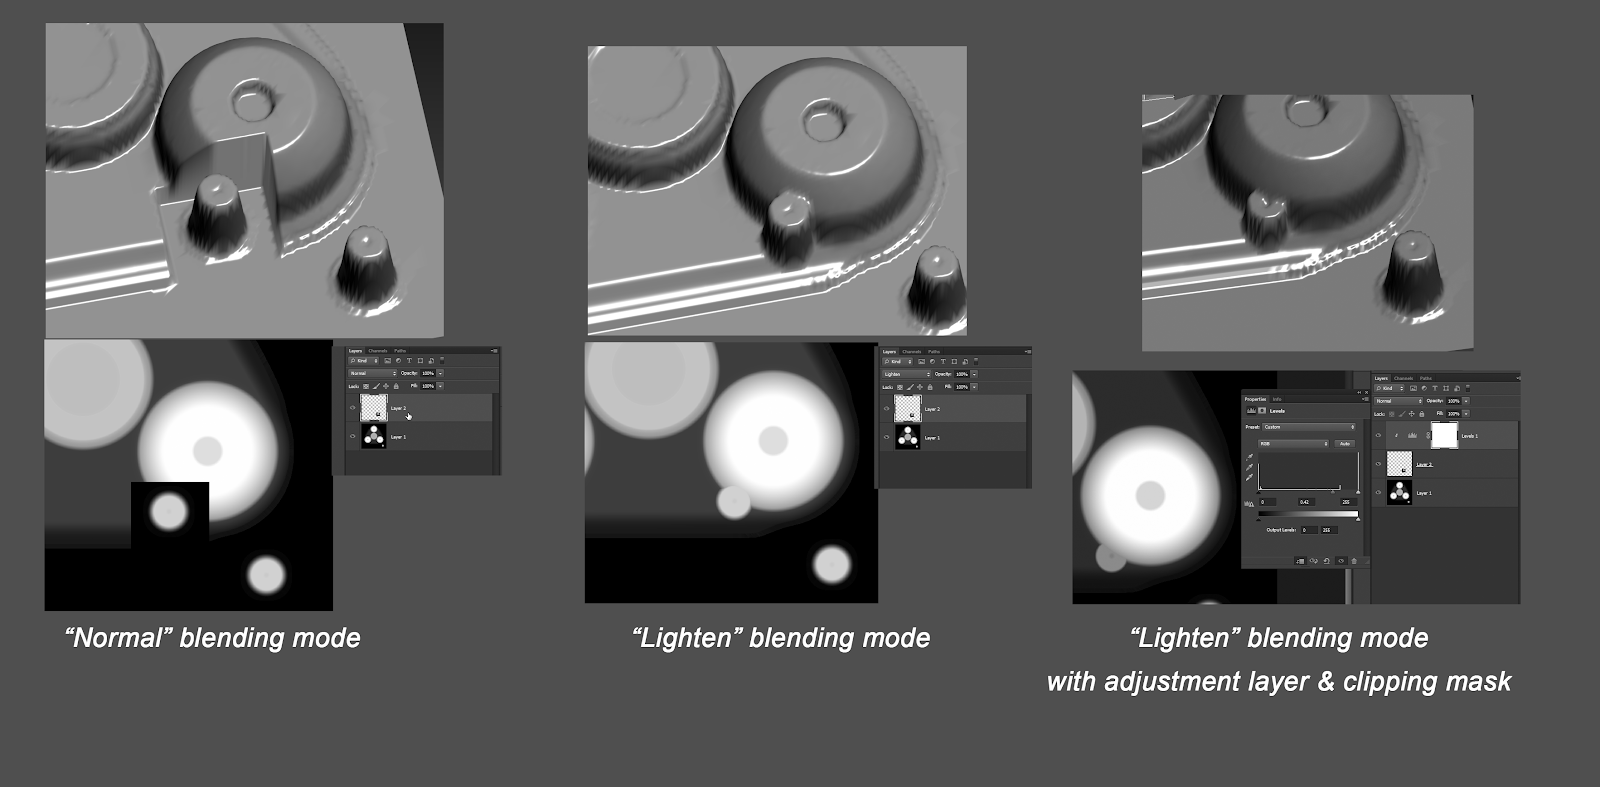
I can add adjustment layers to tune the height of the boolean shape. I can brighten it and pull it further out, or invert and push into the mesh.

And the really useful part is, you can set those pixels to be a layer mask instead, then you can have smooth blends to that height no matter what. This is good for spots where it might be inset on one shape and raised up from another -- those leveled off transitional shapes.
Want surface details? Adjust opacity so that now instead of sitting perfectly on top, it conforms to the mesh.
FINAL HEIGHTMAP PREVIEW
Photoshop has a million more ways to blend pixels that I can’t begin to cover or understand. For this mesh I used more hand drawn shapes, gradients, and 3d baked pieces. Here’s the final displacement map I made and the preview mesh side by side.

So we should bake from here right?
WRONG
3dsMax does a great job of displacing, but since we’re making an entire prop, we need something beefier. So that means we’re going into Zbrush. If you’re not comfortable there, that’s fine. We’re not spending long.
That said, STRAP IN, IT’S GONNA BE A BUMPY RIDE
HARDSURFACE IN ZBRUSH
Since this is Zbrush, we’re gonna need a tool thickness to it, since Dynamesh tends to freak out with flat planes. Your best bet would be a thick plane or a squat cube, or else you’ll have to fill in the backface of your plane.
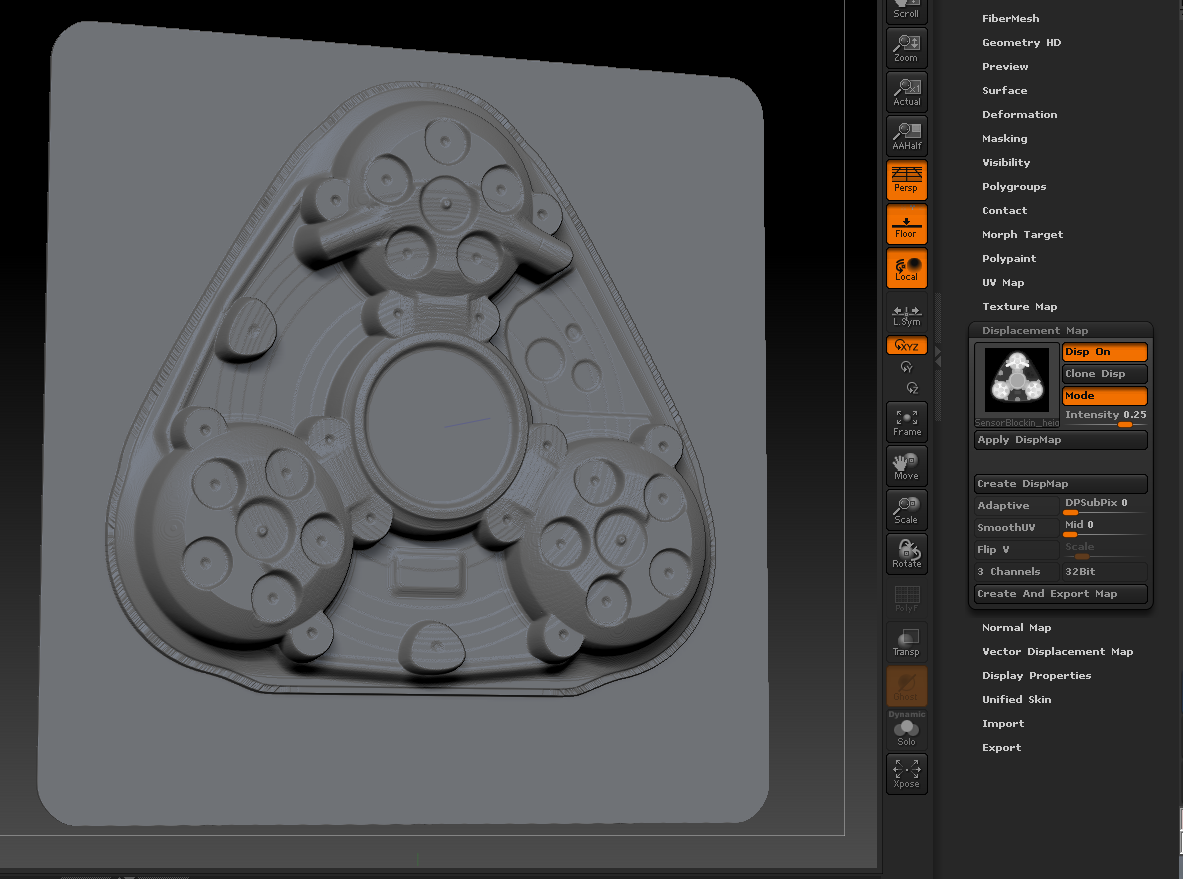
To use our heightmap, first we create a Texture Map. Open the Texture Map tab and click “New Txtr”. Then go to the next tab, Displacement Map, and click on the black square under “Displacement”. This will bring up the Alpha library. From here go click on Import, and once that dialog opens, select your Heightmap. PSD files are fine for ZBrush so don’t feel the need to save as a tiff or targa or whatever.

Once the heightmap is imported, nothing happens. By default the displacement value is set to 0.. For this prop, I used 0.25. It still doesn’t quite displace, but shows a flat looking preview. So you’ll have to click on “mode” for it to show up properly. Now, you can add subdivisions, and set the midpoint, the depth that it’ll displace from -- I set mine to zero. After I’ve got all the values set where I want them I’ll apply them to the mesh and BAM there we’ve got us a hardsurface model in Zbrush.
The real magic kicks in once we apply a Dynamesh -- suddenly all that stretching gets smoothed out, and the displacement gets a little better defined. And since we’ve got the default dynamesh blur enabled, the mesh smooths out a tiny bit transitions. We can do a clay polish if we want to smooth it out a bit more, but I didn’t bother here.
.

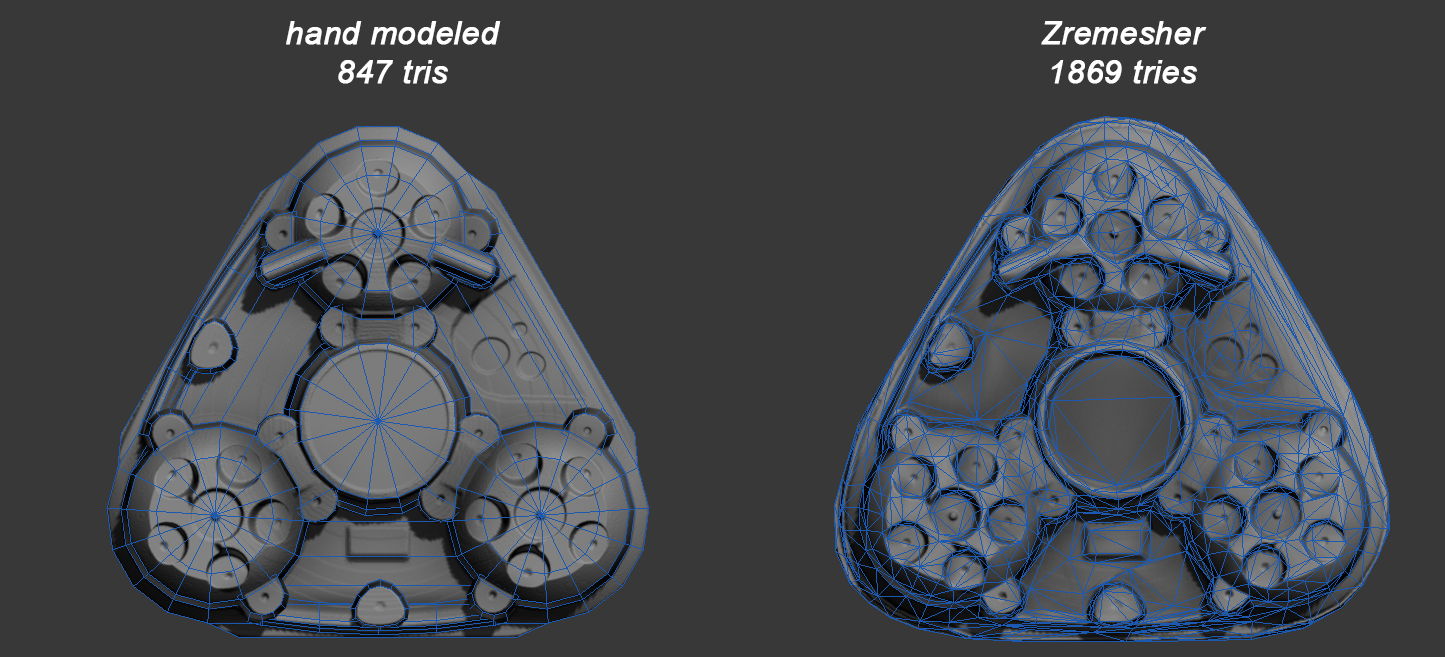
LOW POLY, THE NOT FUN PART, AT LEAST NOT REALLY
My initial dream was to use ZRemesher to generate a lowpoly mesh, but it wasn’t meant to be. ZRemesh and is a nice tool but I still don’t quite get the best results here. The best results I was able to get were still achieved by blocking in shapes in Max.
Using floating and intersecting geometry, I got the polycount down to less than half of what i was able to achieve in ZRemesher before losing details. I’ll keep investigating Zremesh as a lowpoly tool, but where my skills are it didn’t seem worth it yet.
The rest of the workflow follows regular high poly baking workflow using 3dsMax, Xnormal, and Substance
