Home Technical Talk

3ds Max to mudbox and normal mapping question

mirag3
vertex
Offline / Send Message
mirag3 vertex
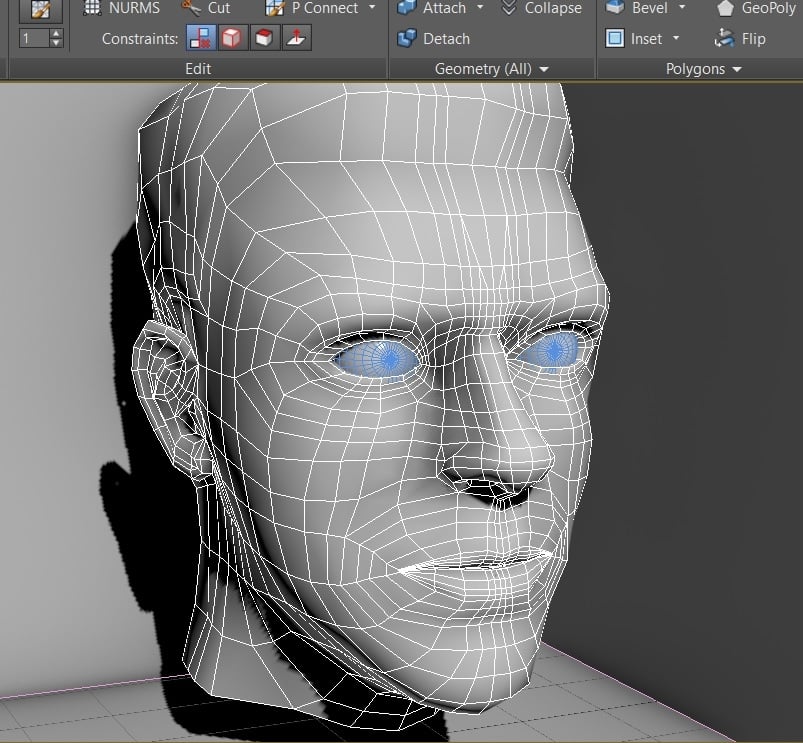
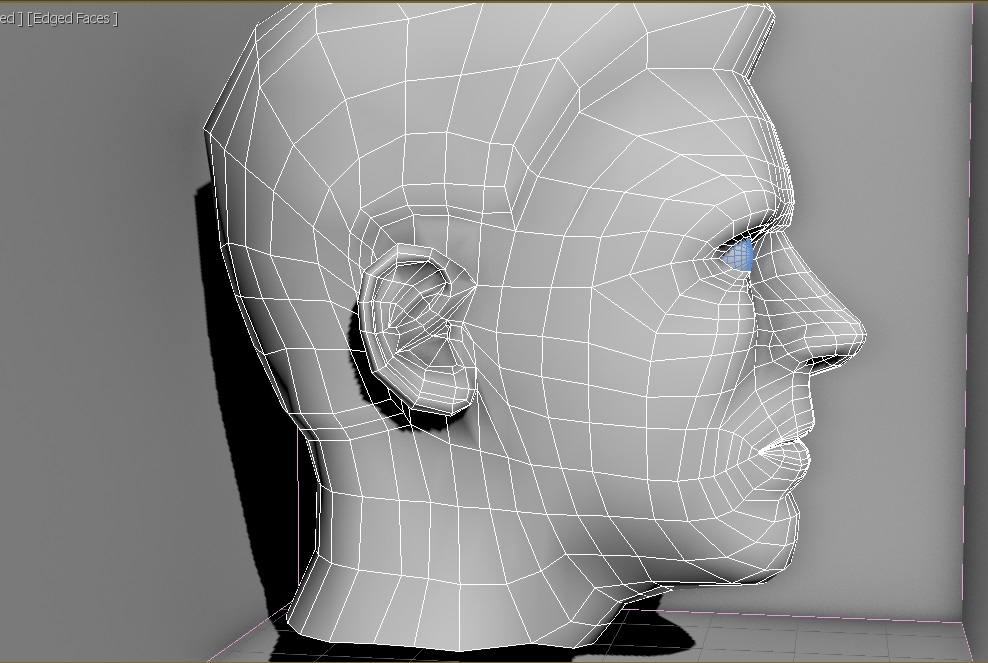
Hello everyone I am new to the forum. my name is Jan I am from the netherlands and I picked up modeling again recently. I am trying to model a character for "gaming purposes" and I ran into some problems with converting the model from 3ds max to mudbox. I made some triangles in my model to keep the polycount a little lower but when I converted it to mudbox it looked like the triangled area's were sort of extruded.

So I've got some questions:

- Should I use triangles to keep polycount low or should I avoid it altogether?
- If I am allowed to use triangles should I make a low poly model and a "cleaned up" model without tris to export it to mudbox or can I just use the model with triangles?

Added two screenshots of the model feel free to comment negative/positive feedback.
Replies

  • mirag3
    Offline / Send Message
    mirag3 vertex
    I found an image of nathan drake face topology (uncharted series) it looks like they made some triangles because they wanted to add detail to the nose/mouth/eye areas and then create some triangles to preserve low polycount? I kinda get why they do it like that and im wondering is this the right way to add detail and keep low poly? because if you look at the model it doesnt look like its creating weird artifacts or anything? though when i do the same and export it to mudbox it looks a little weird on some parts, especially the triangles on the forehead.
  • pior
    Offline / Send Message
    pior grand marshal polycounter
    - You are making the wrong assumption that the end ingame model is the same as the basemesh for sculpting. It is sometimes the case (some art pipelines rely on for efficiency at the cost of fidelity), but very rarely so. The vast majority of art creation workflows for high-end characters rely on a "retopo" step - sometimes using the basemesh used for sculpting as a starting point, and sometimes recreating everything from scratch.

    - Ingame models are all tris as far as graphics card/engine rendering is concerned. What you see in Max/Maya is earlier up the pipeline. As a matter of fact, for absolute accuracy when using normalmaps, you *need* your models to be 100% triangulated before export and baking.

    - Sculpting packages have their own set of limitations, and indeed, Mudbox works best when the mesh provided to it is quad based. But again, this has no relationship whatsoever with the way your final ingame model needs to be built. Now you *can* be clever and efficient by setting up your model to work both ways when appropriate, but considering this a requirement would be a mistake leading to unfounded assumptions.

    In short :

    - Create a clean highpoly model.
    - Create a clean, game-ready model that matches it.
    - Then, make sure to set up a system allowing you to export your ingame lowpoly as a triangulated model, for both map baking and engine import. There are more subtleties involved with the process but that should set you on a good path :)
  • mirag3
    Offline / Send Message
    mirag3 vertex
    So instead of only quads i should first triangulate in 3ds before exporting to mudbox? is there a plugin or anything to triangulate a model? or are there any tutorials that explain how this works? Pretty confused about this.
  • pior
    Offline / Send Message
    pior grand marshal polycounter
    No. You need to triangulate your ingame model before baking your normalmap, and also before exporting it to your target engine.

    As said, Mudbox does work best with quad meshes, but this is no relationship whatsoever with the way you need to build your actual ingame model. Sculpted model and ingame model are two completely separate things, and the problems you are having come from wrongfully assuming that they are the same.
  • mirag3
    Offline / Send Message
    mirag3 vertex
    Thanks a lot for the answers thus far aparantly I have some reading to do! My last question though, should my model be all quads and zero triangles when I am working in max/mudbox? 
  • thomasp
    Offline / Send Message
    thomasp hero character
    on the last few projects i've been and for all my personal work i do mostly all-quads these days (for heads). basically my level 1 zbrush mesh becomes the game export, removing the step where for every sculpt change you have to adjust a separate game mesh. same with the uv's, it's all reused for a normal, reasonably symmetrical human body. with 3d paint stretching becomes less of an issue there, too.

    and you should definitely keep triangles to an absolute minimum for mudbox/zbrush. best kept in rarely seen areas. not smack bang in the middle. it's always a subdivision- and shading problem.

    that uncharted head you posted is very old btw. - uncharted 1 or 2? 8-10 years? people don't do topology like that anymore as far as i'm aware. a lot more even and cleaner these days with less emphasis on low-poly-ness. this there is kind of PS2-meets-PS3 era modelling. some of the triangle placement looks downright criminal nowadays. >:)

  • mirag3
    Offline / Send Message
    mirag3 vertex
    @thomasp so do i understand correctly, you are making a level 1 sculpt in mudbox and you use that as the "low poly base" and add more details in in a higher poly and later bake that into a normal map onto the level 1 sculpt? or do you still create a very low poly base in 3ds first?
  • thomasp
    Offline / Send Message
    thomasp hero character
    i finish a basemesh/game-resolution-mesh - to be used as subdivision level 1 for sculpting - in the 3D app first. e.g. as a generic head or entire body without very characteristic features, then define UV's and triangulation (make sure your OBJ ex/importer does not mess with that - Z and MB will respect and preserve it as long as you're not rebuilding subdiv levels) and finally export (as quads) to the sculpting app for detailing. and correct - any baking is performed from highest level sculpt down to level 1.

    it may seem daunting at first but if this is for human characters then you will be able to refine and improve your base over time. i have not started an actual basemesh from the ground up in a decade or so - i just add, change and refine where needed or where i've picked up a trick. my male and female also are the same mesh and UVs and can morph from one to the other.

    i have about 24k polygons or so in level 1, perhaps 6k of that in the head. all recent third-party basemeshes on PS4 projects i've worked with were higher than that.
  • mirag3
    Offline / Send Message
    mirag3 vertex
    wow, this is some great info from you guys, i really had no idea! I'm happy that i can just start working from scratch in mudbox then, though at the same time I'm a bit disappointed for wasting so much time in this model thus far, ah well i'm guessing that 3dsmax isnt used as much anymore when it comes to creating humans/animals etc? 
  • thomasp
    Offline / Send Message
    thomasp hero character
    well, i do use max, maya, etc extensively because while you can define a shape in the sculpting app, the majority of the work of defining and distributing topology, uvs and triangulation on a base is done outside mudbox et al. sculpting is only step two for me - and not the majority of the work on any game asset.

    some people do rely on the sculpting app and it's semi-automated tools a whole lot more than i do though so it's all subjective.
  • mirag3
    Offline / Send Message
    mirag3 vertex
    @thomasp I've hit another roadblock, when creating game characters some people make one solid model and thats it, but I've also seen people who create, head+neck, torso, hands, legs, boots. like a Lego piece where you can mix matches different clothes etc.

    The character I am working on is going to be fully clothed, so im assuming that its easier to go for the "Lego" solution and make a loose head combined with a loose torso, etc or should i make a naked model with head/hands/etc all in one model and then later make clothing?
    and should i start from scratch or should i retopo and refine my old model?
    hope you understand what im trying to say.

    edit: amazing work you've done, just looked at some of your work! 
  • mirag3
    Offline / Send Message
    mirag3 vertex
    Well, I've started again from a previous build, but I've come to the conclusion that its probably for the best that I'll start over because i think I made some big mistakes in my topology especially in the nose area i think it should have looped down to the chin but i looped towards the ears (please correct me if im wrong) (screenshot nr1) also the eyes i guess i should just cut them open instead of put center it towards one vertex?

    also i found this model someone made, and I've seen something similar before its a pretty low poly female head but somehow it looks incredibly detailed and smooth can someone explain me how its done? because my model is much higher poly but looks a lot more square and edgy..


  • Eric Chadwick
    The 2nd mesh is shown in subdivided mode with isoline display. Isoline is the lowpoly wireframe being curved by subdivision.

    I put examples on our wiki that might help you.
    http://wiki.polycount.com/wiki/FaceTopology

  • mirag3
    Offline / Send Message
    mirag3 vertex
    so yeah ive done a lot of reading lately and i just started on version 2.0 and i kinda understand things a bit better now, like making a 5 pole (i believe its called?) on certain areas to change the loop direction and to go from dense to less dense poly areas. so i hope im on the right direction now. heres a tiny bit of progress thus far (actually think the eyes looks better already)
    still a lot of work to do and also need to pull a lot of verts to get this into shape but any tips and feedback is welcome!

  • Neox
    Offline / Send Message
    Neox godlike master sticky
    try "set flow" you will love it :)
  • mirag3
    Offline / Send Message
    mirag3 vertex
    Neox said:
    try "set flow" you will love it :)
    thanks, I accidentally also found the "relax" button these two work well making the quads evenly spaced out! thanks again!
  • mirag3
    Offline / Send Message
    mirag3 vertex
    can someone explain to me how the nose topology on this picture works? because i cant see it, im working from the noseridge towards the mouth and im trying to follow this topology but i cant figure out how there is so much polygon faces on the nose and then towards the mouth theres less polys so it seems?

    breaking my head over this 

  • mirag3
    Offline / Send Message
    mirag3 vertex
    still got a lot of work to do especially on the nose / mouth area but i think my topology is getting better any feedback is welcome and appreciated 
Sign In or Register to comment.