Advanced tips for beginner 3d artist
polycounter lvl 4
Hi everyone, first off thanks for having me on here.
Now I started studying for a foundation in game art last sept and plan to go for a degree in game design, already have my place, i just need to pass the foundation. My Tutor has been in the games industry for 20 years and is currently working a travellers tales, you know .. the guys who make the LEGO games.:). Ive learned alot from him and could quite easily pass this course at my current skill level.
Thats not good enough for me, I dont want to just "pass " it. I want to excel at it. I wont be happy with anything less than a "merit" (it goes fail, pass, merit, distinction). Thats what lead me here, I figured it would be a good idea to talk to as many people as possible in this field.
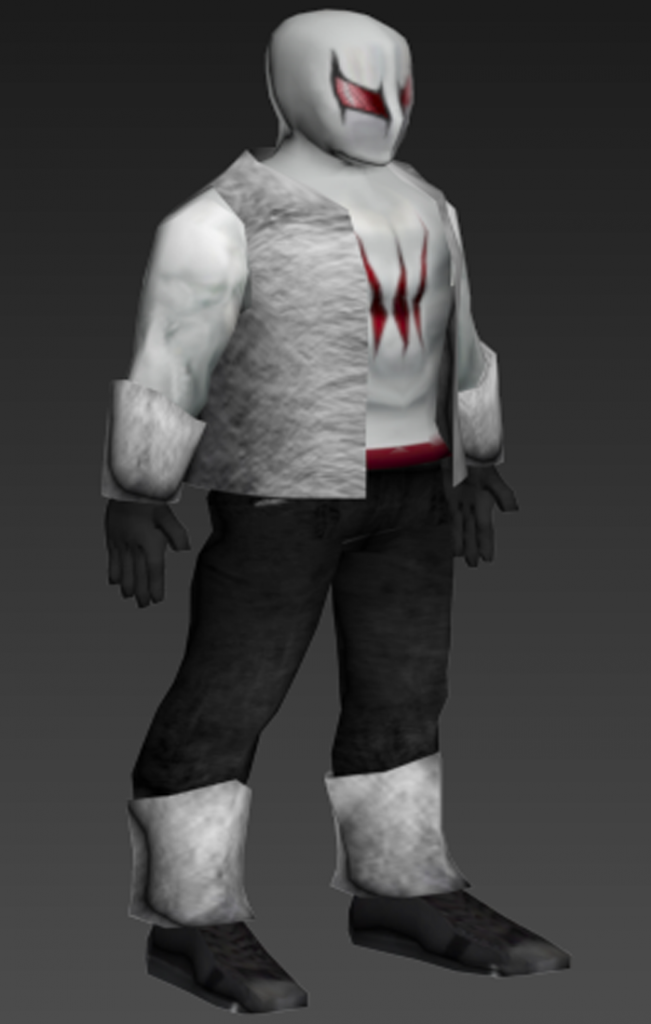
This is my first model, well my first organic model. Sorry for the bluriness, not sure what happened. This is my own character, the White Wolf, a super hero I made up as kid and has changed quite alot between now then. He stands at just under 2000 pollys. Now my tutor gave us the limit of 7000, Is this too low? He says game art is all about keeping pollycount as low as possible while still makeing it look as good as it can.
He mentioned something about Xnormal and NVIDIA photoshop plugin to make the texture look better but I cant remember what. I hope it doesnt involve any more UV mapping because dam, that was so tedious and I hated every minute of it.
Of course I have loads of other questions I'd like to ask but Ive rambled on enough I think.
Thanks for reading and please post any thought you may have, good or bad.
Replies
In order to use xnormal, you need a high poly model to bake from. This allows you to transfer detail from a very detailed high poly model into the lighting of your low poly model which can make it look more detailed than the geometry allows for.
Also, you should probably get used to UV unwrapping because you'll be doing a lot of it in 3D art.
And sorry for my english, and this wall of text.
Second: the polycount, in this days, can be pretty high for characters. Idk if 7k is enough, I'm environment artist, but for now, you can use it all.
Ans as billymcguffin says, use this limit, if you have an option.
About xnormal and nVidia plugin: this stuff is for normal map. Dont use nvidia plugin, it's shitty as hell.
xnormal is for baking normal map from highpoly model (example, 2mln poly's) to lowpoly models, like yours.
For high poly model you can use 3dmax, maya, zbrush, modo, blender, etc. Use gogle for "making normal map from highpoly model", and study it.
What you can improve now ? If you want to be character artist, maybe some fundamentals of anatomy? Because now this man stands as rigid as shit. Search for some "basics modeling human tutorial".
Then textures: increase the resolution, and search 3dtotal for their texturing tutorials. Also check this out:
http://www.artbypapercut.com/
PRO tips!
Then, if you want to work in games, you should choose some engine to present your work. Maybe for begining, Unity ? Or Marmoset toolbag? Marmoset is not an engine, but real time rendering program.
I brought the polly limit up in class and he said just because the limit is 7000 you dont need to use all of it, you could have thousands of pollys in there, if they dont change the geomerty that much they just wasted pollys. I'll deffinitely add some pollys to the shoes but im not sure where I could add them to the vest for any noticeable improvement.
So for XNormal, all the detail that it captures from the hi polly model is made by geomertry? (IE: creases in pants).
Im allready working on a higher polly model, we'll see how it turns out.
On a side note, Ive seen what can be done with Z brush. Dam that looks fun!
About gemoetry: your teacher is right. But now, you have 2k poly's, and it's look's like 2k poly's. You can add more to jacket. You can "shell" it (modifier in Max). Expand it, to be not just a plane.
On the boot's you can spare more poly's.
If I could use 7k poly's, I would use here ~5k.
Could you show us wireframe of model ?
You sure can add them everywhere, this is a model good for psp or playstation one. Look at all the outline of your surfaces and the silhouette of your model, adding detail to break those angles is valid, as long as you stay under the limit and as the change you make are visible at a reasonable distance.
I am thinking about the vest,arms/shoulders, tha pants, the hands.
If you really want to improve in character modelling, for your next model you really should focus on proportions, it really is the first step.
I have a question: You are studying 3d game art, or game design as you say in your first post ? THose a two completely different fields.
I have always had problems with anatomy, even in my 2d art. Just gotta keep at it. I think the blueprint I was using also didnt translate well into 3d. I remember thinking the chest was too far out and the arms looked pretty stubby so I tried to resize em.
ng.aniki, at the moment I am studying a foundation in game art. I wanted to apply for the Degree in games design or game art, wasnt quite sure at the time. Both of those required qualifications I was lacking. Studying the foundation garanteed me an interview for the Degree courses. I considered game art but I chose design for 2 reasons:
1: Games art highly competitive and hard to break into. Ive seen countless portfiolos and been amazed with ability on show. Thats not to say I have no faith in my own ability, I do believe I have potentail, I just need to work on my skills.
2: The main reason I chose design over games, I would like to have the fundamentals to make games on my own if the situation arose. I feel having experience of the whole development process from conception to release will be more benifical to me in the future.
I'm a beginner too, but i have something to say.
First of all you need to look at low poly. This will make you understand what can it be
1) only 700 tris, and it's divine http://3.bp.blogspot.com/-o8H5QynvL2o/USlvJTh8QdI/AAAAAAAABKg/oqkB9WQIKpk/s1600/Cherry_Darling_final.jpg
2) Insane 2000 tris!!! http://fc06.deviantart.net/fs38/f/2008/348/2/6/BE_DK_construction_shot_by_slipgatecentral.jpg
and
http://2.bp.blogspot.com/-PFrKmO3dxkk/UOwFbqpxxNI/AAAAAAAAAQA/5SNeAZEDOIo/s1600/image02.jpg
3) 3000 tris http://pics.livejournal.com/slipgatecentral/pic/000k6f0b.jpg
4) 3262 tris, i have no words http://th03.deviantart.net/fs71/PRE/f/2010/164/4/8/Comissar_Constraction_shot__by_FirstKeeper.jpg
5) oh my GOD 5240 tris
http://fc03.deviantart.net/fs70/f/2011/130/d/3/selene_constructive_shot_by_hellstern-d3g1phn.jpg
7000 is too much.
Model without a face - this is unacceptable simplification if you learning.
Face can be simple, but it must be face
https://d2mdw063ttlqtq.cloudfront.net/files/64994439/3DO_previews/03.jpg
https://d2mdw063ttlqtq.cloudfront.net/files/64994439/3DO_previews/02.jpg
http://fc00.deviantart.net/fs70/f/2012/039/8/1/lowpoly_shepard_by_pyroxene-d4p4dh8.png
http://fc05.deviantart.net/fs71/f/2012/043/7/8/lowpoly_liara_by_pyroxene-d4pjol6.png
http://fc05.deviantart.net/fs34/f/2008/238/3/9/394c42b7cc84434873cf5a3c477760fc.jpg
there are much more examples, this just my favorite
Search, find, study.
Get feedback on your work as much as possible from people who are more experienced and be honest with yourself in your own self critiques. Good luck!
Onmioji, thanks for posting those models. They are great help and now I see where I was going wrong. Btw I love those Mass Effect chibis!
At request heres a shot of the wireframe
UGH...
Heres that newer model Ive been working on:
Hes around 3000 polys atm. Theres some parts I need to fix such as that big dent on the head but I think its much better than my last one.
Also working on a female mesh.
and an Overlord minion mesh, its around 2000 polys.
Samurai modeling
https://vimeo.com/20257179
Female
[ame="
[ame="
[ame="
[ame="
and
http://cgi.tutsplus.com/tutorials/game-character-creation-series-kila-chapter-1-high-resolution-modeling--cg-24776
and
http://www.3dtotal.com/index_tutorial_detailed.php?id=1508&catDisplay=1&roPos=1&page=1#.UzT6r4WRg-p
Male
[ame="
Male torso
http://www.cgarena.com/freestuff/tutorials/harshvideos/index.html
Head
[ame="
[ame="
Hair
[ame="
[ame="
And here you can download interesting models for study
http://www.polycount.com/forum/showthread.php?t=70908
Its been a while since ive posted on here hasnt it. I just wanted to take the time to thank everyone for their thoughts and help to improve my work. I just got my grade for my organic submission and it was a distinction, the highest one can get. If you guys hadn't told me what was wrong with my first model I would have submitted that and surely not done as well.
Here is what I subbmited. ( I need to work on takeing better renders...and my spelling). The feedback was really good, apprently my tutor thought ,my concept was a dodgy idea, he never told me that :poly124:. The model seems to have sin city vibe which wasnt intentional but Im looking into working that into my enviroment piece. I know its nothing special but I still quite proud of him.
However, I want to make him better. Rigging, normal maps, etc. where do I go from here to make the best model i can?
Thanks again for the assitance.
So Ive had a character in mind that I have wanted to make for a while, ive also been wanting to learn MAYA. So with that in mind I set out to make a 3d model of this character concept:
This is Haggle, a young witch who constantly looks at the outside world wishing her mother would let her explore it. Built in Maya with a polycount of 5935. The texture is meant to emulate the same shading style seen in the concept.
texture maps
She is still WIP and I am constantly updating her to get her as close to next gen as I can. I have remodeled the hands, they are too boxy here, just need retexturing.
The biggest question on my mind atm is what the best way to make normal maps. I have a higher res scuplt in mud box but every time I try to bake the higher mesh onto the lower mesh (seen here) I end up with this:
or this:
I just cant seem to get the desired effect and I have no idea why.
If you have any comments, crits or advice I would love to hear it. Thanks
1. Mirroring is very obvious, especially on the back of the fur vest. Can you find a way to make that not stick out?
2. Material definition - not seeing much there. I think that's something where a high-poly model would come in handy to add details like seams, pockets, etc, and really add another level of realism. I'm not an expert with normal maps so I'm not able to comment on the one you just posted.
Another place where I could see more material definition would be his face/eyes/mask. What material are the eye made of? Are they plastic, glass? Is the whole face/eyes/mask one mask, or are the eye shapes supposed to be separate pieces? These are things I would definitely consider, and I think working to define things like that would really push this to the next level.
3. Vest fur - can you make that more realistic? I'm not exactly sure how you'd do it, maybe through alphas or a normal map. Right now it's not emulating the concept very closely.
4. His feet feel too blocky to me. It's too obvious that you started off with a cube shape. Can you define the shoes more? What kind of shoes are they? I'd definitely look at a reference for the shoes and try to make the shapes more true-to-life so that you can really make good use of the polys you have, to create silhouette. So like, are they shoes like this? This? It's very hard to tell now.
Good luck! Looking forward to seeing how this progresses.
As for baking normal map.
1. Triangulate your lowpoly mesh.
2. make custome cage
3. smoothen edge of the lowpoly.
Doing all 3 will most of the time result in far better normal baking.