Single Texture - SciFi Corridor!
interpolator
Heya!
I realized my "portfolio" was full of handpainted fantasy stuff. So it was time for me to dig into the fruitbowl of environment art. The SciFi Corridor. Inspired by the single-texture workflow seen here on polycount by Snefer and Marcan.
I'm currently using a 1024x1024 normal and a 1024x1024 texture, come to think of it I should've reduced their texture size.
I have enough that I feel like I can show it without too much embaressment, but it feels very rushed at the moment and there's something about the "design" that reads "generic". There's a huge lack of props. Looking at it now it feels like most of the pieces in the scene have atleast some areas that needs to be reworked. Not to speak of the lightmaps!
I had it fully lit by alot of lights to start with, I made a huge lighting revamp yesterday where I deactivated most of the lamps.
Here's the result :
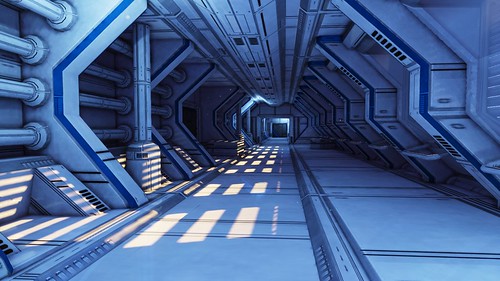
2013-08-08_01 by Jakpe, on Flickr

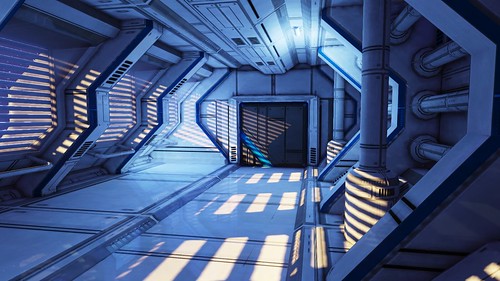
2013-08-08_02 by Jakpe, on Flickr
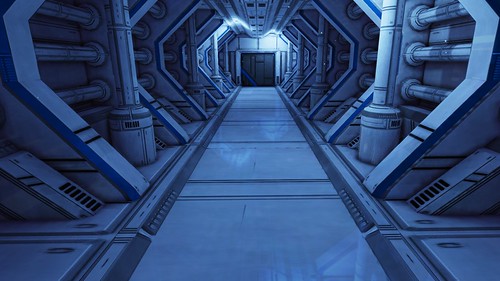
2013-08-08_03 by Jakpe, on Flickr
2013-08-08_04 by Jakpe, on Flickr
I realized my "portfolio" was full of handpainted fantasy stuff. So it was time for me to dig into the fruitbowl of environment art. The SciFi Corridor. Inspired by the single-texture workflow seen here on polycount by Snefer and Marcan.
I'm currently using a 1024x1024 normal and a 1024x1024 texture, come to think of it I should've reduced their texture size.
I have enough that I feel like I can show it without too much embaressment, but it feels very rushed at the moment and there's something about the "design" that reads "generic". There's a huge lack of props. Looking at it now it feels like most of the pieces in the scene have atleast some areas that needs to be reworked. Not to speak of the lightmaps!
I had it fully lit by alot of lights to start with, I made a huge lighting revamp yesterday where I deactivated most of the lamps.
Here's the result :
2013-08-08_01 by Jakpe, on Flickr
2013-08-08_02 by Jakpe, on Flickr
2013-08-08_03 by Jakpe, on Flickr
2013-08-08_04 by Jakpe, on Flickr
Replies
I agree it needs props, some seemingly-unique bits of clutter. Crates would be easy to add. Cables might help to add some curvy elements, break up the hard edges.
Lighting has good intensity but it's very monochromatic. You could add a colored light in the distance, inside a door or somesuch. You could also add colored decals, or color some elements using a material variable.
It would be great to see your flats!
Also, Flickr is kind of a pain to navigate. I want to see the highest resolution as soon as possible, but it makes me click several places to do so. Also I can't right-click to save, which is a drag for someone trying save your stuff off (for example, in a company server folder of prospective job applicants). Also would help to put your name and contact info on each image.
If there's one thing that bothers me, its that I can see the texture density shifting noticeably, llike on the last image, the floor on the bottom sides is so blurry compared to the rest of the details.
@ Mischievous : Thank you! That's true, texture density was off at some places. I remade the floor temporarily, does it feel better now?
More color overall, color coding the pipes helps overall. Hard not to make it look like a total circus though. The holograms are currently heavy WIP. I plan on using more of the alpha for decals aswell.
Here's the texture I'm using. The green channel doesn't affect the look a whole lot, since the intensity is very low. So I'm considering using it for something else.
It does feel like I'm slowly getting the scene where I want it. I could easily expand it into a bigger environment, but to be honest it feels like I've made alot of mistakes and would rather start over with something fresh. I'm really regretting not using a 1x2 texture instead of a square one. Could've done alot more. ( Twice as much! ).
Though to be honest it doesn't feel like I'm stretching this texture to to it's limits either.
Enough whining!
Picture time!
I'm curious about how you're working in your 3D package, specifically pertaining to working with the texture broken up into the RGBA channels of a single texture.
I understand the process on the shader/UDK side of things, but I'm lost as to how you work with the texture(s) in Max/Maya (I'm a Max user by the way).
Are you loading all of the textures into separate materials and designating a UV channel for each, then working with each in turn? Do you have any way to preview what the combined textures will look like in your 3D package before moving it all into UDK?
This multi-channel workflow just isn't sinking in even after researching Snefer's Sci Fi Lab project. No one has asked about how to set this all up in a 3D package, so I'm embarrassingly assuming that I'm just thick as a brick wall! Any help/clarification you could offer would help me a great deal!
I'm looking forward to future updates on this project to see where you take it next
Cheers!
I've done this in 3ds Max with a custom FX shader. I've used the now-abandoned Shader FX tool to create shaders, worked great. Pretty easy to do whatever is needed, since it's a GUI with wires, same idea as Unreal's material editor. And you get a WYSIWYG result...
A tech artist friend has offered to create a similar sort of shader to help my workflow for my own project, but I was hoping not to have trouble him with it. However, it does seem like it would be a really great, hassle-free method for using a multi-channel texture workflow.
Unfortunately shader 'programming' is not a tool in my belt at the moment, so I'd still like to hear how you've been working Jakob, before I turn to my tech artist friend
Thanks again Eric!
@RazorB : Thanks!
@Ignacio_G : Thanks for the input. That's a great idea! I'll let you know how it goes.
I figured the thread was dead, thanks for the new input! I'll start looking into a specular and see what it does for me.
I was honestly expecting some sort of multi/sub-object shader with UV channel switching all over the place to see partial final results in Max, but I see now that it's really more like texturing with photoshop; do your texture in Photoshop, save the file, check the updated texture in Max on the model, back to Photoshop to make adjustments, continue the cycle, etc.
When there's some new workflow like this I always assume that my understanding of the process is too rudimentary/time wasting, and figure that there is some complex way to go about it all. I guess I was just a little afraid to take the first step and cock it all up lol!
Thanks for clearing up the process for me! I'll keep checking back to see what're you're up to with your scene, and if I get mine to a half decent level of presentation, I'll send you link
Cheers!
subbed, more breakdowns if you have time too
Overhauled the light shader to the microfacet BRDF seen here by lpcstr : http://www.polycount.com/forum/showthread.php?t=117463
So that took a while, time to see the results!
I'm kind of on the fence if I like it or not. Lighting is kind of messed up, but I'm having a hard time making it look less like plastic.
Picture time!
After realizing I pretty much ruined the scene I think I've managed to fix and improve it.
Not a final lighting build by any means though. And fugly lightmaps as hell.
Might've gone a bit overboard on the whole peeling paint thing.. Or the contrast between the paint and the metal is just too big.
Thanks for looking!