Drastic difference between high and low meshes
polycounter lvl 11
Hi, guys!
I've been working in this game character and a texturing issue has come up.
Since I'm not very experienced with this, I decided to ask you: how much detail loss is expected when comparing the high res model to the low res model with maps applied?
High

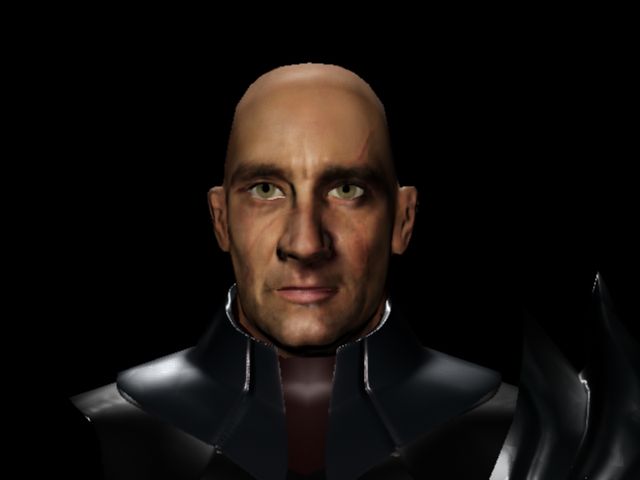
Low (with SSS fast skin shader)
I've been working in this game character and a texturing issue has come up.
Since I'm not very experienced with this, I decided to ask you: how much detail loss is expected when comparing the high res model to the low res model with maps applied?
High
Low (with SSS fast skin shader)
Replies
What's the texture resolution you're baking to? What are the UVs like?
There's no reason you can't have all the visible detail from that highpoly screencap in your lowpoly bake, assuming good UVs and high enough texture res.
I'd suggest you take a look at your baked out maps and see if the textures look like they've lost detail. If your textures are sharp then whatever you are rendering in is washing them out.
It also looks like your screenshot has been enlarged pretty significantly, meaning it could be displaying mip maps.
I set up the shadder to look like this tutorial: http://www.davidmoratilla.com/CloseUpPortraits_MakingOf4.html
Any suggestions about set ups would really come in handy.
it has a lot to do with how much uv space each part of your model has. the more uv space the more detail it can hold from your textures. if your using a 2k texture you have to be very careful and generally you have to scale the coverage of the head up a bit. maybe even a 1k square of your 2k texture just for the head. if your texture coverage ratio was even in most cases the head is small and would get little texture space and look kind of bad.
if your going to go higher then 2k and your rendering in mental ray then its not so much of an issue. just crank up your map to 4k or use multiple tiles and take the res even higher.
I second the suggestion for posting what the texture itself looks like. What are you using to bake the maps with? Also, if you're using surface noise, make sure it is applied to the mesh.
My advice would be to regularly export a medium poly mesh to Max, Maya or Mudbox to at least get a good preview of what the model is actually supposed to look like in its final 3D environment.
The rest of the loss simply comes from sloppy UVs and a non-uniform geometry on the ingame mesh. This just comes with practice
Good luck!
I've just tried the 4k map, with no change whatsoever.
pior, thanks for your input concerning the perspective distortion. I'm trying to work my way out of it by changing the camera's focal length to a higher value.
I still think dii might be right about the rendering being responsible for this loss of detail. Anyone experienced any mental ray relaed issues?
I had this problem as well. I'm still on 4r3 and Maya 13. I exported my Z model to Maya, scaled it, then exported it from Maya (matching scale to my low).
It would interesting to know how much your z model scale is off by (mine was 11.5 x).. is it consistent, or always different? Oh, and don't forget to re center your pivot before re export:)
try the 'Production' quality setting in the render globals. that will bump up the setting automatically for you.
under the quality tab in render globals take a look at your sampling settings. try to bump up the min and max sample levels that controls how much sub sampling mental ray does on things like textures. the more samples the better the quality,
under the milti-pixel quality you can set the anti-aliasing filter. try a sharper filter like mitchell . try them all its a matter of taste and try different filter sized.
i would switch over to mia_material_x shader with a normal diffuse channel untill you get your texture problems worked out then switch back to SSS and work on the shader setup.
its more complicated because your using SSS shader. that drastically changes the way your diffuse surface shading looks and how your textures display. your going to have to dig into the docs and do a bunch of tweaking to get something that looks good. even the best artists struggle to get skin shaders looking good.
i say this a lot but read the docs! read the render global settings and what the shader parameters do. and try to read some of the mental ray docs. its a bit technical and may be hard to get through if your just starting out.
http://download.autodesk.com/global/docs/maya2013/en_us/
http://docs.autodesk.com/MENTALRAY/2013/ENU/mental-ray-help/
Kon, is this an issue if you export the file as an obj, instead of using goz?
Gray, thanks a lot for your instructions. Do you suggest a better alternative for the SSS shader? The mia shader all the way, perhaps?
For now, after a lot of tweaking and research, I found out that the shader automaticly applies a filter to the loaded image, which end up blurring it. I'm doing some test and now I can see a little more detail (however, not as much as in the high res.) In case anyone is wondering where to change this "blurriness": after loading the image to the slot(overall/subdermal/bump etc), go to the effects tab and change the filtering number(the standard value is 1). I'll do more tests, try to put the ideal lightning and scale, and post the results here.