Home 3D Art Showcase & Critiques

Broken wall

polycounter lvl 6
Offline / Send Message
tac0m polycounter lvl 6
Hello, fellow PC members. I'm going to be creating a next gen broken wall. My plan is to sell some kind of story with this.

By the end of this project I hope to have something I can throw into my portfolio and be proud of.

This first image is my basemesh. The thicker wall is only placeholder
broken_wall_basemesh.jpg

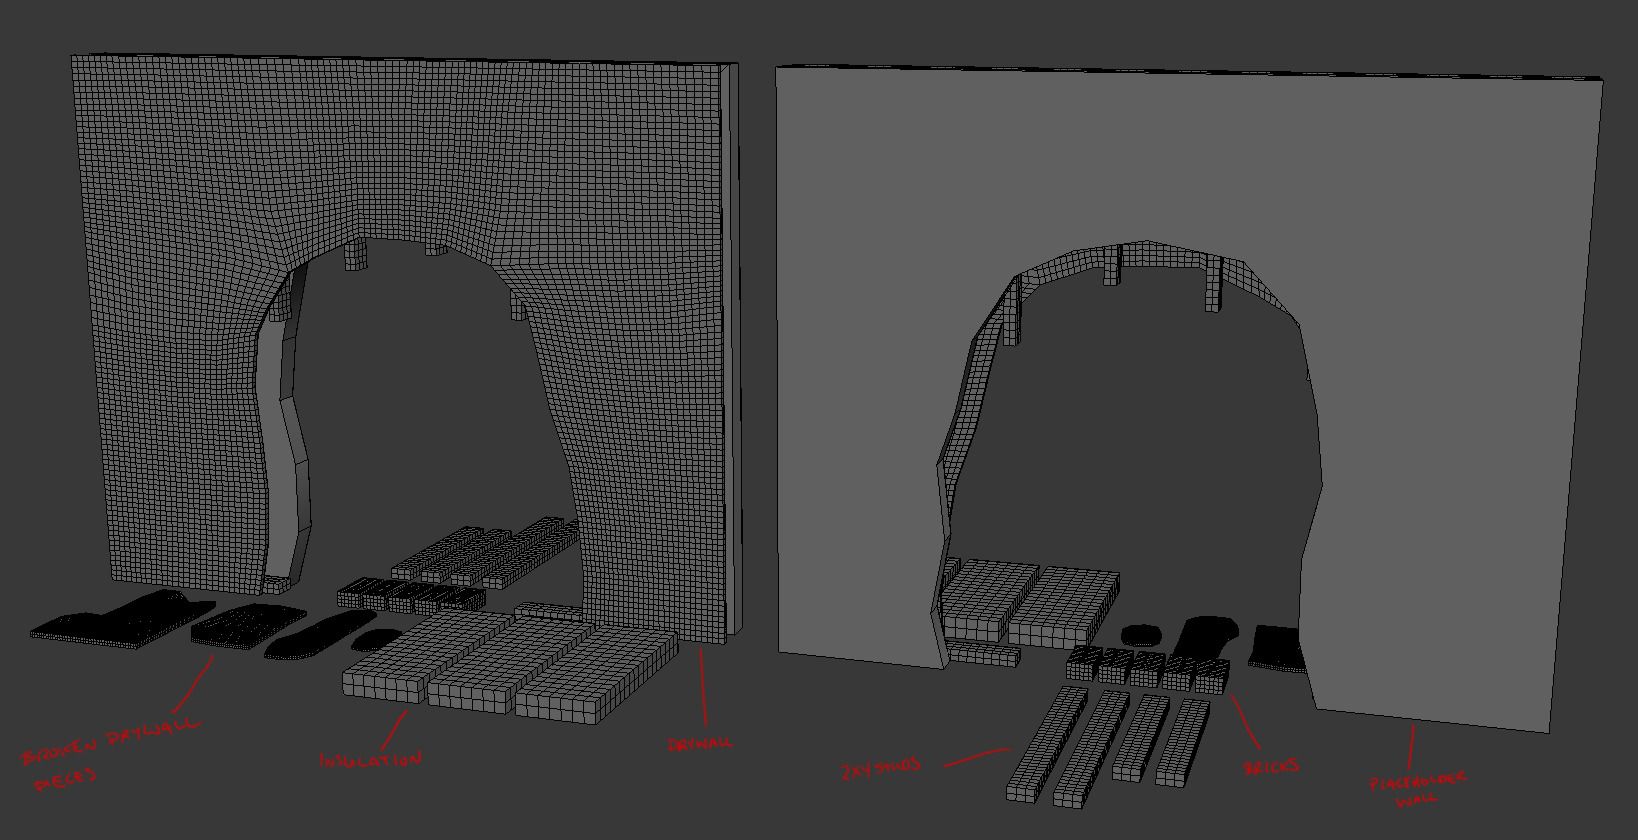
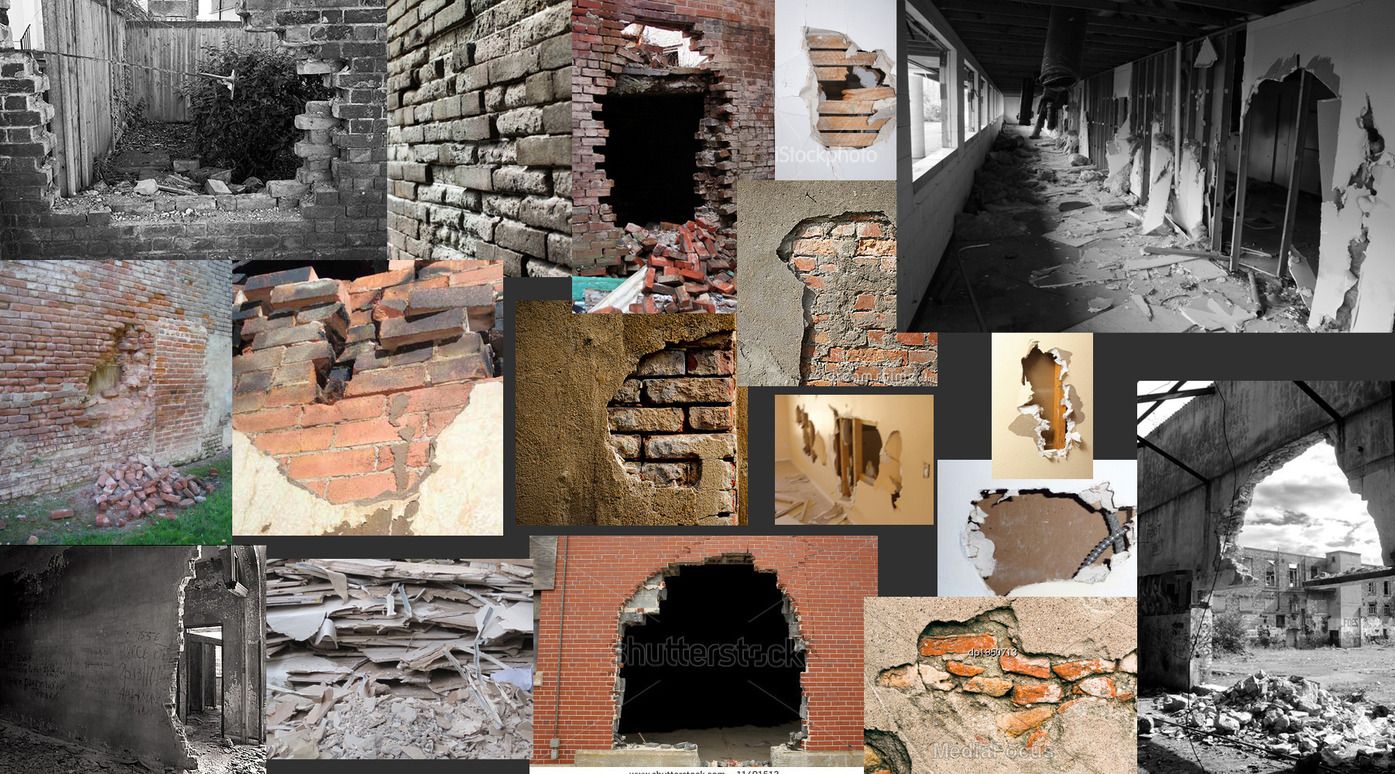
References i've collected
moodboard.jpg

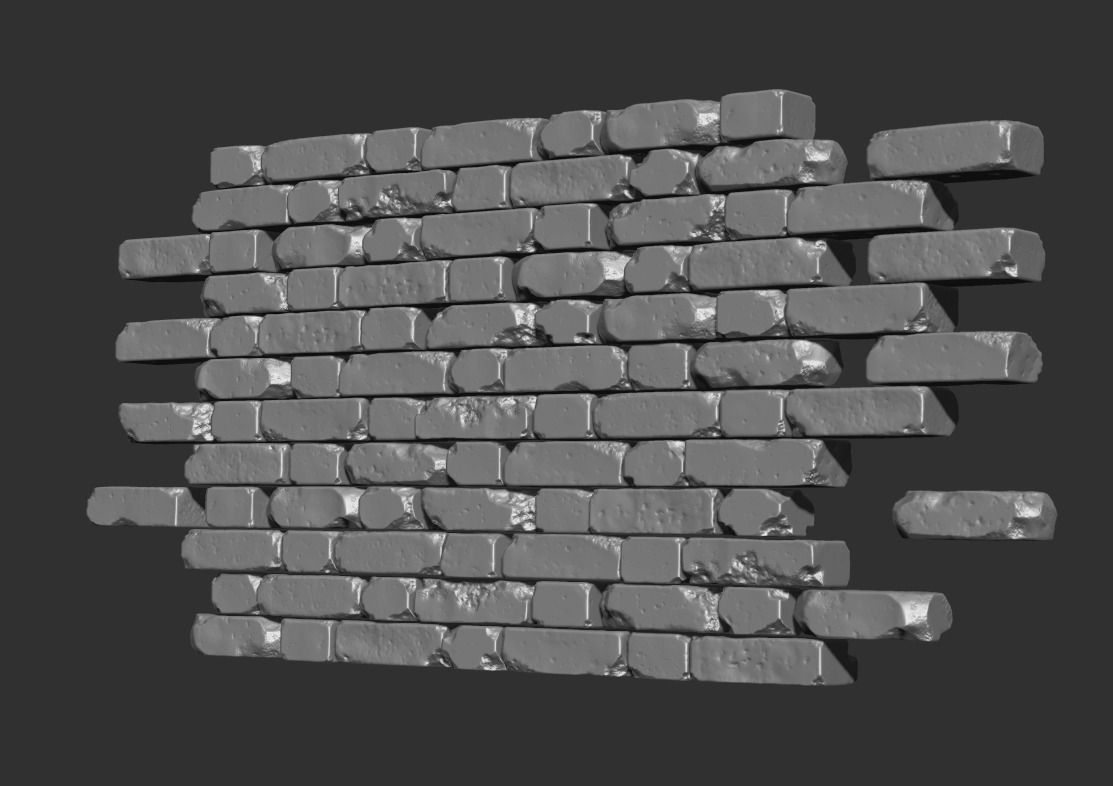
Zbrush sculpt so far
broken_wall.jpg

Replies

  • tac0m
    Options
    Offline / Send Message
    tac0m polycounter lvl 6
    update on the brick section
    broken_wall2.jpg
  • SaferDan
    Options
    Offline / Send Message
    SaferDan polycounter lvl 14
    You have really nice bricks! Any insight into your process would be amazing!
  • tac0m
    Options
    Offline / Send Message
    tac0m polycounter lvl 6
    hope this helps


    Start with a simple base mesh in max and import it into zbrush. I duplicated them out so I had 5 large bricks. I also made 5 shorter bricks but for the purpose of this tutorial I will only show you how I made 1 long brick.
    brick_workflow_1.jpg

    Before subdividing the mesh turn off the smoothing option ( SMT button) I didn't add any hard surface supporting edge topology.
    After it's been subdivided once with the smoothing turned off. Turn the smoothing back and subdivide a couple more times so it gets nice falloff on the edges.
    brick_workflow_2.jpg

    Load up the mallet fast brush (from the zbrush brushes folder) and use these settings
    brick_workflow_3.jpg

    Start hitting the corners and edges of the brick. Giving it damage and weathering. Don't over do it, some large damage is good but not ALWAYS needed. Too many REALLY damaged bricks everywhere gets rather noisy.
    brick_workflow_4.jpg

    Select the hipolish brush using these settings (i think these are the default settings).
    brick_workflow_5.jpg

    Crisp up some of the damaged edges but make sure you don't go crazy with this brush or you'll get some bad results like this.
    brick_workflow_6.jpg

    Select the mallet fast brush with these settings
    brick_workflow_7.jpg

    Start hitting the damage spots again with the new settings and it creates the nice noisy uneven weathering you see.
    It's pretty cool to note that if a brick has taken damage. The weathering and wear and tear on the damaged areas will be accelerated compared to the areas that are not damaged. This is because water and crap gets into the cracks and wears down those areas faster.
    brick_workflow_8.jpg

    Select the dam_standard brush with these settings
    brick_workflow_9.jpg

    Using different brush sizes you get different results. Drag out some tiny pits on the side of the brick
    brick_workflow_10.jpg

    Select the hipolish brush again and lightly go over the area you just pitted with the dam_standard
    If you want you can select the mallet fast brush again and hit those small pits. This will add some variation into those tiny pitted areas
    brick_workflow_11.jpg

    Using 5 different long bricks and 5 different small bricks I made this small wall section. I flipped and rotated and mirrored and got some re usability (<--word?) out of only 5 bricks
    brick_workflow_12.jpg

    Duplicate that small wall section and flip and rotate and mirror again until you get a complete wall section. Then go through the wall and look for any repeating patterns and swap out some bricks or some flipping if needed.
    Once your happy with how the brick work looks start removing, pulling or pushing some bricks using the transform tools. I was looking for a really poorly built wall. So this worked for me.
    brick_workflow_13.jpg
  • Snader
    Options
    Offline / Send Message
    Snader polycounter lvl 15
    For something like this, isn't it kind of useless to have the holes in the bricks?
  • peanut™
    Options
    Offline / Send Message
    peanut™ polycounter lvl 19
    Yes but hey there's ton of good thing in all this .. your giving ideas. Thanks
  • tac0m
    Options
    Offline / Send Message
    tac0m polycounter lvl 6
    Snader wrote: »
    For something like this, isn't it kind of useless to have the holes in the bricks?

    Not at all. If u check the first post I have a bunch of basemeshes that will add to this piece. Its not just going to be broken bricks. So the punched out bricks will add a little more depth to something commonly just flat and plain
  • SaferDan
    Options
    Offline / Send Message
    SaferDan polycounter lvl 14
    Thank you so such for that breakdown,I was not expecting such a detailed post. I will have a go at it when I get back from my girlfriends!

    Thanks again man.
  • tac0m
    Options
    Offline / Send Message
    tac0m polycounter lvl 6
    @SaferDan, I'm a real visual learner. I guess it kinda crosses over into being a very visual teacher haha.

    Just a small update. Starting blocking out the drywall. Don't like how the large crack turned out.

    broken_wall3.jpg
  • tac0m
    Options
    Offline / Send Message
    tac0m polycounter lvl 6
    added the basic insulation in the wall. Gonna start tearing it apart tomorrow
    broken_wall4.jpg
  • Bek
    Options
    Offline / Send Message
    Bek interpolator
    This is looking really good, although I would've thought you'd have polypainted the bricks before tiling them?
  • peanut™
    Options
    Offline / Send Message
    peanut™ polycounter lvl 19
    Bizzare ?

    I just woke up and thinking this morning (sunday) about doing just that. A brick wall with a hole recovered with concrete partially visible.

    This is crazy so call me maybe ?
  • tac0m
    Options
    Offline / Send Message
    tac0m polycounter lvl 6
    Update: Added and refined some pieces here and there.
    C&C appreciated
    broken_wall5.jpg
  • Macattackk
    Options
    Offline / Send Message
    Macattackk polycounter lvl 7
    i think there should be more missing bricks around the hole. bricks around the hole would receive the most amount of shock from whatever blasted the wall
  • Andreas
    Options
    Offline / Send Message
    Andreas polycounter lvl 11
    Not sure the plaster would break in such a circular shape tbh; even if the hole is circular, I think the plaster would snap off at much bigger and sharper angles. For example;

    stock-photo-6834531-hole-in-the-wall-cracked-plaster.jpg
  • Frump
    Options
    Offline / Send Message
    Frump polycounter lvl 12
    I was just about to post exactly what Andreas posted, so that x2.

    Also, what do you have in mind that caused this hole? It's circular and raised off of the ground. Like the Hulk or the Kool-Aid man burst through.
  • tac0m
    Options
    Offline / Send Message
    tac0m polycounter lvl 6
    @mac - are you saying there needs to be more bricks in the rubble pile at the bottom?

    @andreas - i believe your right. I did say that i was going to be making drywall. Thats my fault, i meant to say plaster...since plaster was commonly used before drywall and actually doesnt break like drywall. My bad sry man. I do have drywall in my original references until a friend pointed out i should make plaster wall instead of drywall so it fits with an older style brick
  • mbischof
    Options
    Offline / Send Message
    I'm liking the brickwork :) Thanks for the Step by step!
  • Macattackk
    Options
    Offline / Send Message
    Macattackk polycounter lvl 7
    im saying that around the circle that is the hole in the wall, you should remove more bricks, not necessarily to make the hole larger but to show that bricks have been displaced by whatever action caused that hole to be created. like create a slight checkered pattern from bricks being removed around the blast hole. not too much though, just enough to indicate that more damage was dealt in that section
  • cptSwing
    Options
    Offline / Send Message
    cptSwing polycounter lvl 11
    Oh please model the Koolaid man!
  • tac0m
    Options
    Offline / Send Message
    tac0m polycounter lvl 6
    I really hope im not giving away the story im trying to "sell" on this piece...but who ever said something blasted through it ;) you'll probably guess exactly what im doin in my next update though. I still have some meshes hidden in the scene :)
  • tac0m
    Options
    Offline / Send Message
    tac0m polycounter lvl 6
    Update: Don't really like the stucco covering the bricks right now. Still one more mesh i'm hiding for now. :)

    broken_wall7.jpg
  • tac0m
    Options
    Offline / Send Message
    tac0m polycounter lvl 6
    Comments and crits welcome :)
  • pangarang
    Options
    Offline / Send Message
    pangarang polycounter lvl 11
    My word, this is amazing; especially from just 5 bricks! I know compliments without critique isn't quite what you're looking for but as for the latter, I got nothing. Keep going! Can't wait to see this in game quality!
  • Macattackk
    Options
    Offline / Send Message
    Macattackk polycounter lvl 7
    awesome dude, thats exactly what I meant, now it looks much more like a damaged area where the hole is.
  • peanut™
    Options
    Offline / Send Message
    peanut™ polycounter lvl 19
    hhmm pretty sharp ... really nice, lots of details.
  • tac0m
    Options
    Offline / Send Message
    tac0m polycounter lvl 6
    wow guys thanks for the comments... :)
  • Rockley Bonner
    Options
    Offline / Send Message
    Rockley Bonner polycounter lvl 12
    tac0m wrote: »
    Update: Don't really like the stucco covering the bricks right now. Still one more mesh i'm hiding for now. :)

    broken_wall7.jpg
    awsome work.

    so basicly whats happening is you have the bricks layed out in z brush with a flat mesh that you push inside?

    whats the plan to bring it int o lowpoly?
  • copenhagenjazz
    Options
    Offline / Send Message
    copenhagenjazz polycounter lvl 14
    Hey there

    This looks great. its a very nice sculpt! Big thumbs up on that part.

    However I am wondering how relevant this is production wise - ?? Personally I would never model anything like that - except if it is some sort of hero piece that the player will crawl through in first person. Instead I would make it by good use of blending between tiling textures, some vertex color AO, some edge decals, and by some uniquely unwrapped hero bricks.

    Making everything as one piece to bake with a unique texture seems like a bit overkill to me + you would get better texel density by using tiling textures. What are your thoughts?

    But again; great sculpt and if nothing else this is a good sculpting exercise :)
  • Macattackk
    Options
    Offline / Send Message
    Macattackk polycounter lvl 7
    Hey there

    This looks great. its a very nice sculpt! Big thumbs up on that part.

    However I am wondering how relevant this is production wise - ?? Personally I would never model anything like that - except if it is some sort of hero piece that the player will crawl through in first person. Instead I would make it by good use of blending between tiling textures, some vertex color AO, some edge decals, and by some uniquely unwrapped hero bricks.

    Making everything as one piece to bake with a unique texture seems like a bit overkill to me + you would get better texel density by using tiling textures. What are your thoughts?

    But again; great sculpt and if nothing else this is a good sculpting exercise :)

    yea but itll look better if its unique for an asset with such unique details to it. if you use tiling textures it wont look as good. for portfolio stuff its better to go the extra mile to make it look good even if it could lower performance/take more time.

    he could even use this piece as a modular asset and populate a level with multiple holes. if its a unique texture, itll be more important and believable.
  • tac0m
    Options
    Offline / Send Message
    tac0m polycounter lvl 6
    Macattackk - Exactly bud, well said haha :)
    RJBonner - Just gonna take it into max and retop it. The overlaying stucco on the bricks is set up with two different meshes... one mesh has a the big hole cut out and the small holes for the missing brick damage and the second is another simple mesh with just the big hole cut out and then pressed in over the brick with sculpting to simulate the crap left on the wall after old stucco has been scrapped off.
  • kippernicus
    Options
    Offline / Send Message
    kippernicus polycounter lvl 11
    Very nice, tac0m. The stucco is really bothering me though. It's too thick and pillowy and the outline around the outside of the hole is very uniform. Maybe just sharpen the edges and decrease the depth.
    stock-photo-8718792-stucco-covered-brick-wall-background.jpg
    stock-photo-2518001-brick-and-stucco.jpg
    cutcaster-photo-100060402-Old-Brick-and-Stucco.jpg
  • copenhagenjazz
    Options
    Offline / Send Message
    copenhagenjazz polycounter lvl 14
    yea but itll look better if its unique for an asset with such unique details to it. if you use tiling textures it wont look as good. for portfolio stuff its better to go the extra mile to make it look good even if it could lower performance/take more time.

    he could even use this piece as a modular asset and populate a level with multiple holes. if its a unique texture, itll be more important and believable.

    Yeah you are right. Why would you ever want to show a potential employer that you understand how to create ingame friendly gfx :)
  • tac0m
    Options
    Offline / Send Message
    tac0m polycounter lvl 6
    Update: Been busy with getting laid off and trying to find a new job and find freelance work. Gotta love it.
    @kippernicus - thanks for the reference. Sharpening the stucco was on the list of things to do but your reference made it easier. I also made the stucco thinner. Thanks for that

    Ok, so anyone who has followed this probably knows what this hole is about.... someone is trying to keep something out. The wooden planks are just basemeshes right now but i figured i'd show it anyway. Once i get the wooden planks sculpted i'll make some interior trim and then start polypainting this puppy. If anyone has any images of old gross wallpaper and would like to share i'd love to take a look at it. Most googles searches for anything "wallpaper" show up with windows wallpaper backgrounds :(

    broken_wall8.jpg
  • willy-wilson
    Options
    Offline / Send Message
    willy-wilson polycounter lvl 8
    search for peeling wallpaper you should get what your looking for
  • tac0m
    Options
    Offline / Send Message
    tac0m polycounter lvl 6
    Update: Someone doesn't know how to use a hammer :)

    broken_wall9.jpg
  • Blaisoid
    Options
    Offline / Send Message
    Blaisoid polycounter lvl 7
    on most ref photos bricks that stick out from hole are leaning down since gravity pushes them down eventually. it would be cool to add that.
    and also some of such bricks look like they're magically glued to other bricks. you might want to add more mortar to show what keeps them from falling off.

    besides that it looks really good.
  • tac0m
    Options
    Offline / Send Message
    tac0m polycounter lvl 6
  • tac0m
    Options
    Offline / Send Message
    tac0m polycounter lvl 6
  • Prtofdacrowd
    Options
    Offline / Send Message
    Prtofdacrowd polycounter lvl 8
    Wow! cant believe I missed this thread until now!, looking awesome and I really appreciate the brick wall tutorial, I always find it very interesting how different people have their own methods! Would love a close up/breakdown of those nails! thats a fantastic touch! However I would also consider looking at putting in some grain on the wood similar to 'Selaznog's' and 'choco's' (Amirs) Arenanet art test.

    Cant wait to see how the low poly works out! also check out http://www.michaeldunnam.com/free-stuff.html
    for some Zb alphas that would really help your workflow and speed :)
Sign In or Register to comment.