The BRAWL² Tournament Challenge has been announced!
It starts May 12, and ends Oct 17. Let's see what you got!
https://polycount.com/discussion/237047/the-brawl²-tournament
It starts May 12, and ends Oct 17. Let's see what you got!
https://polycount.com/discussion/237047/the-brawl²-tournament
UV's in Max 2010 and terrain in-fill
polycounter lvl 7
Hi everyone,
I'm working on a project for fun. The gfx engine is not so bad but to really optimise it's doing a lot by hand.
It's a free driving sim/game:
http://www.racedepartment.com/forum/forums/racer.117/
Anyhow, I'm currently building the rolling moor land that the driving course runs through, so you can see up to 10 miles and some of what you can see you will drive past a minute or so later.
Obviously the area is large but consistent in nature so using some generic textures is ideal.
I'm scattering transparent objects along boundaries for trees and so on.
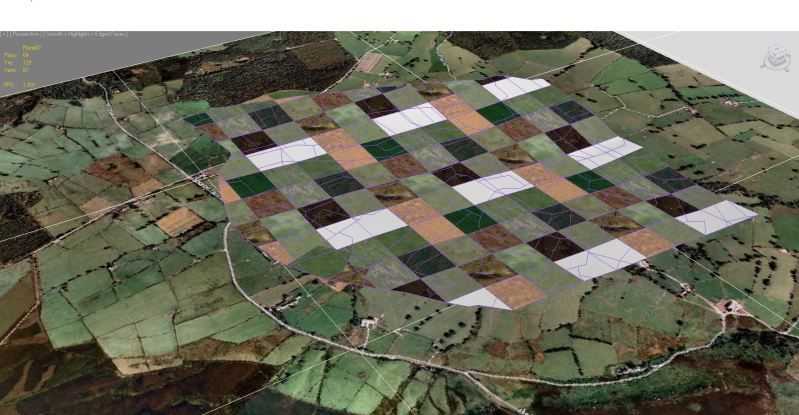
I've made an atlas at 1024x1024 for now, with 16 textures in it (you can see it repeated in the image above)
So each 256x256 tile is ~ 120m across in real terms and obviously tiles.
I generated a 120m interval mesh grid and dropped it over my digital terrain model.
Then I UV'd the grid from above so the UV's repeat almost perfectly across the grid.
I then cut into the grid the shapes of each field and area.
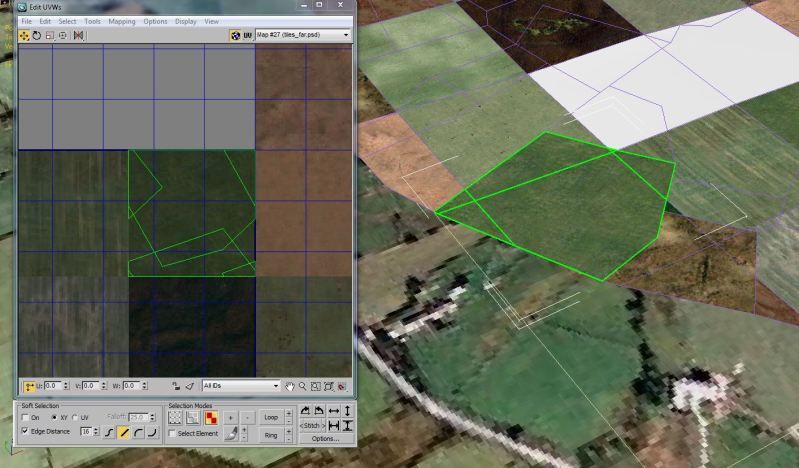
Then I'm editing UV's for each field area so I can tile the appropriate texture in each field, as you can see below.
The problem is this is a huge task. I have maybe 300 fields to edit in this way, perhaps more.
I don't mind the cutting bit, and I can get the correct tiling in the base grid mesh from the start with UV mapping the grid before conforming to the terrain/cutting.
The tough bit is detaching each field area and then detaching the faces and offsetting them and tidying up the edges (they are not always at perfect intervals of 0,0.25,0.5 etc etc)
Is there any elegant way to automate this process? It's almost like I need to set any UV's that go outside the 0,1 coords to wrap rather than go beyond... but I'm not sure how I can do that.
Also does anyone know of any functions to atlas UV's in 3DS Max. Ie, say I have my 16x16 tiles on 1024x1024 and want to expand it to 32x16 on 2048x1024, is there any way I can select my UV's and adjust by input rather than visually.
The transform spinners in UVW editor only seems to work on position but not scale/rotation.
Any help/comments would be much appreciated. I'm not sure if this is generally the technique I'm happy to use right now so just testing it out but it's hard to even make a test area to try it!
Many thanks
Dave
I'm working on a project for fun. The gfx engine is not so bad but to really optimise it's doing a lot by hand.
It's a free driving sim/game:
http://www.racedepartment.com/forum/forums/racer.117/
Anyhow, I'm currently building the rolling moor land that the driving course runs through, so you can see up to 10 miles and some of what you can see you will drive past a minute or so later.
Obviously the area is large but consistent in nature so using some generic textures is ideal.
I'm scattering transparent objects along boundaries for trees and so on.
I've made an atlas at 1024x1024 for now, with 16 textures in it (you can see it repeated in the image above)
So each 256x256 tile is ~ 120m across in real terms and obviously tiles.
I generated a 120m interval mesh grid and dropped it over my digital terrain model.
Then I UV'd the grid from above so the UV's repeat almost perfectly across the grid.
I then cut into the grid the shapes of each field and area.
Then I'm editing UV's for each field area so I can tile the appropriate texture in each field, as you can see below.
The problem is this is a huge task. I have maybe 300 fields to edit in this way, perhaps more.
I don't mind the cutting bit, and I can get the correct tiling in the base grid mesh from the start with UV mapping the grid before conforming to the terrain/cutting.
The tough bit is detaching each field area and then detaching the faces and offsetting them and tidying up the edges (they are not always at perfect intervals of 0,0.25,0.5 etc etc)
Is there any elegant way to automate this process? It's almost like I need to set any UV's that go outside the 0,1 coords to wrap rather than go beyond... but I'm not sure how I can do that.
Also does anyone know of any functions to atlas UV's in 3DS Max. Ie, say I have my 16x16 tiles on 1024x1024 and want to expand it to 32x16 on 2048x1024, is there any way I can select my UV's and adjust by input rather than visually.
The transform spinners in UVW editor only seems to work on position but not scale/rotation.
Any help/comments would be much appreciated. I'm not sure if this is generally the technique I'm happy to use right now so just testing it out but it's hard to even make a test area to try it!
Many thanks
Dave
Replies
I realise you're technically doing this anyway (I think, I am still a bit confused), but it just strikes me as slightly more hassle than it's worth?
As for altering the atlas after the fact... this is another reason for why I wouldn't be starting with one.
I feel like I'm missing something incredibly obvious here, I'll be back later if something pops into my head, but I'm fresh out of brain-juice at the moment.
Baking to a new texture at the end also makes some sense, it's just hard to get a figure on the GPU cost if you do a quick prototype in the GFX engine because you'll have loads of draw calls.
Since I've not used this technique before I think I'll struggle with it for this chunk of land and see how I feel about it.
I've already found a more elegant method for the way I have gone though.
Simply edit UVW, and just work along each column, break, offset 0.25, re-select, break, offset 0.25, then do the same vertically on the rows until you have all co-ords packed into one part.
Then select chunks of mesh that I know will share the same texture style (ie, individual fields), then just offset those selected uv's to the appropriate co-ords.
It's pretty quick and easy now actually. I'll post some in engine shots soon with the trees and things added.
I'm not so happy with the fact I have these lined directions in some textures that work with the field shape though. This method means I only have two real orientations to work with.
This is terrain that makes up the background so it's not all that important really, but it'd be nice to have more control, perhaps I can just add a few alts with the texture changed a bit and at an appropriate angle for those fields.
As per your alternative workflow where I build each field on a full uv sheet and then bake to an atlas. How can you bake to an atlas in 3DS Max?
Assuming I end up with say 16 textures and I want to put them all in 1 x 1024x1024 (or a 4x4 atlas), how does that work in Max?
I'm running 2010 here but as far as I know I'd *still* need to do the transform of the UV's manually per material from the 0,1 uv space to their position on the atlas pre-baking of the texture?
Does Max also do boundary preservation when generating DDS texture bakes so the mip-maps don't bleed into each other?
Thanks for the help/advice so far!
Dave
Out of curiosity, have you tried seeing what impact 1 draw call VS "however many you'd need if they were separate" will have? Not doing a texture atlas at all is going to give you a boat load of control.
Disregarding my lack of knowledge on boundary preservation, you could bake atlases in max by attaching everything together, grouping them by their elements in the unwrap window (does that option exist in 2010?) and doing an auto-pack with no padding/scaling/rotation. All on a different map channel, of course... which is the one you'd bake to.
There must be another way to do this, but nothing springs to mind. Oh, except using a script of course.
I hope someone smarter than me comes in here soon though, these methods seem like rather destructive workflows, which always worry me.
Just playing with ideas for now.
Much of the graphics engine is modern from a rendering point of view but a lot of actual scene asset management might be quite old school so I'm not sure how bad it is to just have a massive wide area aerial photo (edited appropriately to take out trees etc) chopped up and then loaded at higher resolutions on new shaders on the closer elements until the very close elements where the build would be more 'conventional' with tiled texture/detail textures and so on.
That might actually be more elegant for this purpose, it's just a case of managing what might end up being near 16k of texture at it's highest detail level down to an appropriate level so your only actually loading a small amount into memory each frame...
But then I'm not sure how nice it'd be to have such a huge amount of texture deployed.
Thinking more on this I think I've cut myself too short on the variance in the 16 sample slots.
I could probably do with double the res (so most fields will fit inside a tile (now almost 300m x 300m) so UV'ing is easy to rotate/vary), and probably double the sample count, so basically having 4096x2048 for 32 tiles in rgba, so about 32meg of texture.
In practice I might turn this stuff off earlier and use higher detailed models closer up so the texture res could drop and I could run a 2048x1024 instead.
Haha, it's just finding the balance to build to. Oh for an engine like Frostbite 2 where you just paint your terrain how you want it and let the engine deal with the deployment!
Dave
FPS without the new terrain/trees is ~ 100fps, so I'm losing about 14-15fps with the three extra shaders which are terrain, trees and another batch of trees (oodles of transparency, probably lots of overlap too so can cull lots of them!)
Looks pretty good here I think, but as you've said it's a pain to author and destructive. I think doubling texture res and doubling the tile count will improve visuals AND make authoring a load easier.
Cheers
Dave
That script looks pretty handy, I knew I'd seen something like it before a long while ago but could find it again.
I'll probably give that a go too with your suggested single tile per field workflow, then try crunch it all for export to whatever sized atlas is finally needed!
Many thanks
Dave
A shame that this workflow eventually gets destructive but in cases like this I tend to have two versions in my scene, the "working model" where changes and tweaks can still be made, and the "to export" version which is the finished result.
Keep us updated.
That area is about 1500m x 1500m and is just the low-detail distance detail and as you can see by the mini-map in the top right it's about 7km track length, so I have possibly 15-20x more area to build to this kinda quality for the mid-distance stuff.
Thanks for your process help. I'm glad you haven't found any general issues with the concept of doing the terrain like this for the end use... it's just how you build it quickly and non-destructively that is the tough bit as always
Cheers
Dave