The Polycount Newsfeed
Re: What are you working on Animators? 2024
jumping on it.
Portal 2 Personality Core (Test Render 1)

a shot of the current rig and the proxy mesh is there.
stay tuned for a WIP thread in both forums. the render is basically just for post-processing lookdev. the textures are getting there but the animation is way off. running at 95% speed to boot.
apparently i forgot to skin that triangle piece on the gimbal. glad i put that watermark up.
Portal 2 Personality Core (Test Render 1)
a shot of the current rig and the proxy mesh is there.
stay tuned for a WIP thread in both forums. the render is basically just for post-processing lookdev. the textures are getting there but the animation is way off. running at 95% speed to boot.
apparently i forgot to skin that triangle piece on the gimbal. glad i put that watermark up.
 pistachio
5 ·


Re: Natalia's Art corner
Hey everyone! Long time without posting!
Here's my latest critter: The Dark Mother.
More on: https://www.artstation.com/artwork/lDvYXV
I made a little video I love you can see there!
Hope you like it!
Nat


Here's my latest critter: The Dark Mother.
More on: https://www.artstation.com/artwork/lDvYXV
I made a little video I love you can see there!
This creature believes herself to be a deity. If encountered, one must kneel and divert their gaze. Such display of workship may offer a fleet respite of her wrath.
As always, I had a lot of fun designing her. Took special inspiration from the creepy, stoic face some religious statues have. I wanted to portray an impending sense of danger hidden under that neutral face with a slight smile on it.
Hope you like it!
Nat
 Cersei_Lannister
7 ·
Alan Wake 2 - Lighting
Hey everyone !
Taking the occasion to share some lighting work made for Alan Wake 2, from levels and cinematics. I had the chance to work on multiple locations from Cauldron Lake to Brightfalls, passing by the Dark Place. Enjoy !
Cinematics : https://www.artstation.com/artwork/zPR026
Dark Place : https://www.artstation.com/artwork/9EVPvR
Brightfalls : https://www.artstation.com/artwork/WB0J4G
Cauldron Lake : https://www.artstation.com/artwork/29VYPY
 Pandator
11 ·
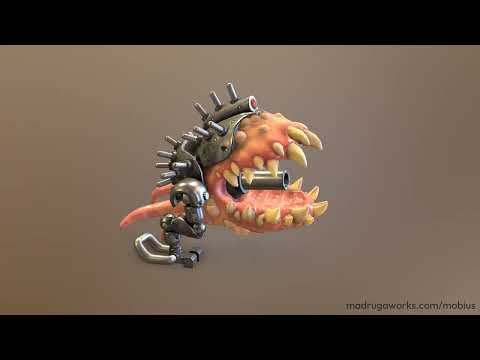
Re: The Mobius Machine - A new project from Madruga Works
Thank you jStins ")
Here are some videos showing the animations of few of our NPCs, models by myself and animations by our great animator Matjaž Lamut:
Here are some videos showing the animations of few of our NPCs, models by myself and animations by our great animator Matjaž Lamut:
 https://www.youtube.com/watch?v=WZjIDzZtykU
 https://www.youtube.com/watch?v=sFFyEHW84Xg
 https://www.youtube.com/watch?v=Hm2MegU-IfI
 https://www.youtube.com/watch?v=RYJZ1vj7wuI
 https://www.youtube.com/watch?v=PLGMSqEwURo
 https://www.youtube.com/watch?v=UH9FwNTLsOs
 tucho
tucho
5 ·
Joe Blow: Skin 01 - Real-time Fan Art
Joe Blow: Skin 01 - Real-time Fan Art
Fan Art project done to study 3D Characters for games.* Concept Art by Abel Oroz:
https://www.artstation.com/artwork/0l6J8
* More images at:
https://www.artstation.com/artwork/yD36Xn
https://rodrigopixel.com.br/project/joeblow-skin01/


 rodgon
7 ·
Re: Easy Trim Tool for Maya
Hi all this is probably way past due but I’ve decided to “open source” my trim tool for Maya. You can find it here on GitHub: https://github.com/Subtle1rony/EasyTrim
It is also updated now to work in Maya 2024. Thanks Lucas for bringing it up today and to all that purchased the tool since 2019, it funded some coffees for me:) I’m just glad people found it useful, and hopefully more will now that its easier to access.
Cheers and happy 2024!
 Subtle 1rony
5 ·
Re: Sketchbook: ID-LL
and back in zbrush, prep for detailing and other accessories, looking neat..


 idli
idli
3 ·
Dark Elf
My first ever Handpainted Character done for Weston Reid's Stylized Character Art for Games class! I’ve never had more fun texturing!!
Based off of Tooth's Wu amazing concept ~
The artstation link for more breakdowns! https://www.artstation.com/artwork/1xo5Qe


Based off of Tooth's Wu amazing concept ~
The artstation link for more breakdowns! https://www.artstation.com/artwork/1xo5Qe
 taanthip
10 ·
Cyberpunk 2077: Phantom Liberty- Black Market
Hi Folks!
I decided to share our work for Cyberpunk 2077: Phantom Liberty- Black Market here on Polycount.
It was a wild ride working on those environments!
For each vendor, I strove to create unique visual solutions that would set them apart in the game world.


Pictures taken from - Artstation
Credits:
Stadium Location Owner - Javier Pintor
Stadium Environment Artists - Sebastian Fijal ; Martin Kocisek
Level Design - Seb Mcbride
Lighting Art - Dave Yablonsky
Environment Art Lead - Kacper Niepokólczycki
Art Director - Pawel Mielniczuk
Art Director - Jakub Knapik
I decided to share our work for Cyberpunk 2077: Phantom Liberty- Black Market here on Polycount.
It was a wild ride working on those environments!
For each vendor, I strove to create unique visual solutions that would set them apart in the game world.
Pictures taken from - Artstation
Credits:
Stadium Location Owner - Javier Pintor
Stadium Environment Artists - Sebastian Fijal ; Martin Kocisek
Level Design - Seb Mcbride
Lighting Art - Dave Yablonsky
Environment Art Lead - Kacper Niepokólczycki
Art Director - Pawel Mielniczuk
Art Director - Jakub Knapik
