Worlds worst normal map. What have I done wrong?

grand marshal polycounter
Has anybody ever created an uglier normal map?
This is my first attempt at anything other than a very basic normal map, so don't laugh too hard.
I did this in Maya 2018. As you will see, I exploded the mesh. I used the envelop method, with the option of only llooking inward.
Is the issue that my low poly and hi poly models are not closely matched up enough? Or my envelope was too large? Is that even an issue if there is no overlap between the different meshes?
Any help is really appreciated here. My high poly sculpt looks pretty decent I think, and I spent a lot of time on the retopo making sure everythihng matched up just perfect. But look what I have created. It's a monster!
Additional note: I have xNormal, but got even weirder results with that.

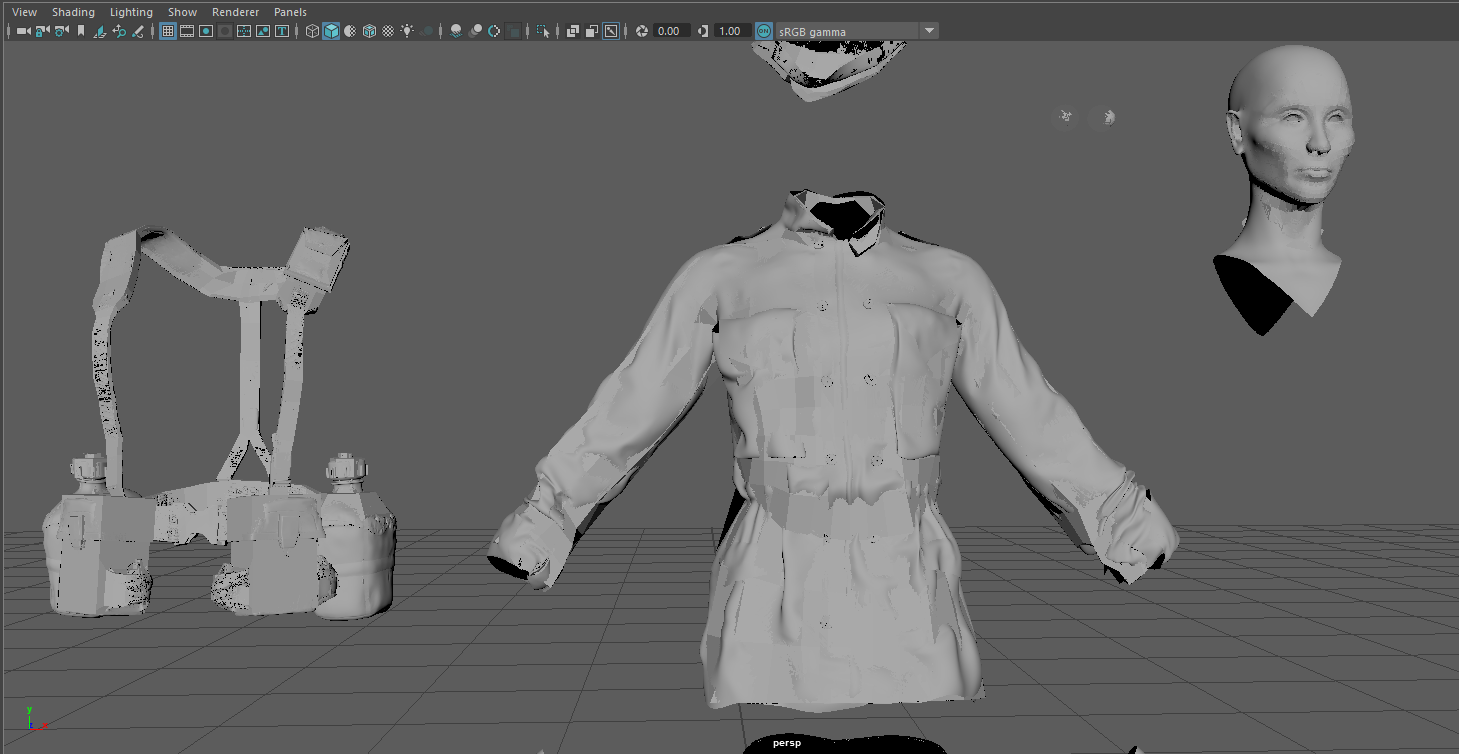
The hi poly and lo poly together
hi poly only
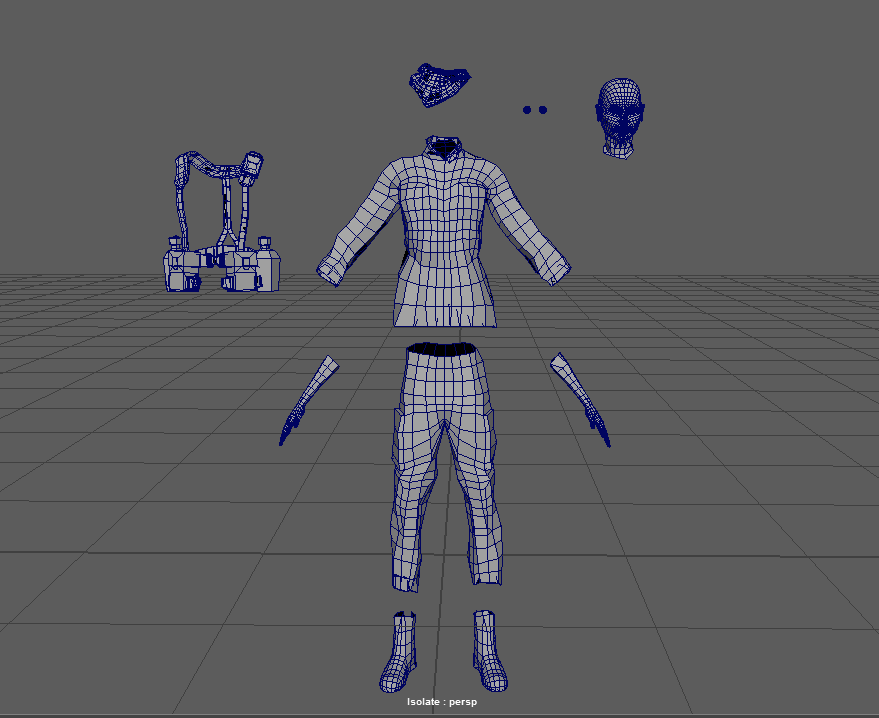
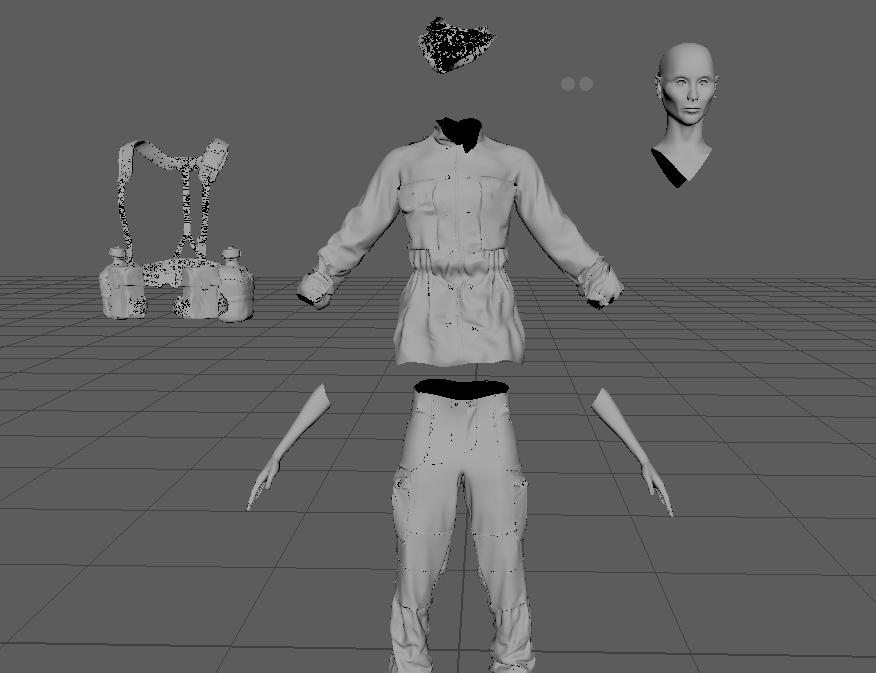
lo poly only
This is my first attempt at anything other than a very basic normal map, so don't laugh too hard.
I did this in Maya 2018. As you will see, I exploded the mesh. I used the envelop method, with the option of only llooking inward.
Is the issue that my low poly and hi poly models are not closely matched up enough? Or my envelope was too large? Is that even an issue if there is no overlap between the different meshes?
Any help is really appreciated here. My high poly sculpt looks pretty decent I think, and I spent a lot of time on the retopo making sure everythihng matched up just perfect. But look what I have created. It's a monster!
Additional note: I have xNormal, but got even weirder results with that.
The hi poly and lo poly together
hi poly only
lo poly only
Replies
The worst spots are black. Whats up with that?
I know it's not the exact answer you're looking for, but you need to improve every step of the way instead of taking shortcuts.
As for the actual normal map errors, I believe there are a series of problem that would have lead to it.
*Your smoothing groups are not set up properly
*Low and hi-poly meshes not aligned properly. Rays that fire fail to hit surface.
*You may have overlapping UV elements
This tutorial taught me all about baking normal maps. It's for 3DS Max but I'm sure the same concepts apply.
https://cgi.tutsplus.com/tutorials/create-a-game-ready-fire-extinguisher-with-3d-studio-max-part-4--cms-20275
You should also check out these links:
http://polycount.com/discussion/107196/youre-making-me-hard-making-sense-of-hard-edges-uvs-normal-maps-and-vertex-counts
http://wiki.polycount.com/wiki/Texture_Baking
1. Smoothing groups -- I've seen this pop up here and there, but from what I've read this is a non-concern for Maya. In Maya, you either harden or soften normals, that is all. But this is all kind of Greek to me anyhow, I haven't found an explanation of this that I understand...
2. Practice high poly modeling -- briefly, can you elaborate of some issues that you see with the high poly model? I'd really appreciate it!
Your bake definitely shows issues that seem like they could be caused by smoothing groups. But seeing your UV map, and baked texture, is super important too. Could you post those as well?
Coming to a crashing halt after working on this model daily for like, probably a month is kind of a bummer. I can live with saying good game and trying another, but I feel like if I can just wrap my head around map baking and normals and this more technical stuff, I may be able to fix my glorious masterpiece here and not have to walk away with my tail between my legs.
Anyway, here's some shots.
I admit, I did the UV's in an impatient and frustrated state of mind because I had to troubleshoot a bug in Maya. Ended up using UVlayout, which worked decently. Though I couldn't figure out how to fix some small overlapping issues, which I know how to do in Maya but my UVunfold Plugin won't work. That's probably part of the issue...
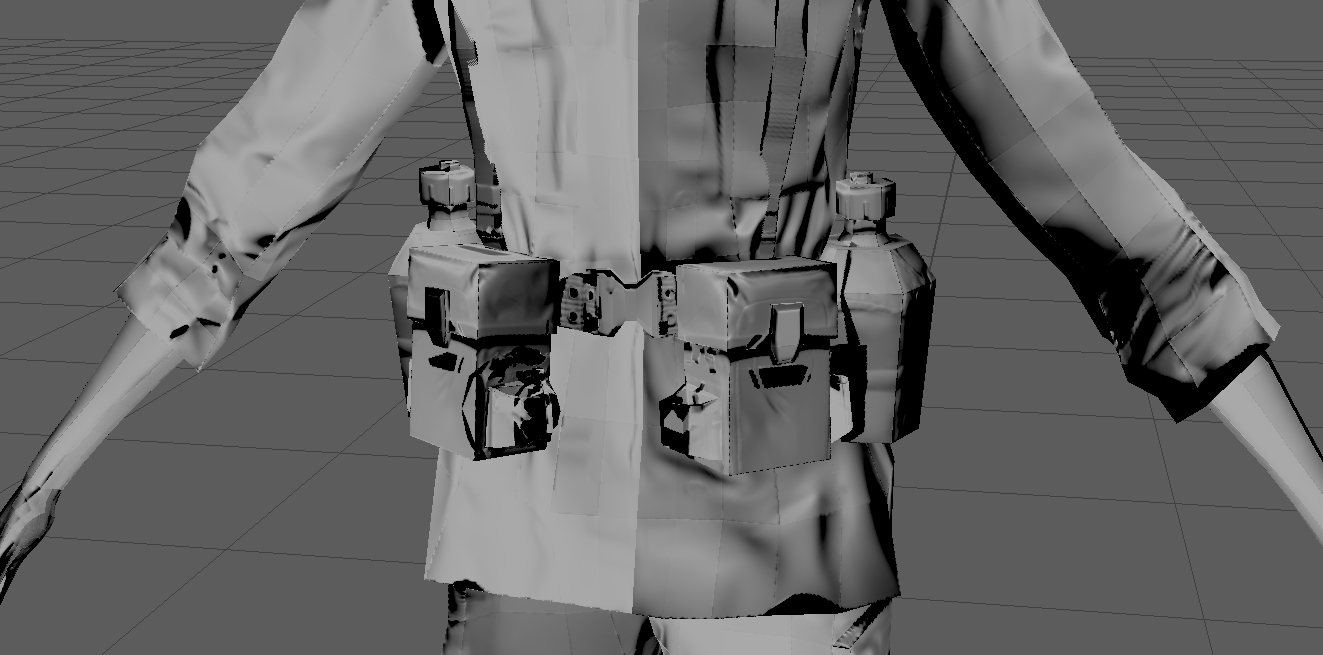
There is some instances of UV overlapping, but they were on the back sides of things like the ammo pouches, and thus shouldn't be seen. The most obvious instance is the Y-joint of the LBE harness, which you can see as the long thin strip in the upper right.
I do have some understanding about what the colors mean here. I understand that these sudden changes in color represent a sudden change in normal direction. But why, on the face for instance, is each polygon face bulging out like that?
Take some time and read up the polycount wiki about normal maps and check the sticky threads about baking. And check up your UVs as well, currently they are pretty wasteful and don't really help you at all in your current situation.
http://wiki.polycount.com/wiki/Normal_map
I got together with some people and we decided to start putting together a prototype, so I got in a rush to get this character done.
Now I am stressing and not learning properly.
I think what needs to happen is a change in workflow. I was going from high poly to low poly, and pretty much everything after the sculpt was a struggle. So I'm going to reverse the workflow and start a similar character. This time, building my low poly model first and sculpting from that. That should build and reinforce better topology flow procedures, and when it comes to the retopo, well, it will already be done.
this is a pretty good read to get you startet
You might also wanna "explode" you mesh in differents parts to bake it. For exemple: keep the head away from the rest of the body, and so and so. Still keep it as an hole mesh (used only for baking), it will save you a lot of troubles!
I didn't know about that at the time though. I'm approaching this stage with my next model here in a few days, so I'll be studying all the reference I've received here and hopefully get a good result. Additionally, I've worked this model from low to high, so everything should match up perfectly.
in your first bake, all the miscolored stuff is most likely due to the camera baking the backside of your model
Luckily, the results are much better this time -- however there is still some issues to resolve. I've read through the beginners guide to normal map baking, and basically followed the steps. But the one step I am not sure how to implement in Maya is probably what is making my map look like this:
The ear is most apparent. The low parts are where they ought to be, but they look like really low resolution with those torn edges.
So everything is where it should be, but it is way too strong and the resolution seems kind of low.
I did this in xNormal with 2k maps, 4x antialiasing. I triangulated the mesh, the lo and hi res meshes match almost perfectly, but what I haven't done is "soften" the normals. The thing is, I don't know how to do this in Maya. Is it the same thing as "soften edges" in the mesh display menu? Because when I enable that some of my faces appear to have become concave.
Upon further inspection, i have to remember that about right here is the closest the camera would probably ever be from this dudes face. And for now, I think this is fine enough to move ahead.
My unrealistic desire is to make one of these photo realistic faces like you see on artstation. But these are not game models usually, and they are made with different techniques and by people with multiple years of experience. So, let's be realistic. This normal map is far from perfect but it is good enough for a 3rd person game prototype.
Maya also colour manages images, you want to disable this for your normal maps.
Basically set the colour space to RAW in the file node.
Also make sure that the green channel is correct. For Maya you want it to be +y.
If the green channel is flipped, for example you made your normal maps with UE4 in mind, but want to preview it in maya as well, a quick trick i use is to play around with the colour balance of the texture.
Set the colour gain to 1, -1, 1 and set the colour offset to 0, 1, 0.
Doing this means you dont need to go rebake your maps with the correct handedness or simply invering the green channel in photoshop or whatever.
I didn't feel like looking up what to do in Maya, but decided to move on to Substance Painter. Sure enough, bringing the mesh into Substance Painter and applying the maps -- it looks great.
Still some minor seam issues, but these can be painted over easily enough.
Thanks a million everybody who helped and shared resources in this thread. I still have soooo much to learn about UV's and map baking, but at least now I have the confidence of knowing I can produce something with satisfactory results.
But when I take this into UE, you're saying I will need to invert the green channel? Is that something I'll have to do manually in photoshop, or probably when I export the maps from substance painter I can set the channels appropriately then. Well... one thing at a time. for now, I'll get it textured, then worry about making it work in engine afterward.
If the color channels are inverted, wouldn't that be indicated by high points appearing low and vice versa? As far as the height looks, everything looks good to me.
There is a big ugly seem on the shoulders... There are a few artifacts which show up as round splotches... But as far as some kind of channel inversion, everything seems fine to my untrained noob eyes.
Looking at the map like this, I still only see those same errors like that artifact on the torso.
The second issue is observation. You cannot possibly look at something like this :
and say that you are just having "some mirror seam issues". There is something fundamentally off about the way this was baked/displayed, manifesting itself in the inversion of shading over the shoulder seam. There is no reason to qualify this as "minor" since this is so jarring visually.
There is no reason for your bake to not be visually indistinguishable from your high - so start looking at them side by side. Of course not give you any technical answers, but at least you'll be able to spot the visual errors which is a first necessary step.
Also ... your earlier posts and screenshots illustrate that you are probably going into this way too fast. Forget about sculpting and normalmaps altogether for now, and put your efforts into getting better at building solid and clean "old school" models for like, the next 6 months or so instead. This is the basis for everything and you are currently skipping over this step. You could get something like these :
http://www.kenbishopart.com/GermanDesertInfantry.jpg
http://www.bobotheseal.com/portfolio/EF2/render04.jpg
Once you get to that point it will be a good time to start worrying about sculpting/baking ... with very simple props models. And THEN, you can start thinking about applying all that to full featured characters.
Maybe that would probably be a wiser thing to do, but it's just not my style.
I did build this characters base with box modeling techniques, and that has really helped me with the whole process. From now on, I will start every character with box modeling and working in a low to high method, rather than beginning with Zbrush and dynamesh. I started out that way because that is what the tutorials available to me describe. I realize trying to jump in and do things the exact same way as the pro's is going to a difficult path, but I'm just kind of stupid-stubborn like that. I yam what I yam.
There are tons of mistakes with this model, some due to my ignorance, some due to negligence. Some I am aware of by my own inspection and some others have helped me identify. What I call minor, any professional probably would not. It's just semantics -- to keep my spirits up, okay?
I see the the seam where the map reverses, and I certainly wouldn't deliver a product like this to a paying customer if I was a professional... but I'm not. I've been doing this for two or three months now, so I'm willing to catalog this problem as one that I'll learn to solve along the way as I create more models. In any case, I'll be starting a digital media degree next semester so they'll probably begin things at square one.
If not, then keep going with the model as it is - and you will only end up frustrated, because these technical issues cannot be fixed by painting over them. That's just the way things are.
If yes, then forget about the character as a whole for now and focus on, for instance, just getting the shoes right. You need to tackle things very carefully and looking closely at good reference models, understanding the way they are built. Then once you get that right move on to the rest.
You're making the very common mistake of tackling a complex project while trying to learn a very technical skill at the same time. I know there are ton of seemingly impressive "full character" tutorials out there, but unfortunately this is not a good way to learn.
Good luck.
This way, each time I make a new model, it gets fewer errors each time. But if I strive for perfection with an individual model, it just takes too long and I get tired of it and don't learn as much.
Don't misunderstand me. I want to make glorious AAA models, and I really value your advice and take it to heart. But I've got to know myself and the way I learn and try to play to my strengths and work around my weaknessess.
My next model, because I've gone through the entire process now -- I'll be able to dial in and focus on researching and experimenting to solve these issues I have with the UV's and map baking. But if I try to do all of that now and spend another week on this model, I'll lose my forward momentum, get bored, stop having fun... and that's not going to help me one bit.
If I was just working on my own, I would probably heed your advice and really go through just a single part of this model and try to fully understand the process. But right now I'm working with some others to make a game prototype, so I want to keep up with them.
I really appreciate your time and good advice. You know, this is probably the most important type of advice somebody can give but you never see in online tutorials -- that is, understand how to learn.
And this is something I am learning along the way. I never enjoyed school and I went into the army instead of going to college, so I didn't exactly ever learn how to not be a dummy. But I did learn how to persist at things, and so eventually with enough smashing my head against hard things I do learn.
I'm not learning in the most comprehensive manner right now, but I am having a lot of fun and definitely improving -- so why let the perfect be the enemy of the good?
For instance, you could :
- Spend about 50 to 100 hours sculpting, retopo-ing and attempting to bake a full character, only to to end up with unforeseen and frustrating technical issues ; or,
- Spend 2 to 3 hours modeling a simple, clean prop (a grenade, a shoe) then spend a few evenings over the following days to fully understand the tech. Then move on to the rest. That's the best way to keep momentum, and gets to the end result faster too.
But then again, whichever works for you really.
Also, if this is for a game prototype : don't bother sculpting/baking or anything of the sort. Just do a lowpoly without textures (flat per-face materials), like Hitman GO and Tomb Raider GO, It will look probably much better that way.
I think I'll do that. I'll just box model characters and props, trying to make them look about as good as the original Ghost Recon game, but I think I will still need to UV unwrap them in order to texture, right? I could simply apply premade materials to UV groups for the most part, but there is still no way to get around UVing unless you want flat colors, right?
Here is the final result (except the eyes whcih I'm going to switch out with another model.) Now I feel like, this isn't bad. It has issues, but those can be resolved. Why should I go backwards?
But.... if my character looks like this, then the entire environment has to be up to par as well, and then we will have a host of performance issues to solve.
It's hard to decide what to do.
***Update: After discussing this with the programmer, we decided, "Fuck it. We're going all out. We can do something more simple if things prove too difficult."
By doing a simple object first, you will still go though the entire process like you would with a complex character.
However with a simpler object you will be able to focus on the technicals better, as there is no noise of a complex model.
It will give you more clarity, spot errors better, etc. Again you will still go through all of the same steps, just not get lost in details.
Once you master the process on a simple object, you can easily upscale and use the exact same methods for your complex characters.
This 'simple object' could be anything you will be using in your project if you are hell bent on making progress with your prototype.
Like Pior said, a grenade, a helmet, binoculars, a barrel, rocks, concrete barricades, etc. etc.
TLDR, master the basics > apply to more complex models.
For the green channel by the way its so easy to understand that it drives me nuts to see that you dont have the point haha:
There are 2 kind of normal maps; DirectX and OpenGL. The only difference is the green channel that is reversed.
Every software got his preferences. Check that:
http://polycount.com/discussion/147156/is-it-y-or-y-for-normal-maps
Of course at first you might think the problem is not that big but trust me: everyone see it
For the rest, nice ameliorations congratz for that
EDIT: dont rly have the time to investigate but maybe the seam on the shoulder is caused by the way you "exploded" you mesh: is it an UV cut? An hard edge? If you cut you mesh there you should have locked the normals before. Good luck!
Wow I've never seen someone get banned for being so doggedly ignoring reality. It's not against the rules or anything but you might pull it off!
What you seem to think is the case, is that with each model you will get better and better... like magically some how?
What everyone is telling you is that you are going to repeat really stupid technical errors over and over until you actually stop. And diagnose these problems. now.
It looks like you haven't read all of the conversation. I explained my process of how I keep moving forward and fix mistakes. You don't know my situation or anything about me, so don't be so aggressive.
@fatihG_
Yes, that is probably a more comprehensive way to learn. For this reason, I am focusing on some of the props for the game now rather than doing another character. I appreciate the advice regarding this.
@Olingova
Yeah, that is at a UV seam.
And just to reiterate guys -- I figured this was a somewhat simple problem to fix, but for the time my patience for researching and fixing problems is all used up. Like you guys have noticed, I have largely skipped over the basics, so you can imagine that by trying to do a big model like this I have to learn a lot and solve lots of problems that are novel to me. This all requires energy, and I work at it around 5-8 hours a day most days.
So at some point, I say this is good enough for right now. But the model is not going anywhere! I will go through another character, reinforce methods I've learned, find new problems and solve them, and most importantly I have catalog of situations I encountered with the previous model and I make sure to solve them with the new model.
TL:DR, what I am saying is that I am putting this model away for right now, but rest assured it will be fixed later, and it is very much in thanks to the kind advice and answers received from this thread.
My main method for learning is Pluralsight tutorials. They show you how to do things, but often times they don't cover all the mistakes a beginner will make while following along. So the entirety of my learning so far is from those tutorials, google searches, and asking questions on forums like these. I've been at this for a couple months -- starting from zero knowledge of anything having to do with technology -- so what might seem like a simple answer from somebody with lots of experience is just a vague point in the right direction to me. I need these hints, but for them to be comprehensive answers I still have to do a lot of research and trial by fire. I'm not a total dummy, but I really don't have any basis in computer technology or this kind of work, period. Thus, things that others may understand quickly takes me more time because I have more fundamental things to learn.
But, the way I see it, a big complex model is just lots of small simple models. One way or another, I'll need to learn these same things. But a complex model is kind of like taking a bite of food that is a little to big. It can be uncomfortable to chew! But don't worry, I always finish my food.
Yup, thats why we suggest to tackle something basic first.
That way you dont spend all your creative energy of technical issues.
Making progress on your project is understandable, but if you simply dive in head first, the project will suffer. As you will get more and more frustrated on technical issues. Decide that something is 'good enough' when it really isn't. etc.
Personally the only time you can call something 'good enough' is when you are polishing. As in the polish stage everything is done and all you are doing is refining.
Anyway keep going. All we are trying to do is make your learning experience more smooth. =]
I'm about to turn 30, so I doubt I'll be making any radical personality changes. I tend to do things the hard way for no good reason... But the good thing is that I've switched to a degree in digital media, so I'll have plenty of instructions and exercises in the basics. That should help round things out and fill in the blanks I have from self learning.
It will be a week from now at least.
Sorry to revive this thread, but I've got some normal map questions again and I figured it would be better for me to keep similar questions in one place rather than spam the boards...
Anyway, I've made a more simple character, and my normal maps have turned out fine except for two issues. I know what I did to cause the issue, but I am not sure if there is a way to correct it without redoing half the UV unwrapping on this model. You'll see what I mean...
I thought I could get away with mirroring the model to save some time, but I did not know when I did that that I would need to flip the UV's. Well, now I know, and I figure I can chop him in half again and redo it, but isn't there a way to normalize the way the UV's are facing? I have normalized the surface normals, they are all pointing the right way. And as you can see in the UV layout Maya is telling me that the UV shells are all facing the same way as well (because they are blue, not red). And yet when I bake my map, clearly half of each shell is NOT facing the correct way.
Cutting him in half and flipping the UV's shouldn't be a big deal if that is the way it has to be done. But there is one more issue -- notice the stark seams. Is that because I have too much of a difference between the pixel density for the adjacent shells? Other than those seams, the details are coming through perfectly from the hi res.
As always, thanks a lot for any advice.
Ok, for posterity, if you are working on a symmetrical mesh and want to speed up your UV's, just use symmetry when cutting your seams. If you have a half mesh and want to mirror it after unwrapping, make sure you set "flip uv's" option in the mirror options panel. If you don't do this but sew your pieces together, it looks like in my case maya does not recognize that two parts of a single UV shell can be facing opposite ways, and thus the problems you see above.
But if you unwrap half a mesh and mirror, then you still have to go in and sew all these lines back together. In my case, that got maya acting weird with its unfold options, so i ended up just redoing the UV's from scratch. So, TL:DR, don't do your UV's and then mirror unless you are highly experienced and already know about all this stuff already.
For a simple character like this with just a few pieces, it only took 20 minutes to unwrap him again with HeadusUVlayout. If you don't know about that, i recommend trying the free trial version. It is a really easy way to unwrap your meshes, but I also recommend learning to do it in your 3d application as well because, for me at least, I didn't really have a good understanding of what was going on until I worked through this a few times solely in Maya.