Home 3D Art Showcase & Critiques

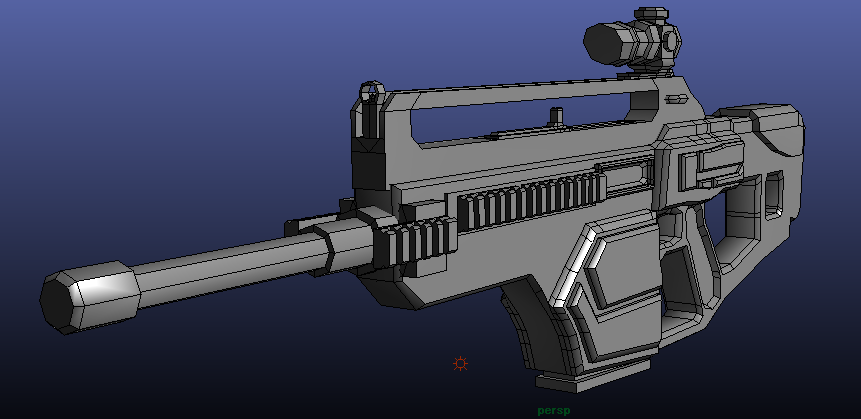
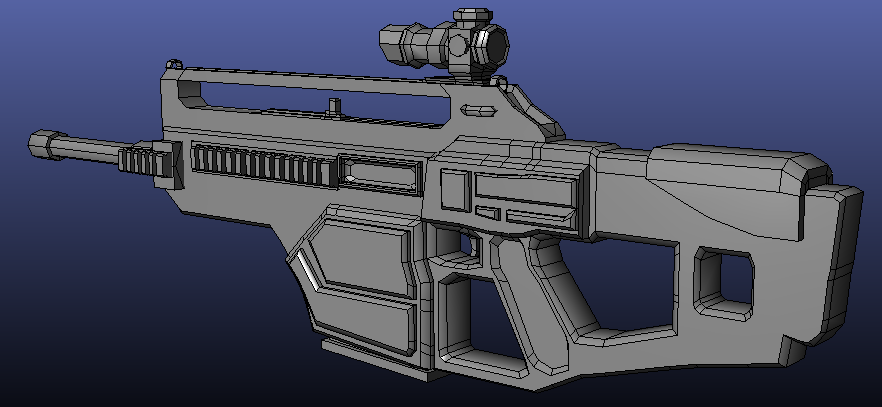
first texture project - rifle

my photobucket album for this project

http://s1138.photobucket.com/albums/n531/88ppclolmud/blackrifle/

going to gym now. will brb and then see how uvs look exported

RenderExport1.png
RenderExport2.png

Replies

  • Bombshell
    Options
    Offline / Send Message
    Bombshell polycounter lvl 10
    there aren't any pictures of the UV's or a texture. its a nice model but what is there for us to comment on?
  • n88tr
    Options
    Offline / Send Message
    I swear it took me longer to clean up and organize my uvs then it did to make the rifle. 4 hours

    outUV.jpg

    Combined a lot of similar parts like rails

    start texturing and see what happens....

    Edit: I also changed the scope to be more highpoly along with the ring ironsights

    RenderExport7.png
  • Bombshell
    Options
    Offline / Send Message
    Bombshell polycounter lvl 10
    fairly complicated UV unwrap... I personally would have kept more parts intact on the UV's so I could tell 1 random circle from another random circle.
    But if you can work on it with this texture, I look forwards to the results.
    I'd imagine a UV like this would be used for automatically generated maps? like a sculpted high poly or something?
  • biofrost
    Options
    Offline / Send Message
    biofrost polycounter lvl 12
    You could probably get most of the side all in one part. With so many small pieces it is going to be hard to get a lot of detail in your model.
  • Alberto Rdrgz
    Options
    Offline / Send Message
    Alberto Rdrgz polycounter lvl 9
    yeah, with that unwrap your texture is gonna be all over the place.

    I would focus on making a highpoly, honestly, then the lowpoly would be easier to unwrap
  • n88tr
    Options
    Offline / Send Message
    Texture started
    texture4Jpeg.jpg

    Model texture progress
    RenderExport9.png
    RenderExport8.png

    have to go to gym, later
  • makecg
    Options
    Offline / Send Message
    man that uv-map looks like it would be terrible to texture
  • TicoTaco
    Options
    Offline / Send Message
    Curious, what is the gun initially made out of?
  • Uly
    Options
    Offline / Send Message
    Uly polycounter lvl 15
    Yikes. Naughty UVs. Look at some guns by EQ, you need simple shells/islands.
  • Hamish Bode
    Options
    Offline / Send Message
    Yeah - before you really get invested in the texture you should really nail down those UVs and get every pixel you can out of it. I'm sure someone around here must have an example. I, for one, do not :(

    Seriously, you'll kick yourself further down the track when you realise that you could've done it 10% better! Do it!
  • Dragan
    Options
    Offline / Send Message
    you're wasting a lot of UV space, you could a lot of just the one side of your gun as one part, and as for your scope, you could just set your seam lines, and just pelt it, and relax. It will make your texturing a lot more clean and easier. The way you have things right now, it seems like it would be a pain in the ass to texture. lol.
  • samcole
    Options
    Offline / Send Message
    If nothing else trying to keep sense of what each unwrap is must be challenging. Thats something I still struggle with when I go to unwrap things. I'm still slow, and clumsy when it comes to UV'ing, but I try to keep some logical sense when I select faces and unwrap things.

    I mean can you even tell what is what if you didn't have your 3d app open? Odds are...probably not.
  • n88tr
    Options
    Offline / Send Message
    Skuee wrote: »
    If nothing else trying to keep sense of what each unwrap is must be challenging. That's something I still struggle with when I go to unwrap things. I'm still slow, and clumsy when it comes to UV'ing, but I try to keep some logical sense when I select faces and unwrap things.

    I mean can you even tell what is what if you didn't have your 3d app open? Odds are...probably not.

    I select the uvs in Maya [I have split windows. 1 for uv editor and one for perspective view, they're stacked] and see where they show up in the perspective view. It's not really that bad.
    Dragan wrote: »
    you're wasting a lot of UV space, you could a lot of just the one side of your gun as one part, and as for your scope, you could just set your seam lines, and just pelt it, and relax. It will make your texturing a lot more clean and easier. The way you have things right now, it seems like it would be a pain in the ass to texture. lol.

    I have no idea what seam lines & pelting is, I'll look that up. It is a pain in the ass to texture but that's what the UV looks like. The biggest parts of the gun [the body and top handle] are by biggest UV pieces so I think I did that right.
    Yeah - before you really get invested in the texture you should really nail down those UVs and get every pixel you can out of it. I'm sure someone around here must have an example. I, for one, do not :(

    Seriously, you'll kick yourself further down the track when you realise that you could've done it 10% better! Do it!

    Not really sure what you mean here.
    Uly wrote: »
    Yikes. Naughty UVs. Look at some guns by EQ, you need simple shells/islands.

    Again I need to look up shells/islands. I'll see what EQ has posted.
    TicoTaco wrote: »
    Curious, what is the gun initially made out of?

    I guess plastic [I did the for the gun sides, it's a bit too heavy though] and metal. Metal rails, scope, etc. Not fully sure, was making it up as I went along. I wanted/want to make a rough texture all over and then take my time and make the metal, scope etc highlights etc.
    makecg wrote: »
    man that uv-map looks like it would be terrible to texture

    Heard that already.

    I will look up these UV tactics and see what I get.
  • Grimm_Wrecking
    Options
    Offline / Send Message
    Grimm_Wrecking polycounter lvl 8
    Heard that already.

    I will look up these UV tactics and see what I get.

    Perfect Blue's Thread

    Waviness

    Malcom's Workshop #3

    I know there are more, but those are the 3 threads that come to mind right away.
  • n88tr
    Options
    Offline / Send Message
  • r_fletch_r
    Options
    Offline / Send Message
    r_fletch_r polycounter lvl 9
    man those uvs!

    (he he he)
  • n88tr
    Options
    Offline / Send Message
    I think I'm going to smooth out the model a bit more and remove those side extrudes by the trigger guard. Will post again soon.
  • n88tr
    Options
    Offline / Send Message
    Reading over those links you gave me and all 3 have to do with normal maps, something I'm not planning on doing with this model quite yet. Were you trying to suggest I use them in the weapon here?
  • n88tr
    Options
    Offline / Send Message
    Working on redoing the gun along with another one I hope to AO render for the first time.
    Goal in mind is to make community assets for games I liked to play in the past.

    Thread is not dead lol
  • Cooljay
    Options
    Offline / Send Message
    Nice work here so far. Can't wait until there is a texture for it.
  • n88tr
    Options
    Offline / Send Message
    Sorry bump but project restart
    gonna try something simpler like a character
  • Xaltar
    Options
    Offline / Send Message
    Xaltar polycounter lvl 17
    lol character texturing is certainly not easier. On something like this you can get away with some photo sourcing. On a character, to do it right you need to paint a lot. Not to mention the uvs on a character will kick you in the bum if you had trouble with this. If you are trying to learn then you really need to stick to something once you start. If you want to try something easier then try something less tricky like a soda machine or a bin etc. We all start somewhere and what counts is that the project teaches you something. Do a lot of small projects and finish them, you will learn a hell of a lot faster that way.

    Just my 2c
  • octokitty
    Options
    Offline / Send Message
    octokitty polycounter lvl 14
    i agree, you really should start with something inorganic for your first texture project. People usually have more trouble with characters than anything else.
  • n88tr
    Options
    Offline / Send Message
    aww well i just watch a lot of Gilesruscoe videos so i figured i could do something like he does.

    so i should make like a flower pot or something instead? a fence?
  • gilesruscoe
    Options
    Offline / Send Message
    gilesruscoe polycounter lvl 10
    Trolling me or genuinely watching them? I never thought they were greatly useful to anybody haha.
  • r_fletch_r
    Options
    Offline / Send Message
    r_fletch_r polycounter lvl 9
    why not see this through and finish it.

    post what you have, what your problems are and let folks help you.
  • Joseph Silverman
    Options
    Offline / Send Message
    Joseph Silverman polycounter lvl 17
    If you want a simple texturing project to get your feet wet, texture Pedro's amp! It looks like it's still hot and fresh out of the oven, and it's an excellent subject to learn a lot about material definition.
  • n88tr
    Options
    Offline / Send Message
    Trolling me or genuinely watching them? I never thought they were greatly useful to anybody haha.

    oh no they are very helpful actually.
  • octokitty
    Options
    Offline / Send Message
    octokitty polycounter lvl 14
    Whatever you do, just start with something simple. If you really wanna do a character i guess that's fine, but make sure it's really simple like the one in gilesruscoe's video or even simpler. Or you could try that amplifier like SupRore said. Or something like a barrel, a lot of people start with that. It's your first texture project and you don't want to overwhelm yourself! Most importantly, make sure you UV it the best way possible. It will make texturing so much easier :)
  • n88tr
    Options
    Offline / Send Message
    Well i started my little barrel

    23ljv4h.jpg
  • n88tr
    Options
    Offline / Send Message
    ditched the green
    28itj60.jpg
  • octokitty
    Options
    Offline / Send Message
    octokitty polycounter lvl 14
    cool, I'm glad you went with that! The uvs are looking much better than the gun uvs, but i would still try to fit them together more. A really easy way to unwrap a barrel is to just make 3 pieces on your uv map: the top, bottom and the sides all together. Here's a picture I found that illustrates that:

    2559211890_39a2fb8049.jpg

    You want your uv map to be easy to texture as well as using up as much space as possible. Make sure you use reference for this too. Find one you like and try to match it exactly. It is really good practice!
  • n88tr
    Options
    Offline / Send Message
    are you saying i should redo my uv?
  • octokitty
    Options
    Offline / Send Message
    octokitty polycounter lvl 14
    well you dont have to completely redo it, but you should at least put some things together. make it so the cylindrical parts stay together in one piece on your map so you dont have seams when you make the texture. so the cylinder of the barrel is one piece, and the cylinder of the piece on top is one piece.

    also, i just noticed something. the top and bottom pieces of your barrel is one big circle. you should have any polys that are more than 4 sides, so you should probably split that up. at least that wont take to long.
  • sybrix
    Options
    Offline / Send Message
    sybrix polycounter lvl 13
    Ah yes, the dreaded UV unwrapping. I'm still quite slow with it, but here are my suggestions. It looks like you're a fellow Maya user.

    Figure out where you want your seams to be on the model. Seams occur where two clusters of your UVs come together. Unless you have a perfectly tiling texture and/or carefully plan your seams, seams will be visible and are pretty ugly to look at and generally frowned upon. Think about how the player will be seeing your model. If the camera will never come behind the model, put the seam in the back. Etc

    seams.jpg

    The yellow outlines where the texture is visibly interrupted by seams. You can see the seams in the UV map too in yellow. Your UV map for the gun not only was hard to comprehend to paint it, but it also had a bajillion seams, which is bad. Sometimes you can get away with lots of seams but you want to only use them when necessary.

    Yes, you'll want to redo your barrel UVs like how octokitty has them laid out in their example. "Wasting UV space" means there's too much space in between your shells (individual pieces). You want your UV map to be as tightly packed as humanly possible, so that you fit as much detail into your maps as you can.

    Maya's Auto Unwrap creates a bunch of tiny pieces. If you go into Edge mode in the UV Texture Editor window and select an edge, the corresponding edge will also be highlighted. See where the edges meet up and sew the UVs together (using the Move and Sew or just Sew UVs buttons on the top of the window). Try not to leave everything too scattered.

    When posters were saying how you could keep the side together, they mean keeping the whole side panel of the gun as one shell, instead of 3+ scattered pieces like how you had it before.

    oneunit.jpg

    See how the whole side panel of the car and the top is stitched together? So much easier to paint!

    You can also stack your UVs. It saves time and UV space. Lots of low poly objects (like this car) and things like guns, swords, etc can be split right down the middle. Then you only worry about unwrapping/texturing one half. Other repetitive details can be stacked too, like the car seats in the image and the wheels/tire tread.

    Google is your BEST FRIEND. Try looking up some step-by-step unwrapping tutorials. Maybe someone on here can refer some good ones.
  • n88tr
    Options
    Offline / Send Message
    redid my uvs and the model

    i clicked on an edge of the barrel err girth [the wide big part lol] and saw i was able to sew them all together.

    did the same with the barrel cap on top

    i think this is looking better yeah?

    uglybarrel21.jpg
  • throttlekitty
    Options
    Offline / Send Message
    Only if your barrel has a funky shape as shown by the UVs, but I suspect it's more or less round. Use Unwrap on those top/bottom caps, and if it gives you trouble, unselect one UV and try again.

    For the sides of the cap, do the same you did with the barrel body, create a vertical seam, so you can lay that out flat.
  • octokitty
    Options
    Offline / Send Message
    octokitty polycounter lvl 14
    yea that's almost there! just divide those top and bottom caps so there aren't any polygons over 4 sides, and i think it's good. The only other thing is what throttlekitty said, your barrel has a strange shape? but if that's how you want it then you could move on to texturing.
  • Xaltar
    Options
    Offline / Send Message
    Xaltar polycounter lvl 17
    Now you are getting there mate, UVs get super easy once you understand the basics, once you have the basics down you can then afford to spend time on them working out things like pixel density etc. For now though just keep practicing unwrapping stuff. If you want some more models to practice with take a look in the SDK thread and pick up some of the models and reunwrap them for practice. Before you get to textures get your unwrapping down. Understanding your UVs will also help you with texturing down the line and vice versa. When you start painting textures start on low res textures (like your attempt in the realeas the heads thread), they will be quicker and really force you to think about your layout and use of brushes and color. Slaping down a photo and smudge/copy paste things around will help you get an idea of how things are painted but be carefull not to fall into the trap of using photosource then calling it done, you need to actually paint your textures to improve, the photos should be a guide, not the final result.

    That said, it is nice to see that you take the advice given and put it in practice. Keep up the good work and positive attitude and you will learn fast ;)
  • n88tr
    Options
    Offline / Send Message
    throttlekitty, are you saying i should unwrap the sides of the top cap like i did with the body of the barrel?

    also would it be worth looking into normals and a spec map for this piece?
  • throttlekitty
    Options
    Offline / Send Message
    Yes, your aim in UV mapping is to (usually) match the 3d shape as best as possible to avoid texture distortion. For a flat part such as the ends of the barrel, there's no reason not to.

    As for normals and spec, that's up to you. I haven't followed the thread that closely, I don't know what your aim for this barrel is. If you want the practice, then by all means, do it.
Sign In or Register to comment.