Home 3D Art Showcase & Critiques

Destroyed bridge scene

1
polycounter lvl 6
Offline / Send Message
jordan.kocon polycounter lvl 6
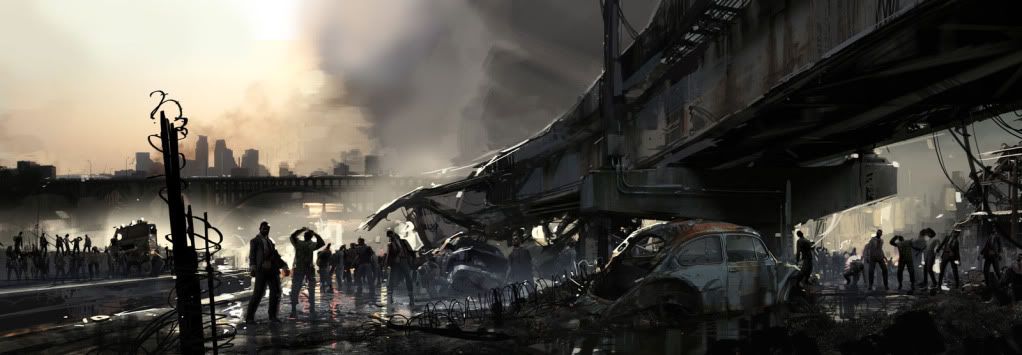
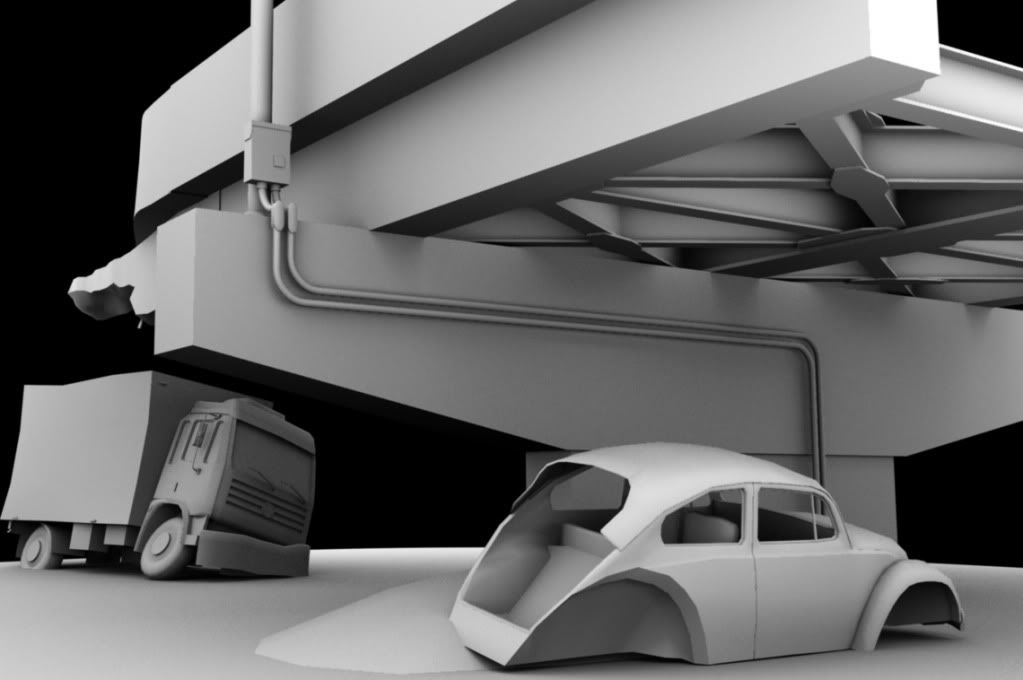
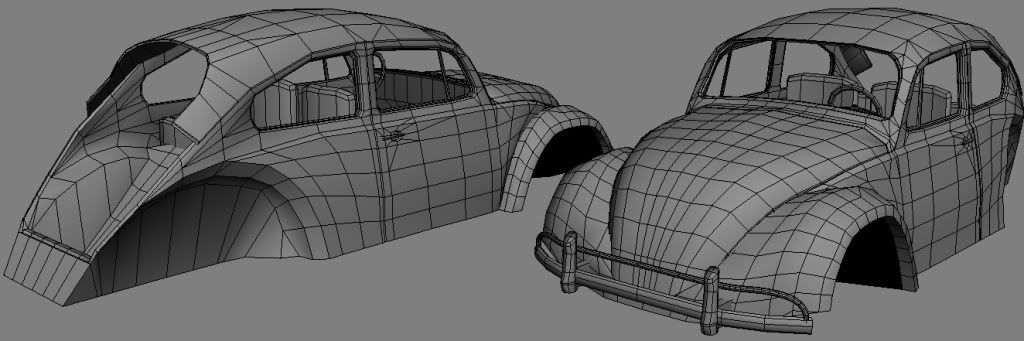
Hey all, I'm starting my new environment. I'm going off of a piece of concept art from left4dead (I'm not copying it 100% but sticking quite close). Here are some shots of what I have. Considering the beauty shot will be near the ground, looking up at the bridge like in the concept, I figured I could cheat the top of the bridge a bit and just make 1 modular piece and duplicate over and over on the top (so I can still do a top down render). As for the vehicles I hope I didn't get too crazy with the poly count on them. Any and all C&C is greatly appreciated! :) Also I hope I have properly presented this.

left-4-dead-2-wallpaper-bridge-concept-art.jpg
wip2.jpg
wip1.jpg
wip3.jpg
wip4.jpg

Replies

  • warby
    Options
    Offline / Send Message
    warby polycounter lvl 18
    thats a solid start :) will keep an eye on this one
  • daylehodgson
    Options
    Offline / Send Message
    really looking forward to seeing this. keep it up :)
  • Habboi
    Options
    Offline / Send Message
    Habboi sublime tool
    Good start, lighting and atmosphere will be the key, good luck.
  • jordan.kocon
    Options
    Offline / Send Message
    jordan.kocon polycounter lvl 6
    Haven't done much at all in the past 2 days :( Hoping to get a let done tomorrow and friday, I plan to finish, or near finish my low poly. I'm wondering how this destroyed rock is looking? I will of course be taking it into zbrush to further add detail. C&C as always would be great, though I know this is a small update.

    Untitled-2.jpg
    Untitled-1-2.jpg
  • jordan.kocon
    Options
    Offline / Send Message
    jordan.kocon polycounter lvl 6
    Alright so I changed the direction of the twisted metal and cement to try and look less random, and more like something exploded on the bridge. Im posting this in hopes I can get some feedback today while I continue to work.

    Untitled-1-3.jpg
    Untitled-2-1.jpg
  • jordan.kocon
    Options
    Offline / Send Message
    jordan.kocon polycounter lvl 6
    Alright another minor update, added a fence on the one side to add some closure to the scene, and a road on the other side. The road is a little hard to see right now without a texture, but that's what it is.
    Untitled-1-4.jpg
    Untitled-2-2.jpg
  • SnaFuBAR
    Options
    Offline / Send Message
    The lack of collapsed sections/rubble from a topside explosion, along with a panel truck where that should be will make for a break in the suspension of disbelief later down the line. I suggest you revise the placement of the truck, as it wouldn't even be there. As for the VW, I would just get rid of the front bumper all together and maybe just pop the front lid (trunk) instead.

    The bridge looks awesome. Maybe you should accentuate the destruction on the bridge? For having a seemingly demolition sized blast theoretically be the cause of the bridge damage, there's sure a lot of thin metal in fine condition near where the explosion occurred.

    You're off to a fine start, just remember this scene is telling a story, so try to make one up behind all the destruction :)
  • jordan.kocon
    Options
    Offline / Send Message
    jordan.kocon polycounter lvl 6
    Snafubar: thanks for the comment! I havent placed the rubble yet, that's about my last thing to do before going into Zbrush, I plan to add a lot of pieces of cement and rebar. I'll try moving the truck, perhaps even onto the road. As for the VW are you suggesting adding the back windo and trunk, and then doing the opposite on the front by removing the hood?
  • sltrOlsson
    Options
    Offline / Send Message
    sltrOlsson polycounter lvl 14
    Hi. Looks cool! I have no real crit, just wanted to share this with you. It's some reference pictures a guy on eat3D forum toke.

    I'll keep an eye on this :)
  • Harbinger
    Options
    Offline / Send Message
    Harbinger polycounter lvl 8
    There's something about the scale of the bridge that's throwing me off. I keep flipping back and forth between the concept and your 3D shots, and I think the bridge is too small. From the concept, if I base the bridge scale off of the VW Beetle it looks smaller than if I compare the scale base on the zombies.

    Looks very promising though. Maybe once there's some small rubble and debris the scale will resolve itself.
  • jordan.kocon
    Options
    Offline / Send Message
    jordan.kocon polycounter lvl 6
    himadri_sm: Thanks :) I'll throw some wire frames up right now

    sltrOlsson: Cheers for the reference! Definitely some really cool destruction in that picture, I'll be trying to incorporate that into my scene for sure.

    Harbinger: I agree that the scale at the moment does seem a little strange. I think some time next week I'll be adding the debris. This is when I have class with one of my teachers who can help me with sculpting the rocks. As for the debris I'm thinking about using the ICE physics engine in soft image to randomly place the debris, is this the right approach do you think or just hand place?

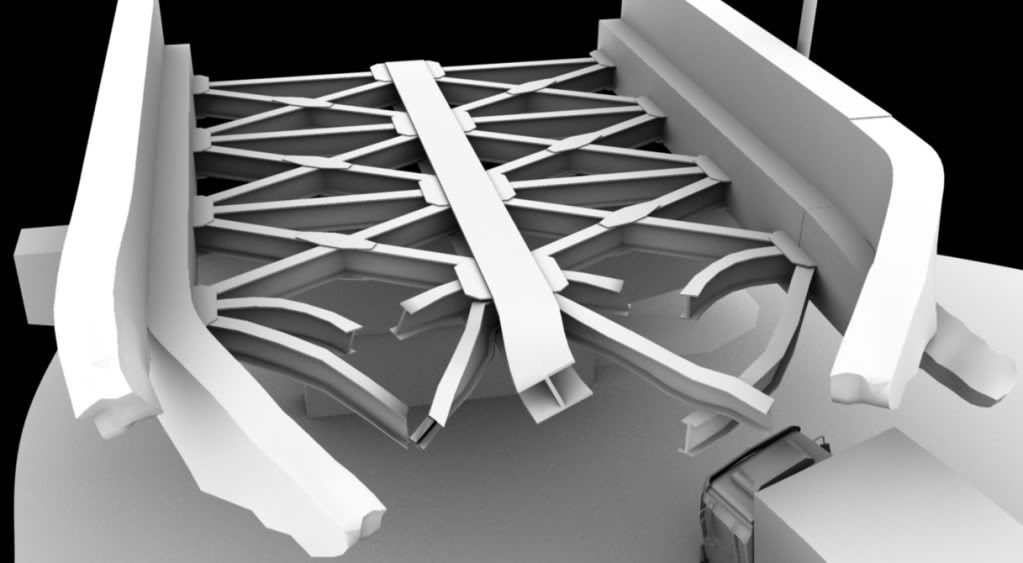
    I also Included a quick drawing of something I was thinking of doing to the bridge to add more interest (basically slanting down the broken part and adding a second break). At the moment the scene is a total of 43,000 triangles

    wire1-4.jpg
    wire2-3.jpg
    wire3-2.jpg
    wire.jpg
  • sltrOlsson
    Options
    Offline / Send Message
    sltrOlsson polycounter lvl 14
    Their is some scripts for and max that places objects/object over a specified surface - randomly. It can be a good start for some of the debris that will be scattered all around and reused. But i would say go with a physics system if you can. Always looks more convincing.
  • Mathew O
    Options
    Offline / Send Message
    Mathew O polycounter
  • Mark Dygert
    Options
    Offline / Send Message
    Looking great! Keep up the good work. Any plans to reign in the poly count a bit and drop it in a something like UDK? The reason I ask is that some of the tools in UDK can help speed up certain tasks that might take longer in max/maya/softimage.

    If you're using 3dsmax check out the paint object scatter that was included in the graphite modeling tools in 3dsmax2011. Or if you're on an older version check out Soulburn scripts, he has a great object paint scatter/randomizer. He also has some great tips for using physics to pile up rubble and scatter debris around.
  • Rurouni Strife
    Options
    Offline / Send Message
    Rurouni Strife polycounter lvl 10
    Awesome start! This could be absolutely awesome! I'd love to see this in something like UDK or CryEngine
  • jordan.kocon
    Options
    Offline / Send Message
    jordan.kocon polycounter lvl 6
    sltrOlsson: Unfortunately I only know softimage and maya, so I'm unsure how to use the script in max, though I do know the one you are talking about. ICE in softimage is pretty easy to use for basic collisions though.

    Mathew O: Thanks for the subscription :)

    Mark Dygert: The last scene I did I tried bringing it into UDK, but ended up doing my final render with mental ray. Once again with this scene I will probably try bringing it into UDK, im trying to learn it, but it seem like setting up materials and lighting is quite complex. If all else fails It'll be another mental ray render. As for the poly count, I will clean it up when I'm finished all my low poly stuff, before I zbrush/unwrap.

    Rurouni Strife: Thanks!

    Seeing as today is valentines day I will be spending all day with my girlfriend which unfortunately means no updates. However I should be back on it tomorrow! I think a day away from the project may do me some good as well :)
  • sltrOlsson
    Options
    Offline / Send Message
    sltrOlsson polycounter lvl 14
    First of i have to say it's unfair to leave us without any thread love! Second, i was supposed to write "Their is some scripts for maya and max..." :D

    Now i'm gonna stop cluttering you thread and wait for an update :D
  • jordan.kocon
    Options
    Offline / Send Message
    jordan.kocon polycounter lvl 6
    Sorry for the lack of thread love sltrOlsson ;) This isn't a big update, been slacking hugely, and having a hell of a time with the debris. Here is where I'm at now, it consists of 3 different rocks, 1 piece of rebar and 1 eye beam, all duplicated and dropped using physics. I'm somewhat pleased with the result but still think it could be a lot better, perhaps someone else can spot what I'm missing to get the right 'feeling'.

    Untitled-1-5.jpg
    Untitled-2-3.jpg
  • SHEPEIRO
    Options
    Offline / Send Message
    SHEPEIRO polycounter lvl 17
    model and texture as you go...dont leave the uv'in and texturing till last...its a common mistake th etexture can often add to or influence the modeling and also i find it helps with breaking up the workflow

    also if your working in-engine then this should come as a natural process.... get it in... check it out...see whats wrong and fix it...add more art etc etc

    if you leave "getting it in" till the last you wont acheive best results and it will be a slog...but do it as you go and it wont be, it will be as natural as possible and you will learn as you go in small manageable chunks
  • sltrOlsson
    Options
    Offline / Send Message
    sltrOlsson polycounter lvl 14
    Looking good! I can't get the the question, were the fuck did the other side of the bridge go? :D I guess it's out side of your scene.

    Something is missing, maybe some big ass cracks in the brdige?
  • SimonT
    Options
    Offline / Send Message
    SimonT interpolator
    looks really cool!
  • Matroskin
    Options
    Offline / Send Message
    Matroskin polycounter lvl 11
    SHEPEIRO wrote: »
    model and texture as you go...dont leave the uv'in and texturing till last...its a common mistake th etexture can often add to or influence the modeling and also i find it helps with breaking up the workflow

    also if your working in-engine then this should come as a natural process.... get it in... check it out...see whats wrong and fix it...add more art etc etc

    if you leave "getting it in" till the last you wont acheive best results and it will be a slog...but do it as you go and it wont be, it will be as natural as possible and you will learn as you go in small manageable chunks

    +1

    I am already seeing unwrapping all that geo (especially the small rubble pieces) as a long routine task :P Can imagine how time wasting it will be later.
    Get at least the unwrap and base tiled texture pass asap in order to avoid wasted time or bad look on later stages.
  • warby
    Options
    Offline / Send Message
    warby polycounter lvl 18
    SHEPEIRO wrote: »
    model and texture as you go...dont leave the uv'in and texturing till last...its a common mistake th etexture can often add to or influence the modeling and also i find it helps with breaking up the workflow

    also if your working in-engine then this should come as a natural process.... get it in... check it out...see whats wrong and fix it...add more art etc etc

    if you leave "getting it in" till the last you wont acheive best results and it will be a slog...but do it as you go and it wont be, it will be as natural as possible and you will learn as you go in small manageable chunks


    massive amounts of truth detected !
  • jordan.kocon
    Options
    Offline / Send Message
    jordan.kocon polycounter lvl 6
    SasoChicken: Thanks :D

    SHEPEIRO: I agree I should have done that. I have done some unwrapping as I go, but I definitely haven't done any texturing. I've skipped over to UV'ing what I have, on my next environment/piece I will for sure texture as I go.

    SltrOlsson: I agree, something is missing, I will be zbrushing in lots of cracks and destruction. As for the second piece of the bridge... it should in theory be in my scene but due to time and such I'm leaving it out.

    SimonT: Thanks :)

    Matroskin: All the rubble (the 3 rocks that make it all up, the 1 piece of rebar and beams) were all unwrapped before being dropped into place.

    Will most likely post some zbrush work in progress later today. Anyone have any tips on how to zbrush cement destruction or good alphas?
  • jordan.kocon
    Options
    Offline / Send Message
    jordan.kocon polycounter lvl 6
    Alright so I've just started sculpting, things should start progressing quickly. This while be my first time in Zbrush doing something other than a character, and more specifically doing high res detail to bake into the low res model. Any thoughts on the direction I'm taking for broken cement?
    2.jpg
    Untitled-2-4.jpg
    stone1.jpg
    Untitled-1-6.jpg
  • letronrael
    Options
    Offline / Send Message
    this look really nice so far!
  • jordan.kocon
    Options
    Offline / Send Message
    jordan.kocon polycounter lvl 6
    So I did the 3 rocks that compile all of the rock debris. Overall I am pleased with the result, any C&C on them would be nice though as I've never done rocks before :)

    rocks.jpg
  • Artifice
    Options
    Offline / Send Message
    Both your rocks and your concrete look way too smooth. It's a common problem with ZBrush that a lot of the tools end up being really blobby/organic, and you've got to be careful to keep the harder lines. Remember, concrete has larger stones in it. Don't be afraid to make it chunky. Yours looks like it's got minor skin irritation, when what you need is a full on rash of boils. Where it's broken needs to be really jagged, not the smooth slope like what you've got now. Also, ZSub instead of ZAdd on your concrete. It shouldn't be poking out where it's broken, but chipped in.

    Your rocks look really weathered. The third one is the best out of the three, but still has room for improvement. While there are stones out there that look like yours, they're not very interesting. Get some hard lines in there, shearing, cracks, etc and you'll have some interesting looking rocks.

    What you really need to do is close ZBrush and open Google. Reference, reference, reference. Keep working at it, get some interesting planes, angles and details going. The blockout you have is really great, it's important to have the details be just as good.

    Concrete
    Concrete
    Rock
    Rock
    Rock
  • jordan.kocon
    Options
    Offline / Send Message
    jordan.kocon polycounter lvl 6
    Artifice: I agree that the rocks were too smooth, good eye on the fact I was using ZAdd and not ZSub ;) I will admit that, like a noob, I didn't use reference and just made what I thought looked like cool stuff. Thanks a ton for the reference pics, combined with those, and some more I found, I ended up with a much more desirable result for my cement rubble.

    As stated before this was my first crack in ZBrush at something like this. This rubble is all small pieces, so I don't want to focus on it too much and continue on with my scene.

    cement_rubble.jpg
  • Artifice
    Options
    Offline / Send Message
    Hey, now that's more like it! Those sell themselves much better. Don't feel bad about your first crack at it, it's not easy at all. As the incredibly talented Autocon posted in the Rock Tutorial thread just moments ago...
    Autocon wrote:
    Rocks are the hardest thing to do well in 3d. Most games have terrible rocks from what I have seen. I think a big problem is people just go strait to sculpting there rocks which is horrible. Focus on modeling out the big forms and shapes first.

    One last crit, you might tone down/shrink/vary the noise on those, as it looks a bit uniform. Though it may work well once you get them textured... You can always revisit this stuff down the road if it's not working.

    Anyway, as I said, I really like your block out and where this is going. Keep it up!
  • pthomas1172
    Options
    Offline / Send Message
    pthomas1172 polycounter lvl 10
    real quick,

    I try to do this when I make broken concrete
    - TRIM DYNAMIC to get a more faceted feel.
    - GOUGE to get a refined broken look
    - then alpha some cracks and pits.

    Also be careful, a lot of detail can get lost in the normal so don't go off!
  • sltrOlsson
    Options
    Offline / Send Message
    sltrOlsson polycounter lvl 14
    That wont sell as concrete i'm afraid. Look at what damaged concrete blocks like. There smooth and flat and nice, and then with a very sharpish edge, a broken one, it turns into the uneven concrete mess that we love.

    I'm trying to create a broken-ish concrete ceiling. I'm not sure if i'm going to use this, but the technique i used worked pretty well.

    It goes like this.
    • Save a morph target.
    • Fuck shit up with fast mallet brush and clay buildup. I use clay build up to get some nice holes in. Use spray and a square alpha.
    • Use morph brush with spray and a square alpha here to and paint back the edges you want.
    • Fuck shit up more, morph bake more.

    Try it out!

    2nst0ki.jpg
  • jordan.kocon
    Options
    Offline / Send Message
    jordan.kocon polycounter lvl 6
    Artifice: I think it does look a lot better from before, but can definitely still use some work.

    pthomas1172: Thanks for the method, I'll definitely give it a try, and see if I can't get it to work :)

    sltrOlsson: What are morph targets? :P
  • sltrOlsson
    Options
    Offline / Send Message
    sltrOlsson polycounter lvl 14
    A sorry, it gives you the possibly to "freeze" your model at a certain stage. So that you can A, go back to it completely or B, paint information on your model away.

    Try this, open the sphere. Under morph target klick "store MT". Paint some shit on there. Then select the morph brush and paint over the shitines and watch it disappear :)
  • Artifice
    Options
    Offline / Send Message
    There's always room for improvement. :) You seemed ready to get them in there and move on. It's actually not a bad idea to just get them in the scene with a little bit of texture to see how it all works, then do a second texture pass when things like lighting are a little more defined. You'll save yourself a lot of time not going over the top, just to find out it didn't work or you didn't need it.

    A morph target is basically a second mesh that you can 'morph' in between...like a smile and a frown on a face, or between a brand new and cracked and damaged concrete pillar. Morph targets and blends are a lot more than that, but those are the basics as far as sltrOlsson's example. Basically, you can make a morph target of your basic, unsculpted mesh, beat the crap out of it, and use the Morph Target brush to paint back in the original, thus painting out the damage. Think of it as a repair or undo brush.

    http://www.pixologic.com/docs/index.php/Tool:Morph_Target_Subpalette
    http://www.pixologic.com/docs/index.php/Morph_Brush
  • jordan.kocon
    Options
    Offline / Send Message
    jordan.kocon polycounter lvl 6
    SlrtOlsson + Artifice: Thank you guys so much for the info/help on this morph function. I think my sculpt its looking 1,000,000,000 times more like concrete! :) I still needs lots of practice and have a long way to go, but I really think this is the right direction. One question, when using the morph brush, how are you getting such sharp edges? Im using a free hand stroke with a square alpha (made in photoshop with no soft edges) but I'm still getting soft edges.

    Untitled-2-5.jpg
    concrete.jpg
  • sltrOlsson
    Options
    Offline / Send Message
    sltrOlsson polycounter lvl 14
    Yeah, that's a real step up! I use spray with some tweeked settings in the strokes pallet. Then you need to remember to keep a very low focal shift. i use about -85. And intensity set up to 100 for the morphing..

    I have only used the square alpha that's in the library in zbrush, works fine for me (:
  • jordan.kocon
    Options
    Offline / Send Message
    jordan.kocon polycounter lvl 6
    Another small update, this piece was a lot harder to sculpt for some reason, after a lot of fighting I got something I'm pretty happy with. Have to do the other piece that goes on top of this one, and the broken chunks at the end

    bridgeSide.jpg
  • jordan.kocon
    Options
    Offline / Send Message
    jordan.kocon polycounter lvl 6
    So I threw everything into UDK, trying to learn it, hoping I won't have to resort to another mental ray render, but I dont know UDK at all. Here is how it looks in UDK, with some normal maps applied. Here is some pics of the scene (trying to light it but not sure what lights to use). I really have no idea how to present UDK screens either, so sorry about that...

    Untitled-2-6.jpg
    Untitled-1-7.jpg
    Untitled-3.jpg
  • sltrOlsson
    Options
    Offline / Send Message
    sltrOlsson polycounter lvl 14
    Ah! Besides some normal issues on the mesh it looks great! If you'r lazzy, like me, check out marmoset. But then, UDK is a great and fun tool when you know it.
  • jordan.kocon
    Options
    Offline / Send Message
    jordan.kocon polycounter lvl 6
    Ya I have marmoset, it seems better for single item renders. I also can never get my normals looking right in it. But here is a quick update, did some texturing, figured out lighting a bit. I followed the eat3D old pillar tutorial closely for this. I really like how it came out, and will be following this style for the scene

    Edit: The pillar looks a lot less dark in the scene, not sure why the screen shot is so dark

    pillar.jpg
  • sltrOlsson
    Options
    Offline / Send Message
    sltrOlsson polycounter lvl 14
    I think the "broken parts" needs some loving. Both normal map wise, and texture wise.I feels a bit bland atm. Make that shit pop!

    Regarding Marmoset and normals, you use the same settings as if it where maya right? I think it kinda works with bigger scenes to. Mostly the camera that is a bit funky.
  • SimonT
    Options
    Offline / Send Message
    SimonT interpolator
    A good inspiration source could fallout 3 be. I would ask myself why the big car is in that position under the bridge. Wouldn't it be more logical that it crashes down from the bridge?
  • jordan.kocon
    Options
    Offline / Send Message
    jordan.kocon polycounter lvl 6
    SltrOlsson: Yea I agree, they aren't popping like I'd like. Trying to figure out the best way, got them looking a bit better I think. As for marmoset yes, I'm using the same settings, I was just wondering if there is anything special you have to do (like in UDK you have to invert the green channel on normals).

    SimonT: I didn't think to check out fallout, I'll definitely google some of it. As for the car it would be more logical that way, but I placed it according to the concept.

    So here is an update on texturing, still plugging away, C&C welcome :)

    Untitled-1-8.jpg
    Untitled-2-7.jpg
  • jordan.kocon
    Options
    Offline / Send Message
    jordan.kocon polycounter lvl 6
    Here is another texture update, worked on the lighting a bit as well. Comments?

    wip1-1.jpg
    wip2-1.jpg
    wip3-1.jpg
    wip4-1.jpg
  • mrturtlepaste
    Options
    Offline / Send Message
    Hey man, this scene is really starting to come together. I am a little confused about the purpose of this overpass. Right now because of the way you have divided the lane it seems more like a bikepath highway :p The size of your cars vs the size of the lanes seems a bit mis-matched. Maybe just make it a one-laner on both sides?

    edit: maybe the perspective in the shots is just confusing me?
  • jordan.kocon
    Options
    Offline / Send Message
    jordan.kocon polycounter lvl 6
    mrturtlepase: The overpass is actually a train bridge. The rails on it are painted yellow (I thought it looked more interesting than just plain metal), however I didn't think about the confusion it would cause, as the center line of roads are yellow... or white... So basically my idea was 2 small trains, like LRT's would fit on this, going in opposite deirections.
  • Artifice
    Options
    Offline / Send Message
    It's starting to look good! Regarding your textures, I think the concrete is either a bit splotchy, or your lighting is dim. You run the risk of everything being noisy and not reading well. You might try lowering the opacity of the weathering/grime a bit.

    The other issue I see is the noise of the girder texture. It's not only noisy but the tiling is obvious (the circular rust spot on the left or right side of the texture). I'm also thinking it's a bit too rusted. Those girders are structural steel and painted with anti-rust solution. A little bit is ok, especially where there's damage, but as far as general weathering, it'd be in better shape than the rest of the metal in the scene.

    Keep going, it's really getting there.
  • jaysmith
    Options
    Offline / Send Message
    its looking awesome mate but yeah, i second what artifice is saying about the girders, but keep it up mate :)
  • sltrOlsson
    Options
    Offline / Send Message
    sltrOlsson polycounter lvl 14
    Atm it feels much more like a bike bridge or something. I think you need to pupt propper tracks and dirt to make it look like, yeah tracks :P

    Look at roosterMAP's concrete literary! I think you'll get some cool idea from that little project. The broken part of the concrete for example, i think i really nailed it.

    What about the VW beatle? The textures looks a bit strange. Super scratch put clean.. I say, turn down the amot of scrates, alot. Add some rust. Dirt it up.

    You should try to find in some lights under the bridge. A barrel with some burning shit in it. A small street light or something under he bridge. And maybe a bigger streetlight to?

    Keep at it! :)
1
Sign In or Register to comment.