UDK Environment: "Vertcon Center"
polycounter lvl 7
I've found myself slacking quite a bit lately and feel I have to raise the bar on my work, so I've decided that my next project is to create an environment in UDK. I have been really inspired by the work on this site and I hope that I can meet the same quality this community sustains. Be it looking through the advice in adam's Building an environment thread or working through a 3dmotive tutorial, this community has been a GREAT resource. I have never attempted an entire environment before, nor have I really worked with UDK, so I hope this will be another great learning experience.
I plan to make a routine out of asking at least one question every time I update the thread with a post. I feel I should know a lot more than I do as I often find myself lost while modeling, and it has become very frustrating. I'm hoping to not only learn better techniques, but also become a bit more technical.
The Vertcon Center is a club influenced by the House of Blues that incorporates some technological elements that place it in the near future. I wanted to push the capacity a bit more than the House of Blues because I'm a fan of large open environments, but not so much that the design would become difficult. The idea is to use a minimalistic, clean, and semi-colorful style.
Goals
Concepting ideas out
Color/Size/Style concepting
I've got the main "shell" below, I'm still not sure if I like how the balcony's look. The lights and rails are temporary, but I think I may have to bump up the size on the rails so they read a bit more clearly.
So, that's what I have so far. Now on to da' questions!
First: The way I currently have this set up is that the main shell (corner above) will be one asset that has it's own texture/norm/spec. I'll import that, then simply place the smaller assets (railings, speakers, lift, lights, jumbotron, cameras) around the level as needed. I'm hoping if I use UV space correctly it can work with a single 2048 texture map. Should I break up the shell into more modular pieces, or is it okay as it is?
Second: (rendering) I know very little about rendering setups (besides AO renders), and right now the above is using MR with three mr omnis. The only problem is the object is blown out with or without the omnis, and I can't seem to get any shadows in the crevasses. I've applied far attenuation but that doesn't seem to do much, it's almost as if there is a skylight present. What am I doing wrong? Any suggestions?
Thanks!
I plan to make a routine out of asking at least one question every time I update the thread with a post. I feel I should know a lot more than I do as I often find myself lost while modeling, and it has become very frustrating. I'm hoping to not only learn better techniques, but also become a bit more technical.
Vertcon Center Environment
OverviewThe Vertcon Center is a club influenced by the House of Blues that incorporates some technological elements that place it in the near future. I wanted to push the capacity a bit more than the House of Blues because I'm a fan of large open environments, but not so much that the design would become difficult. The idea is to use a minimalistic, clean, and semi-colorful style.
Goals
- Create a detailed and quality environment in UDK.
Every asset is important, big or small. I have to learn to take my time and be patient. I have a habit of rushing smaller details because I want to move on to the bigger/more fun aspects, but it doesn't seam to be conducive to good art/visuals. I feel I could be much more efficient in what I learn if I slow down and allow myself to actually take in what I'm doing. - Learn UDK: how to set up effects, animations (camera movement, lifts, jumpbotron), and properly light a scene.
I'm hoping (i.e. looking for any excuse) to use Adobe After Effects at some point. I don't particularly know why I want to learn AAE so much, but I think it would be helpful to know. I'm also not completely sure what effects I could even make for this environment bar a smoke effect for when the stage rises. Perhaps I don't even need any effects? - Secondary: Create a 1-2 minute video showcasing the environment as an artist performs.
This is a big "maybe" as I have a big enough challenge ahead of me as it is, but it's an exciting thought none the less. I haven't animated anything besides the biped (no rigging), nor have I done any character modeling, but if all goes well I'd love to give it a shot at the end of the project. It would also make sense to have an audience at that point, which would probably be done as 2d cutouts like a sports game. This would also give me another reason to mess around with After Effects!
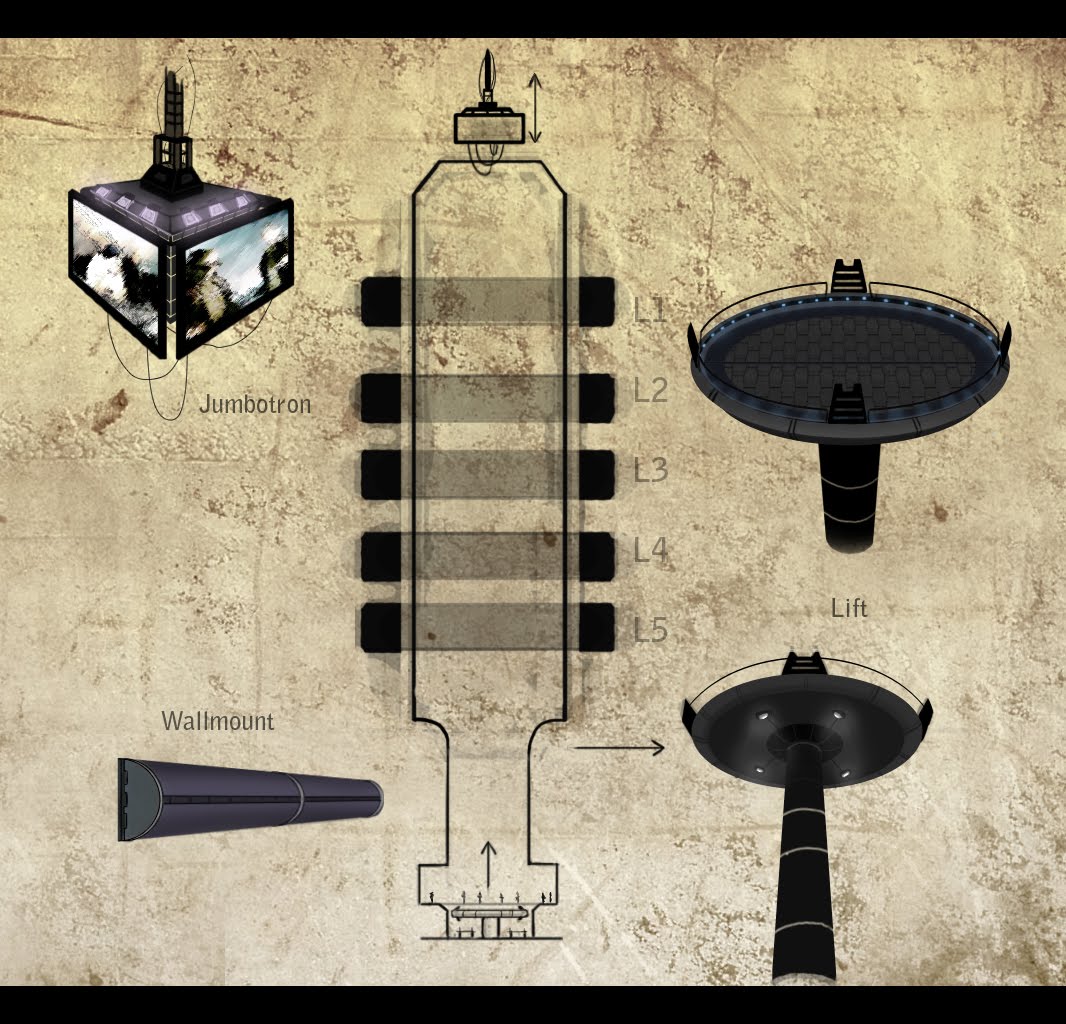
- Stage doubles as a lift. Raises to the "performance" level (ground level), lowers to the private/preperation/performer level.
- Retractable roof jumbotron. Projects images of both the performer (taken from two rotating cameras on the "performance" level) and any accompanying images/video.
- Two rotatable cameras, able to circle 360° around the performer.
- Truss light rig suspended just below retractable hatch.
- Suspended mega-speakers along the inner walls. Glowy bits?
- Encompassing bar around main performance pit. Four elevator shafts at N S E W. Stairs?
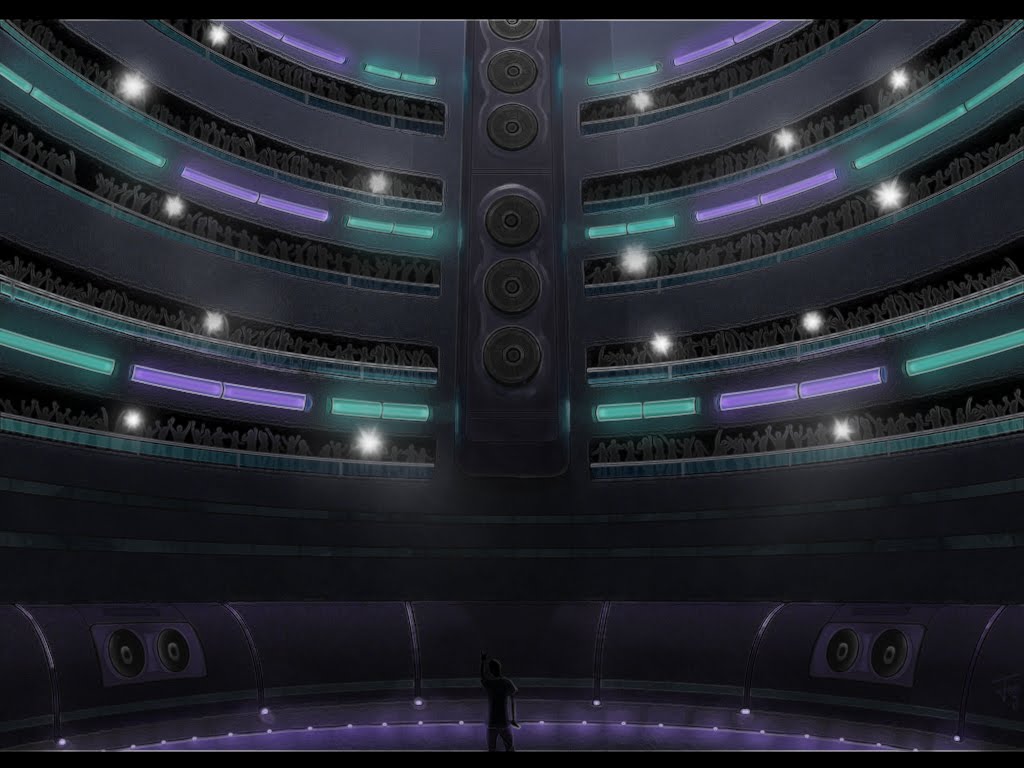
- Low emitting lights, environment on the darker side?
- Medium saturation colors: purples/teals/lightblues? maybe purples/greens/bright greens?
- Thin electronic plasma/hd signs along the inner pit walls? Note: Need reference.
- Large encircling lights around the pit every other floor, main source of light in the pit? Teal/Purple neon-ish lights.
Concepting ideas out
Color/Size/Style concepting
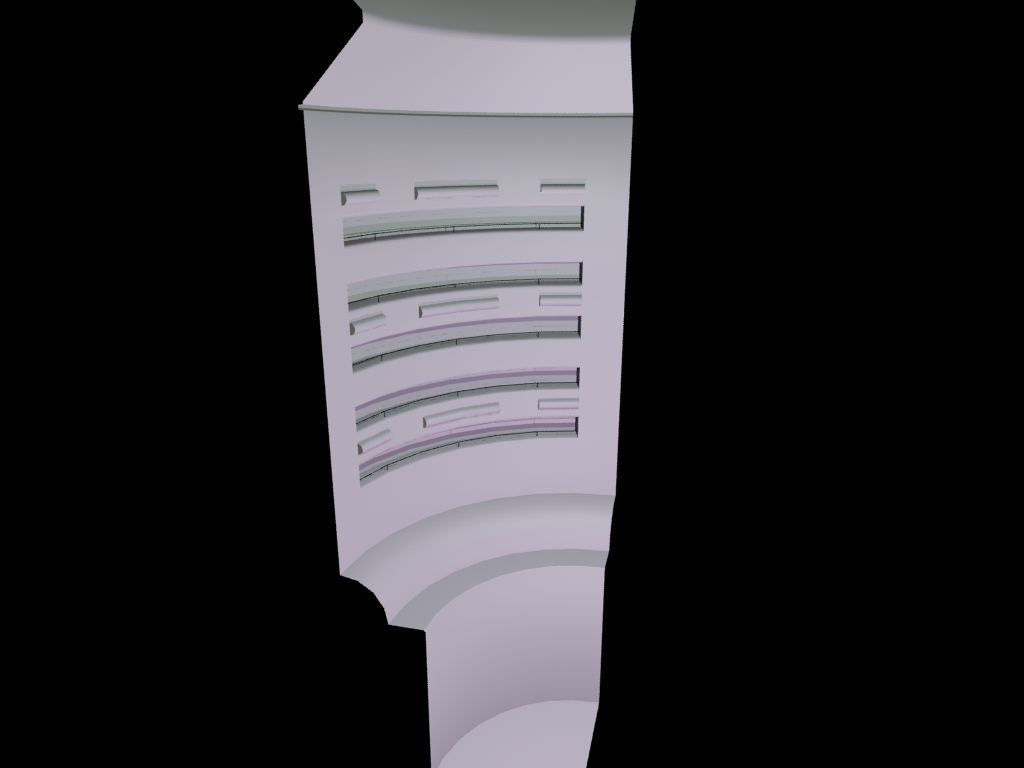
I've got the main "shell" below, I'm still not sure if I like how the balcony's look. The lights and rails are temporary, but I think I may have to bump up the size on the rails so they read a bit more clearly.
So, that's what I have so far. Now on to da' questions!
First: The way I currently have this set up is that the main shell (corner above) will be one asset that has it's own texture/norm/spec. I'll import that, then simply place the smaller assets (railings, speakers, lift, lights, jumbotron, cameras) around the level as needed. I'm hoping if I use UV space correctly it can work with a single 2048 texture map. Should I break up the shell into more modular pieces, or is it okay as it is?
Second: (rendering) I know very little about rendering setups (besides AO renders), and right now the above is using MR with three mr omnis. The only problem is the object is blown out with or without the omnis, and I can't seem to get any shadows in the crevasses. I've applied far attenuation but that doesn't seem to do much, it's almost as if there is a skylight present. What am I doing wrong? Any suggestions?
Thanks!
Replies
Really unique environment you're gonna be making here, loving the concept, will be nice to see it in 3D, you might have to add more in, since you won't have character models in there(?)
Good to see an environment which isn't a sci-fi hallway, can't wait to see when you start testing it out in the UDK.
Good luck!
Update:
I didn't have the best weekend due to storms cutting power in my area and work constraints, but I did manage to get some work on the high-poly version of the lift done! It's my first high-poly model and I have to say it's very fun, yet not nearly as easy as I thought it would be.
The high poly is at 141,000 tris, but I must admit it certainly doesn't look like it in the render. I realize now my initial idea for the lift doesn't have much detail to it, so I'm considering adding more (I'm not sure what right now). The underside of the lift is incomplete and so I'm not going to bother showing it.
Question: A substantial portion of my tris is currently being spent on chamfered edges (4+ segments in most cases) so there aren't hard edges, but will that detail even come out in a low poly? Say I have an edge that the high-poly has chamfered with six segments (pretty smooth), would I make the low-poly chamfered with only two or three segments? And would that smoothing come through nicely with the high poly bake?
Among other things, I managed to cut the tris down by nearly 50% (79,000) somehow, I think it looks better though despite the difference. I'm going to take a slight break from the lift for a day and begin work on the mega speakers, hopefully I can get some critique before I come back to it.
Question: When I begin to UV map the lift, is it best to overlap 45° slices since it's so large?
As for overlapping UVs. I personally would just make a 1/4 of the platform, UV map it, and then duplicate it 3 times and position accordingly.
Good work so far.
@SHEPEIRO: I honestly don't think I would have considered UV'ing that way, thank you. And I do definitely need some odd details here and there so the lift isn't so symetrical.
I didn't make as much progress as I had hoped on the mega speakers, and like the first lift iteration the speakers aren't coming off as large as they will be with the details alone. As you can see in the concept they;re rather massive, so I'll have to work on it some more to get what I want out of it.
Time to jump back over to working on the lift so I can make the changes needed and then move on. I plan to have it completed over the next day or two!
Question: When making an environment is it ideal to have a hpoly for every asset that makes up the environment, big or small? Right now most of the bigger assets like the lift and speakers will have hpolys, but what about things a bit smaller such as light fixtures and light screens?
oh and if they are "mega" speakers i would look at real reference of big speakers.....they currently look like home speakers scaled up
maybe alot of small speaker heads and a couple of massive bass bin holes would look better
Then you have the different driver types (Woofers, Tweeters, Midrange) that very in size as well because of the type of frequencies they produce.
I completely agree with you that my current high poly simply doesn't convey the scale I'm hoping to achieve, and it's something I'm going to look at fixing very seriously after the lift. I like your idea of adding the relief slits (I'm not sure what those are actually called or what their purpose is, but it's a guess), and I'll probably end up making the speaker size vary. I've got some serious changes to make
EDIT:
It was really bugging me so I made some changes to the mega speaker. I think I'm going to have to re design it a little bit...
One thing I think you should try doing, is placing a block/box/model that will represent the size of a human beside your speaker. Hopefully this will help you grasp the scale you are looking for and help you size components of the model appropriately.
As for the platform, why not add in more speakers for contrasting detail? I hope you don't mind, i did a small paint over to convey my ideas. Basically just random anything to help break up the silhouette and redundancy.
As for hpoly models. In my experience, it is not absolutely necessary to create a hpoly model for every model in your scene. If the player is never going to see/pay attention to the model, or the model is quite small or not important, I would probably pass on the hpoly, And just run the texture through crazy bump.
Keep working hard!
I'll be jumping back and forth between the low poly for these and the other assets I need to complete.