Manitoba crash site - UDK env
polycounter lvl 14
I have a problem, Polycount. I always start vehicles, intending to do an environment for them afterwards, but when the vehicle is done, I just quit and move on to the next one.
So here's a thread about my attempt to do it right. First enviro, then maybe vehicle (well, probably).
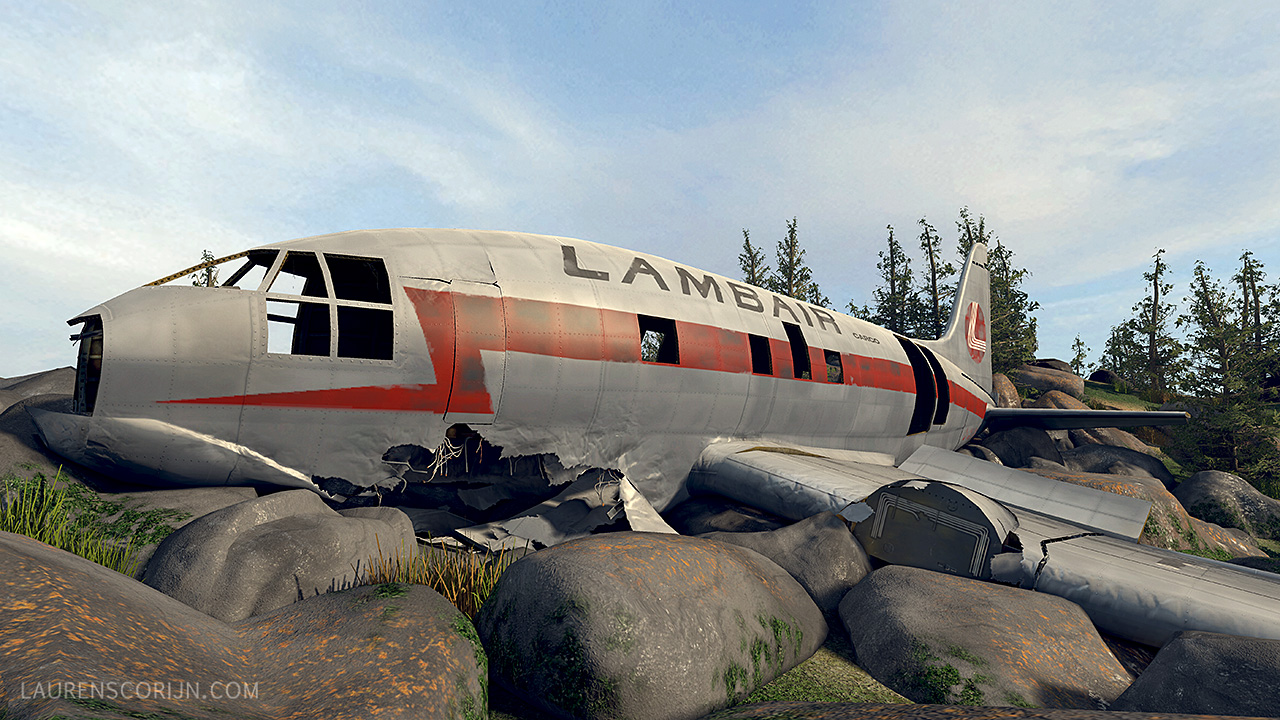
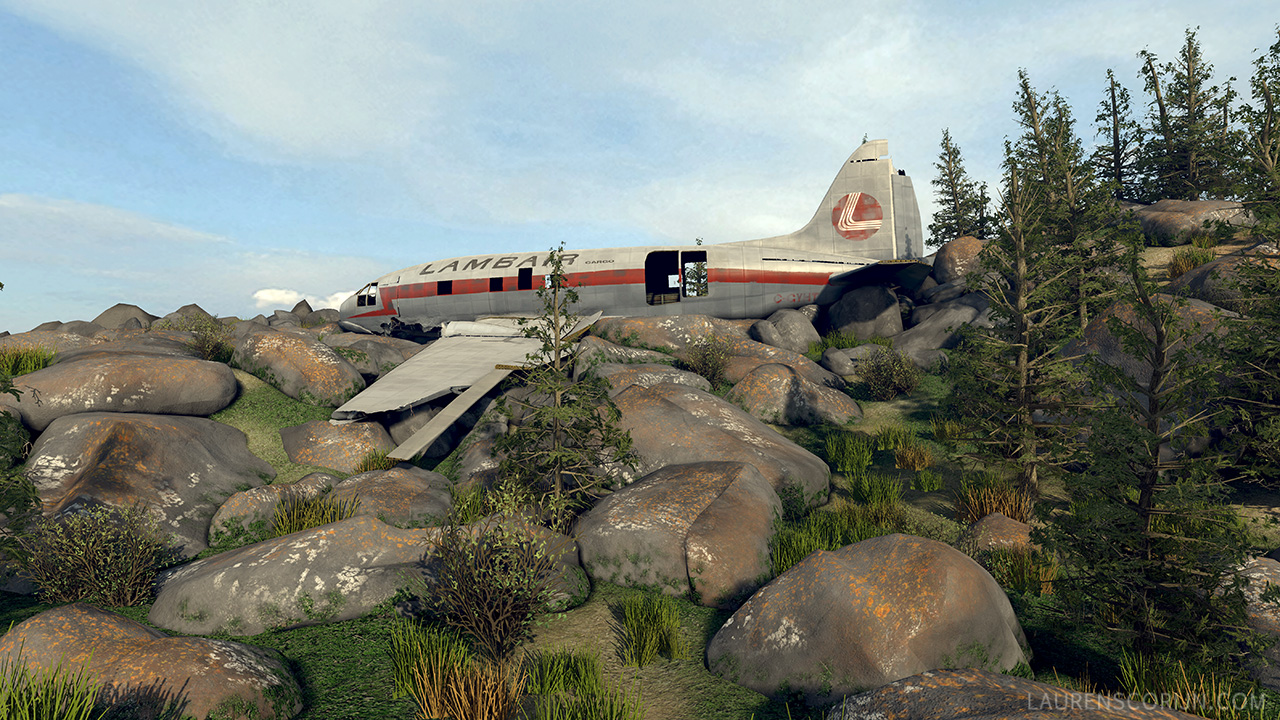
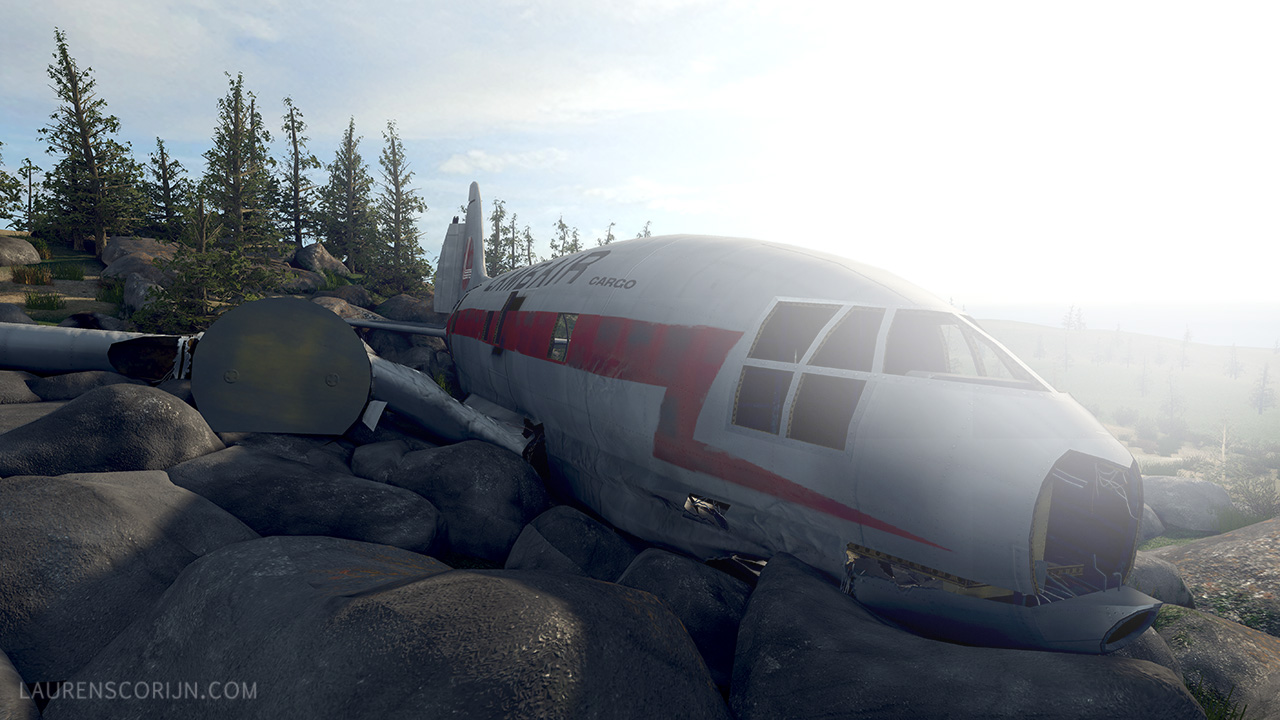
Subject is a crash site near Churchill, Manitoba. It's a Curtiss C46 Commando that has been lying out there for decades, mostly stripped by now:

Current:
Here's what I've got so far in UDK:
http://www.laurenscorijn.com/wipdir/Manitoba/ManitobaWIP1.jpg
http://www.laurenscorijn.com/wipdir/Manitoba/ManitobaWIP2.jpg
Plane will be somewhere on the left top part of the hill.
Please, let me know what you think. I think I like where it's going, but maybe I gotta stick more to the ref with the green terrain and greener shrubs. On some pictures it's more autumn-like, but I might have gone a bit too much brown-orangish.
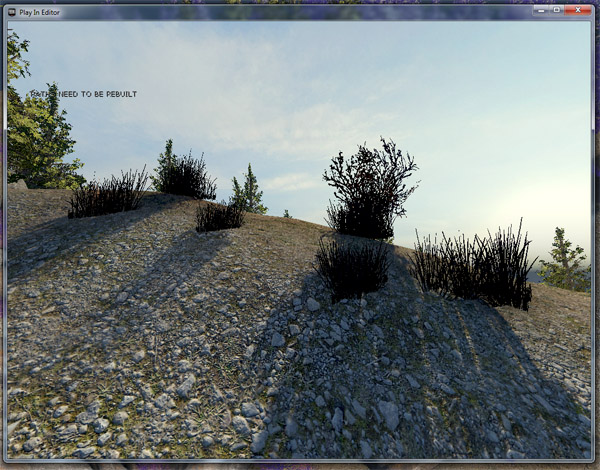
Also, I have a question/problem;
My grass and shrubs look really bad on the side that isn't directly lit by the sun, they're just pure black:
http://www.laurenscorijn.com/wipdir/Manitoba/Vegetproblem.jpg
->fixed by adding somme emissive in material
I've always struggled with this in UDK, any tips ?
Also, next question;
Is there any way to do full random rotation with decolayers? It always keeps Z-up, which is good for vegetation, but sucks for rocks. The ones that are close in view are all hand placed, but it really takes a long time to do those. Or is there something like advanced painter in Max, I just brush and rocks appear fully randomized ?
-> fixed by doing things in Static mesh mode.
So here's a thread about my attempt to do it right. First enviro, then maybe vehicle (well, probably).
Subject is a crash site near Churchill, Manitoba. It's a Curtiss C46 Commando that has been lying out there for decades, mostly stripped by now:
Current:
Here's what I've got so far in UDK:
http://www.laurenscorijn.com/wipdir/Manitoba/ManitobaWIP1.jpg
http://www.laurenscorijn.com/wipdir/Manitoba/ManitobaWIP2.jpg
Plane will be somewhere on the left top part of the hill.
Please, let me know what you think. I think I like where it's going, but maybe I gotta stick more to the ref with the green terrain and greener shrubs. On some pictures it's more autumn-like, but I might have gone a bit too much brown-orangish.
Also, I have a question/problem;
My grass and shrubs look really bad on the side that isn't directly lit by the sun, they're just pure black:
http://www.laurenscorijn.com/wipdir/Manitoba/Vegetproblem.jpg
->fixed by adding somme emissive in material
I've always struggled with this in UDK, any tips ?
Also, next question;
Is there any way to do full random rotation with decolayers? It always keeps Z-up, which is good for vegetation, but sucks for rocks. The ones that are close in view are all hand placed, but it really takes a long time to do those. Or is there something like advanced painter in Max, I just brush and rocks appear fully randomized ?
-> fixed by doing things in Static mesh mode.
Replies
colour wise i would stick to the colours in the ref IE grassy mossy ground mostly green palnts with the odd brown one, the ground here kind of looks like its crawling up the side of the stones giving a very unregular soft silohette this is nice
trees are looking a touch nuked green get a less saturated deeper tone to them...could we get some close ups
Oh and I fixed the shrub lighting already, went to the UDK thread to ask the same question and someone had just posted a fix there, how convenient!
I also adjusted the spruce color (easy fix, should've done it sooner), so here's some closeups;
http://www.laurenscorijn.com/wipdir/Manitoba/ManitobaWIP3close.jpg
http://www.laurenscorijn.com/wipdir/Manitoba/ManitobaWIP4close.jpg
And I might be being a bit nit picky but trees on mountains tend to grow the opposite of how you have it now... as you go higher, the trees become more stunted and they disappear - you can see this in the ref too
Out of curiosity, what happened to the plane? Doesn't look to be too bad of a wreck.
[ame]
http://udn.epicgames.com/Three/StaticMeshMode.html
This is another method I use that works well for me with lighting vegetation. When you place your decals the normals are perpendicular by default and thus can cause lighting to affect it at undesirable times. If a decal is placed on the ground perpendicular, you can face the normals for the decal up towards the sky or light source depending on the angle of terrain. This will allow smooth lighting transition.
If the decal is placed on a 45 degree angle, for example, and the decal is 90 degrees, have the normals pointed at an angle adjacent as well. This will help catch the lighting based on when the hill receives lighting.
I've got a great script i'll have to share that allows you to select a number of meshes, then select the source terrain, and it will automatically adjust normals based on relative angle and position of terrain its on. Its real quick and easy and helps a lot. I'll get it up tomorrow.
The lighting fix was really easy, just put about 10-25% percent of the diffuse into the Emissive channel. Amount depends on brightness of the textures.
And hmm, I know what you mean, but these aren't really mountains. They're tundra plains by the ocean, I think it's at most 50m anove sea level. I don't know if that would happen here as well ? I'll see about changing it, I like the contrast it gives.
edit: I checked; http://maps.google.be/maps?q=N%2058%B0%2045.622%20W%20094%B0%2005.228
It's because the rocks are too close to the surface, not because of height I think.
It is Unreal terrain, but the shadows aren't really to my liking yet, but I am using 'Is Overriding Lightmap Resolution", which changes the behaviour of the StaticLighting Resolution setting, allowing you to go higher than the ugly standard lighting. Also the terrain has been subdivided 2 times in the Terrain editing window, this makes a big difference too. The shrubs shadows your are seeing are dynamic btw, they fade in the distance. This is the default behaviour.
Rasmus; thanks a lot man! I actually wanna have white moss on the rocks separately, as a vertex paint layer. Just gotta do the texture and add it into the material
Disanski, sort of yes.
Breaneck, wow thanks man, that's exactly what I need. Can't believe I never heard of that!
Kab, i've thought about that too yes. Isn't the problem with that you can't have a darker and lighter side? Since the normals are uniform. And is this script for Unreal or ?
Friggin perfect! :poly136:
Yeah man, it only works for materials that are masked and set to receive lighting. You won't have this issue now since you are passing through emissive, but you will still have a darker and a lighter side, just a lot more subtle and will receive lighting the same time terrain around you does. The script is for max yes.
Here's an update;
Env should be almost good. Still some tweaks here and there, optimize the trees. And the background terrain is almost untouched. Gotta add some better materials (scale is wrong) and an ocean waterplane.
Absolutely love your environment thus far Xoliul! Would there be any chance of a tutorial for say either the rocks or the trees? How do you get them to look so crisp and sharp? 1024 texture? Or Higher?
Tyl3r; I'd go visit that place lol. But then again, i live in a country where the national border is only a 4h drive at most, I understand that can be different in Canada
To answer your question quickly; Trees are 1024s, but it's an atlas made by Speedtree. the main fronds do stretch acorss 1024 px. The rocks are one tiling 1024, but with tons of tricks like vertex painting like Uncharted, detail normals, world-space dirt overlay, etc...
I do want to make a small rundown afterwards of how I did most things technically (since modeling and texturing was pretty easy compared to what I usually do), it's the cool shader tricks and so that make things interesting.
Looking good!
I spent a lot of time tweaking the surroundings:
I know it's kinda barren, but there aren't even any trees near the coast there usually.
I spent like 2 hours trying to optimize the trees, but it's not making a whole lot of a difference. LOD'ing just doesn't do a lot. Epic's GDC demo has even more tri's in total and also has shader complexity all the way up in the red, yet it still runs better. I don't get it.
Probably gonna start on the plane next, should be fun, I wanna do this in a really efficient way with textures & modeling; I will try to map as little stuff as possible uniquely, reuse mesh parts etc. Like that crashed C130 in MW2 if anyone remembers.
keep going..
Here's the plane so far, basic shape done:
Don't look at the counter, it's only 3650 tri's for the moment.
Here's a little teaser update:
Looks ok at a glance but there's tons of stuff wrong. The plane's full of unwrapping errors; only the main hull is decently unwrapped (the cockpit door isn't even touched for example). But at least it's a proof of concept that the tiling texture + decals approach is working
And the plane geometry is totally WIP, there's gonna be tons more details on it. It's just a bit of a new workflow for me; modeling/unwrapping and texturing are getting mixed up. I actually made the current tiling texture before I unwrapped it, for example.
What's your workflow for trees and stuff, is it somewhat along the lines of cylinder as branch, then alphas for the leaves? I want to get into making some myself, but not had prior experience with making them.
Good work!
so you may say it's overkill but the plane is the centerpice of your scene, and as this role, it HAS to look better than anything else in the scene and ge tmore attention, because, well while your landscape does look awesome, people will look at it as a landscape, but the plane, will be the center of interest and people will want to look at it in details
unless that's what you did, of course
are you using a realtime or env map...if your using a map chuck it through ati's cubemap filterer to create a nice soft one for the main brushed metal will look a ton better...if your using a realtime map...can you not use a lower mip
Shep, for the dents i was thinking about vertex painting a tiling crumpled texture, it's gonna allow more control than baking. I do want to overlay some larger scale detail, but in general these planes are kinda uniform. This is the best picture I found of a C46's fuselage metal:
http://images3.jetphotos.net/img/2/6/5/9/56712_1183714956.jpg
In other words, anything other than the base UV coordinate set is like rotating and transforming a normal map image using standard Photoshop transformation tools; rotate by 180 and it will appear inverted.
Positioning on the rocks is still wip, It's just thrown in there to see it ingame, I'll place everything carefully once the plane has progressed far enough.
Shep, yes, but it's not a cubemap anymore. It's a procedural sort of reflection (as in my shader), which looks a lot more matte. Maybe it should be a little bit stronger if you can't really tell it's reflecting.
One thing I would like to point out are your rocks; at the moment they really stand out as being terribly lowpoly. In fact, it looks like the plane doesn't really fit in there.
Did you think about sculpting them perhaps? You could easily get away with using 2 well sculpted rocks. As long as they look different on each side it's really hard to tell that they are being reused.Moreoever, you can always vertex paint them to add some unique details. I feel that with a little love your rocks could bring this scene to a whole new level.
Keep it up
Tea; thanks. I can sort of see what you mean with the rocks, but do the really look that lowpoly? They're like 1800 tri's each. I know they look smooth, but these are glacial rocks that have eroded to such a smooth shape by the ice.
And you know, part of the reason I do this project, is to get away from highpoly and baking a bit, after half a year of just that. I wanna focus more on efficiency and having tricks with shaders, post-processing and smart modeling & texturing, do a lot of work for me. So I don't know if I'll get to sculpting.
rooster, yeah I'll dump some more stuff around it, and i thought about birds. I shouldn't get lost in making them too detailed but they should be doable. I just don't know about animating them, that could be a bottleneck.
if you lerp between the diffuse and the spec/reflection with fresnel it gives you a much more metal like material... dont add it blend it basically
kind of going on the basis that reflection is focused light bounce...the more a material is focused the less un-focused bounce light there is...this equates to diffuse and ref maps in our simplified terms so dont add them but lerp between them
this doesnt work brilliantly for every material but fot most (inc this) it will...its like a simplified energy saving bdrf
Feedback on colors and general mood is greatly appreciated.