Frankensteins lab
polycounter lvl 12
Hi! I've started a new project and I thought I should post it here. This will be my first Pimping thread, but I've just made a model that I really like and thought it was time to post it for some critics and comments.
So I've based my model on Stephan Martinieres concept for Frankensteins lab:
http://www.martiniere.com/imagepages/vats.htm
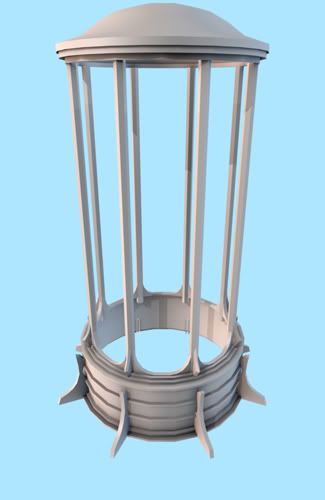
I'm more or less finished with the highpoly version but if anyone thinks I can improve it I'm open to suggestions.
I won't incorporate this into any game, this is just a portfolio piece, but I'm not really sure how high of a polycount I should set as maximum if I'd want to export it to UT3. Right now the polycount is around 2300 polygons but I thiink it'll be around 3000 when it's finished.
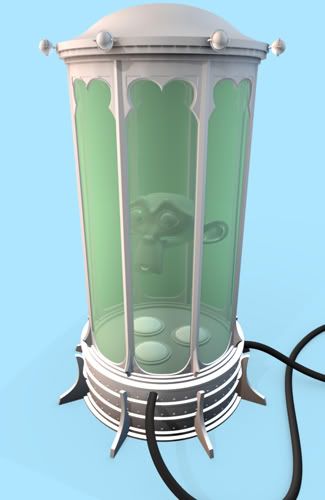
I will add some bubbles and some god-ray like lighting inside the tank also.
My plan is to model and texture this container so that it's completely finished, then I might go on to the table and later the crates. I might also make an octoptus or something and put it in one of these containers (the reason I don't include it in the same model is because I imagine that you would want different models in the different containers).
So what do you guys think?
So I've based my model on Stephan Martinieres concept for Frankensteins lab:
http://www.martiniere.com/imagepages/vats.htm
I'm more or less finished with the highpoly version but if anyone thinks I can improve it I'm open to suggestions.
I won't incorporate this into any game, this is just a portfolio piece, but I'm not really sure how high of a polycount I should set as maximum if I'd want to export it to UT3. Right now the polycount is around 2300 polygons but I thiink it'll be around 3000 when it's finished.
I will add some bubbles and some god-ray like lighting inside the tank also.
My plan is to model and texture this container so that it's completely finished, then I might go on to the table and later the crates. I might also make an octoptus or something and put it in one of these containers (the reason I don't include it in the same model is because I imagine that you would want different models in the different containers).
So what do you guys think?
Replies
I acctually considered doing this but I was going to wait until I was mostly done with the modelling phase and then see if it was necessary. Now I know it wasn't a bad idea, thanks.
Yeah, I see how it could look weird, but that is until you consider how one would texture this thing. As it is right now I can split the model in 8 identical parts and use the same texture on every section of it. I would have the seam start behind those feet-things, run up the bottom, the beams and then along the tops edges that run right above the beams. So i would have to keep the circles vertice count a multiple of 8 all the way.
That is more or less exactly what I thought too.
Yeah, I am counting triangles, but for some reason I always say polygons (I don't know what's wrong with me
Be sure to do some lighting bake tests in Unreal with your stacked UVs + normal map and a constant specular before you move onto final texturing.
The last time I tried breakup UVs that much it came out as quite a mess after baking lights, UDK may have made some changes for the better to the way it handles seams with Lightmass.
Good luck
For the normal map I suppose I will have to use either an object or a world space normal map, or will it work with a regular tangent space map?
I have no experience whatsoever with Unreal so just correct me if I'm wrong.
Also I've got a new update for you, guys. It's not a huge update but I feel I should post it anyway:
The biggest changes here are the lamps in the tank, the speres at the top and some new bolts and screws.
I think the top feels way too empty. Do you guys have any idea for what I could add there?
I had a lot of trouble with this particular prop because of the metal tracery EATING all my tris. What approach are you going to take with that?
Oh yeah, yes, you can just make a 2nd UV map with unique coords for the mapping for unreal. You can even have unreal generate this map for you, but the maps it makes are very wasteful of UV space.
About the top, you could make it like a front of an old train with bolts and things.
Or you could make it into a hatch so it's possible to get things in/out of there.
Or stick more cables and tubes into it.
Or you could leave it alone for now and move on to other props in the scene. Some cool design to unify the everything might come to you while working on something else.
About normal maps and Unreal, I'm pretty sure Unreal only imports tangent space normal maps.
I just did a test with UDK and a spherically shaped top with split/stacked UVs for texture and unique seamless UVs for the lightmap. It worked great using Lightmass to bake lighting, so disregard my warning about that. Most of my light baking experience comes from the old Unreal Tournament build of Unreal, it's good to know that the issue has been fixed.
I will try to use floating geometry and fake the smaller rings with the normal map. I will also model the curvy parts that are attached to the glass, I know it takes more polygons but I think it'll be worth it.
That's awesome, but I think I will unwrap it myself anyway. Do you know if the normal map will work with these stacked UVs?
Thanks for the suggestions. I had acctually thought about adding a hatch up there myself too, so that is what I'm about to do now. I'll make a hatch that is somewhat reminiscent of a submarine entrance/exit hatch then.
No, I won't do this. I have a tendency to just model my stuff till it looks somewhat good and then just move on. But I really want to finish this one with textures and perhaps lighting as well, so I can't start on another model or I'll just get distracted.
I guess that'll have to do then. But like I said above will this work with stacked UVs?
That is awesome. Thanks for clearing that up, man.
Oh, and just a quick question; Is it true that normal maps can't simulate objects that are pointing at a 90 degree out from a surface? In other words; will I have to model the big screws at the bottom on the lowpoly one?
Here's some closeups of my model too:
Yes and no. As far as I can tell, the engine won't smoothly shade over UV seams, even on flat surfaces. It will look like you used different smoothing groups for all the different UV islands. You'll also have to be careful about tiling/mirroring your normal map.
Yep. Normal maps simulate changes in the angle of the surface, not changes in the height. Adding a bevel to your bolts will help a lot.
Stacking and mirroring UVs for normal mapped assets can work in Unreal if done correctly. More info from UDN.
Also related here's a good tutorial on making efficient lightmap UVs, though with the introduction of Lightmass in UDK you don't need to pad the outer border anymore, just between the shells.
Thanks for the links, man. I think it sounds a bit confusing but I think it'll come to me when I get some practical experience with it later on.
Before this post I basically had no idea that you needed lighmaps, so thanks a lot. I thought that we had come to a point with technology that all lights were dynamic. So what exactly do a ightmap do? Is it just shadows that get multiplied on top of the regular texture, or what is it? Also what resolution would you recommend for my model?
Here's a render with the finished hatch (though it turned out more like a lid, because I chose not to include any hinges):
If you want to go with a full dynamic lighting solution you could use Crytek's Sandbox editor rather than UDK. Check out the Crysis Sandbox Editor - MASTER THREAD on how to get it for free, and my post on how to set it up. Unfortunately that's about all I know about the Sandbox editor, as I haven't played with it much. A lot of people around here love it over Unreal, one of the main reasons being no need for lightmaps.
As for the lightmap size it depends on weather you want to go with a practical lightmap size or a "it's for portfolio make it as good looking as possible size" light map. It also depends on how much shadow detail will be cast onto it from other objects in the scene. Lightmass will also dynamically up or downres your lightmap a bit during the bake process as well though I'm unsure how it does this exactly. You could unwrap it for a 64 x 64 or 128 x 128 size lightmap and be able to up the actual resolution setting in Unreal to something higher if you discover you need it.
As for inaccurate screws, it's true they well be inaccurate as far as being a perfect "real world" screws, but they will be perfect for capturing accurate normal map information. All that really matters is the final ingame result IMHO.
The top is looking good btw, keep it up
I think I'll go with the Unreal option, I mean I will need to learn to do proper lightmaps one day anyway, so I can just as well try to learn it today.
I think I'll want to make a practical lightmap size, so that I can someday include it in a mod or something. So I'll unwrap it for 64x64 then.
Yeah, I guess your right.
Thanks a lot!
EDIT:
Silly me, I realized I should've explained this better.
When you first create a level in Unreal it's empty nothing is there. If you add some objects to the level and attempt to view them in lit mode you will see nothing. Once you add a light to the scene everything is dynamically lit until you do a lighting build, once you do that all static meshes get their lighting baked.
This picture represents two objects and one directional light in the Unreal editor.
In other news; I think I'm done with the highpoly. I couldn't come up with anything more to add to my model so I consider it finished. I'm nearly finished with the lowpoly version as well. So here they are:
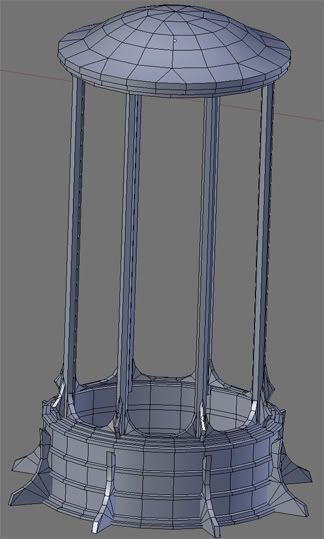
I think the polycount may be too high, as of right now I've got 4456 triangles and that is after some heavy optimization. Here's my wires:
It's good practice to exaggerate any bevels on your high poly model so that they show up better on your normal mapped low poly model. This becomes very evident once things are viewed from a distance in game and the textures are being mip mapped.
Right now your highpoly model has some very sharp edges, unless you use a gigantic texture any intended normal mapped edge highlights won't show up.
Then again you might be going for a really sharp look and not want highlights on your edges in which case it's all good.
I thought I wanted a really sharp look to it but I just tried to make some smoother bevels and it looks a lot better IMO. So thanks for the suggestion.
I can't really find anything else to optimize without sacrificing anything significant. So I think I'll just start unwrapping. But if you guys have any suggestions for cutting down the polycount then I'm still open for suggestions.
I can't believe I didn't think of using geospheres for the lamps, now the lamps only take 1/3 of the polygons they took before. I tried to make the lamps at the top out of geospheres too but that didn't work out, so I just optimized those a bit more instead. Also I had already optimized the ribs like you're explaining if you just look closer on that last render.
Here's how it looks at the moment:
Are you planning to bake ribs on the bottom from a high poly shape like _/¯\_ or _|¯|_ to a low poly shape like _/\_? I don't think the ¯ part will turn out ok. If you really want to optimize it'd probably be better to remove the ribs from the low poly altogether and just bake from _/¯\_ to ____. Though I can't say I've ever tried that exact type of bake before so it might work out ok...
I think this is one of my best unwraps as I usually waste a lot of the space on the UV for no reason at all, but I've changed that now.
I've also made some cylinders for godrays and some planes for bubbles (that will turn towards the player, if possible). Unfortunately this adds to the polycount which is at about 3700 polygons now.
I've got another pretty quick question again, which texture resolution would you recommend? I'm guessing either 512 or 1024 but I want to do this right, so I'm asking you.
Oh, and the reason for the delay of updates is because Blender crashed a couple days ago when I worked with the highpoly, which made me realize that I really needed a new processor (Blender usually lags at only 2 or 3 subdiv levels too) so I didn't really feel motivated to make any progress. I'm going to pick up my new processor tomorrow, it'll be awesome.
That's it for today, folks!
1024 x 1024 seems like it would be a good texture resolution for this object, you could go larger or smaller if you wanted to. Try to decide on a texture budget for the whole scene then break that down. You want to keep the pixel density in your scene consistent.
Your UV layout is not horrible, but it could be better.
Here's some general UV tips.