Nicks Thread of work and Crapness
Hey Polycounters, and people generally more skilled than I....
Ive been poking around Polycount for a while now while teaching myself the basics of game techniques, and I have learned volumes from all the knowledge on here. My goal is to (asap) transition into the game industry. Currently Im working in Animation, and its, well... just nowhere near as fun.
I decided to start my own thread so that as I learn and experiment I can post my crap in one spot and not clutter the boards too badly... Also I think having my own thread will keep me motivated to keep working on my little projects. I want to improve my skills as fast as I can, and I hope that asking my noobish questions to the PC community, and getting feedback from the folks I hope to be working with soon will help me do just that.
Anyway, to get the ball rolling... I just made a quick little test piece while my boss wasnt looking that contains some of the general issues I seem to keep having. Sorry for the big image:
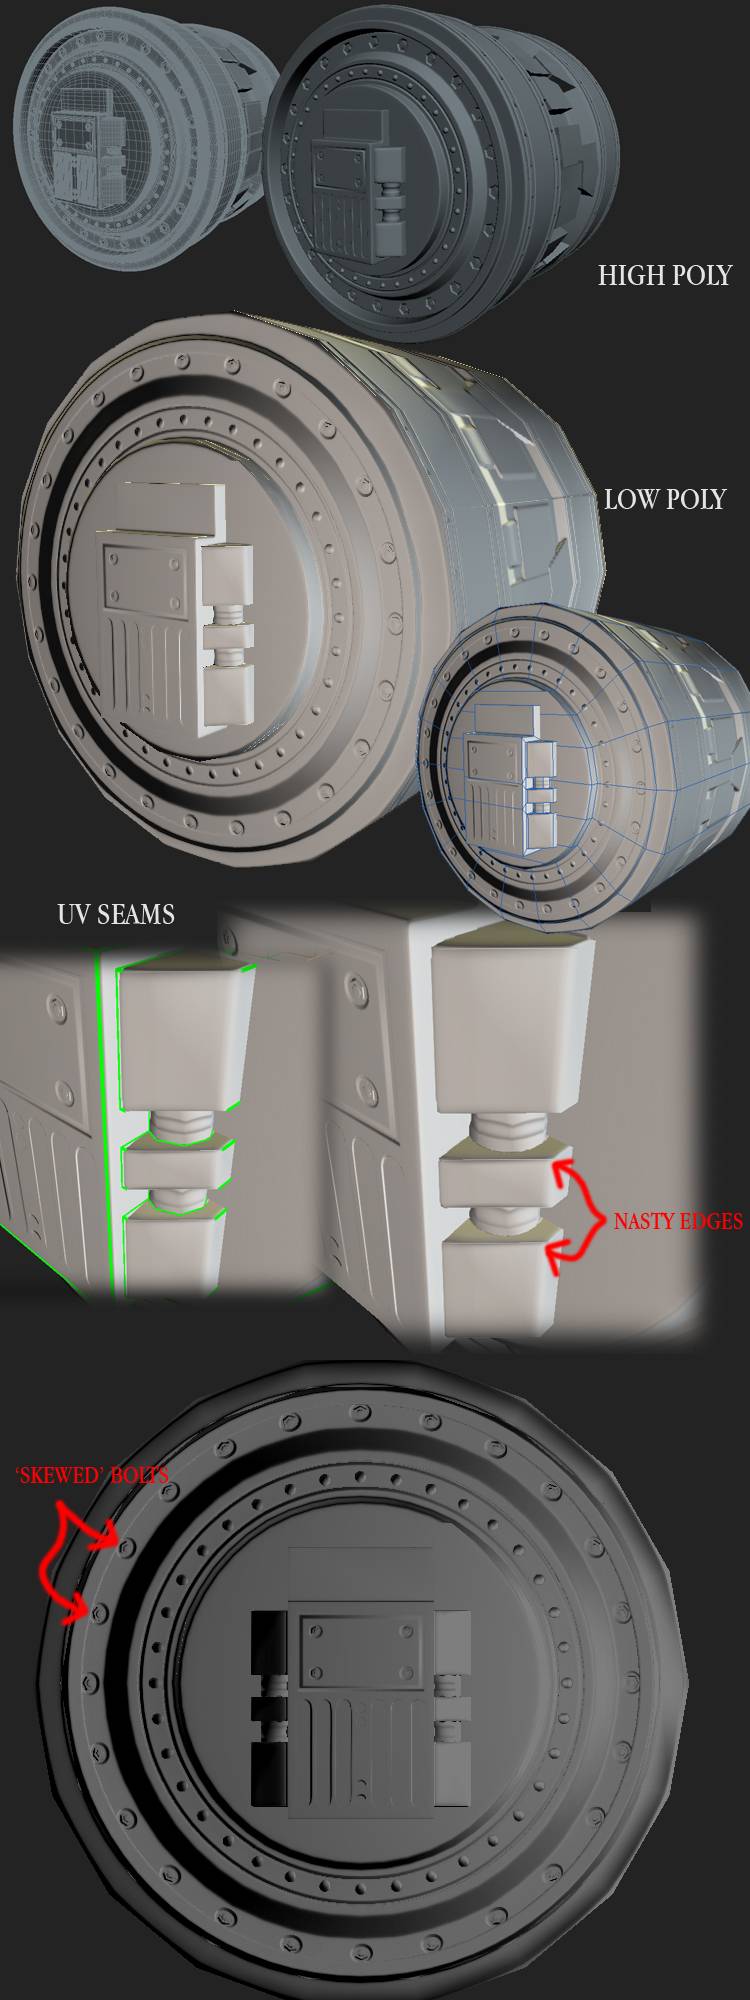
I have read most of the 'Normal Mapping' Sticky, which made my brain bleed a little, and Ive been all over the PC Wiki and Eric Chadwicks site, but I just cant seem to get past a few basic issues that are driving me nuts. If anybody is willing to give some advice, I would really appreciate it.
My biggest frusteration so far has been hard edges, as illustrated in the image. The visible seam just looks awful - Ive played with smoothing groups, various UV layouts, different cages and there still always seems to be a nasty seam somewhere - I elminiate one and another pops up somewhere else - grrr
The second issue I have encountered numerous times is illustrated by the orthographic image at the bottom. Though my cage is 100% coplanar to the high poly mesh, it looks as though the depth of the bolts is skewed, as though the cage normals are being projected at an angle. Again, despite different unwrapping methods and smooth group combos I cant seem to eliminate the error.
Thanks for taking the time to look at my noobness - its amazing how different game 3d is from animation 3d!
-Nick
Ive been poking around Polycount for a while now while teaching myself the basics of game techniques, and I have learned volumes from all the knowledge on here. My goal is to (asap) transition into the game industry. Currently Im working in Animation, and its, well... just nowhere near as fun.
I decided to start my own thread so that as I learn and experiment I can post my crap in one spot and not clutter the boards too badly... Also I think having my own thread will keep me motivated to keep working on my little projects. I want to improve my skills as fast as I can, and I hope that asking my noobish questions to the PC community, and getting feedback from the folks I hope to be working with soon will help me do just that.
Anyway, to get the ball rolling... I just made a quick little test piece while my boss wasnt looking that contains some of the general issues I seem to keep having. Sorry for the big image:
I have read most of the 'Normal Mapping' Sticky, which made my brain bleed a little, and Ive been all over the PC Wiki and Eric Chadwicks site, but I just cant seem to get past a few basic issues that are driving me nuts. If anybody is willing to give some advice, I would really appreciate it.
My biggest frusteration so far has been hard edges, as illustrated in the image. The visible seam just looks awful - Ive played with smoothing groups, various UV layouts, different cages and there still always seems to be a nasty seam somewhere - I elminiate one and another pops up somewhere else - grrr
The second issue I have encountered numerous times is illustrated by the orthographic image at the bottom. Though my cage is 100% coplanar to the high poly mesh, it looks as though the depth of the bolts is skewed, as though the cage normals are being projected at an angle. Again, despite different unwrapping methods and smooth group combos I cant seem to eliminate the error.
Thanks for taking the time to look at my noobness - its amazing how different game 3d is from animation 3d!
-Nick
Replies
The skewed bolts are because the projection cage is a different size / position than the face you are projecting. This is where the warping is coming from. The cage itself is offset, and isn't 100% directly offset from the low or the high. This is the curse of baking cylinders.
Add more geo to the low, remove geometry from the high, or project those elements and details separately. (You could just manually place the individually projected bolts in Photoshop if you really wanted to.)
Correct.
Mmm, this is interesting.
But could you elaborate a little bit on the topic? Maybe demonstrate with a couple of pics if you have the time? I'm sure it would help lot's of guys over here, myself included!
Mmm, this is interesting.
But could you elaborate a little bit on the topic? Maybe demonstrate with a couple of pics if you have the time? I'm sure it would help lot's of guys over here, myself included!
If I were Mechadus, I would just chamfer those hard edges on the low poly, and it would probably fix it, right? Most of the time, one should avoid 90º angles on low polies, this is what I lear'nt with my messing around with bakings at least.
Also, Mechadus. About those screws, are you using xnormal to bake? It would probably help using it, and use rays instead of cage.
IF, you really must use a cage, then you should edit the cage, and move it as close to the High poly as possible, to avoid having those way and skewed stuff on the normal map. God damn cylinder bakes...
EDIT: Aww damn, sorry for the double post. i though I had clicked on edit!
Can some mode delete the previous post pls?
Should stand to reason if you can create those chamfers at hard edges over contigous uv's and bake a proper normal map it should be fine to remove those edges later (if you have to) and still have the normal map project details nicely.
Edit - I do all my baking now in xnormal, only high res to planar surfaces are done in max as both apps seem to give more predictable results that way.
simple rules that i work to to get rid of normal baking issues
1- try to make the dseign less 90 degrees if you can, give geometry 85degrees this will then bake propperly and often look the same, sometimes cant use esp if your replicating something exactly but if its something not real world...
2- chamfer edges that you can do rule number 1 to BUT no so that you make alot of tiny chamfers, for example the extruded door edge in this looks ripe for chamfering, it will reduce the cookie cut effect aswell, but i wouldnt chamfer the lock mechanism
3- any pretty square geometry with straight edges, just split the smoothing groups and the UVs
why- the shader bends the mesh normal by the texture normal, if that edge shares a pixel then the texture normal will try and bend the mesh normals by an average which is wrong for both, each mesh normal needs its own colour to accurately bend the normal, you can see that it is correct where the uvs are split.
4-if you have an edge with interesting destruction or something then its best to use a chamfer (again if its a big enough) as this will capture it properly and any slight miss-matches that you get with a hard edge bake will be exaggerated by any detail here.
5- if you have detail like your screws near an edge over 30 degrees (arbitrary number really depends on the detail) the rays will bend and stretch the bake, you have a couple of ways to combat this, adding a chamfer is expensive but halves the angles halving any stretching which can be useful say on a large surface where it can help the silhouette etc, but generally i would either bend the normals or the cage so that the rays will shoot straight and capture the HP properly
6- use x-normal best workflow/baker out there IM(and alot of others)O
its a matter of experimentation, dont expect a perfect bake straight away, it gets quicker as you know what to expect but i generally make a few tweaks on every mesh, so bake out at low res/ quality until the normals are perfect only do a proper bake with AO etc once perfect as slight changes in the bake for normal will mean that the AO etc will not quite line up if its from a previous bake
As a noob still trying to get the hang of this stuff I couldn't agree more. I never went back to fucking with cages once I discovered Xnormal. With very few steps things just look right. No wavy lines or anything.
Basically, if something looks jacked on xnormal, then it's your high and low meshes not matching up enough. Makes trouble shooting this stuff so much easier.
Thanks so much for all the input - Very interesting stuff so far.
Ive seen most people seem to prefer Xnormal or other baking apps - I have it installed at home, but at the time I wanted to figure out what I was doing before trying to learn new apps... Seems like I might finally be to the point where its the next logical step.
The uv split made a huge difference with the hard edges I do have.. sux cylindars are appearantly the crappy shape for game artists - its my favorite detail shape!
@ Ott - Thanks for the advice, Im definitely going to try and avoid sharp angles when I can... Thats an interesting idea about projecting the parts seporately... I havent really tried doing multiple chunks of the same mesh before - Must experiment!
@ ZackF - I have seen other posts where people advised splitting the UVs where the Smoothgroups differ, but I guess I dont yet fully understand exactly how to best take advantage of this technique... Basically any time there is an unavoidable sharp edge I should make each face a sep smooth group and break the edges in the uv map? Your comment fixed the problem I was having but it seems like it would make the uv map rather difficult to work with if there have to be a bunch of such splits... Funny thing too - Ive been trying to get into your company since I found out they were opening a Florida office... maybe someday
@ natetheartist - This is very much what I thought too, and I did some experiments using that very technique before I posted originaly, but I found that the bizzare smoothing errors on my LP mesh were translated into the Normal map.. Again, I only have experience with Max tho - does xnormal have this issue?
@ [HP] - There are some great examples of this here: http://wiki.polycount.net/Normal_Map#Tutorials. I think I pretty much understand the issue, but how to properly avoid it seems to be holding me up. Im definately going to try xnormal tho.
@ GMCP - I tried that, actually.... Seems like there are situations where it would work pretty well, but in this case I ran into the problem SHEPIRO pointed out
@ SHEPIRO - WTG with the power-post man - thanks! everything you said makes sense, but I have a question about #4 - Im working on another goofly little scene with a lot of destroyed (sculpted) bricks that I wanted to bake... I tried the chamfers last night and though it looked much better in silouhette, I still had some funky lines on the normal... When using the chamfer method, what is the best way to handle smooth groups and UV splits across the chamfered edge? Would each face have its own Smooth Group, or since all edges are 45's, can they be blended together?
-N!
will do one on bake skewing if someone hails me as the grand poobah.
edit: also everyone should at least skim through this: Too much optimisation (do polygon counts really matter?)
The grand poobah title has officially be reassigned! The little character sketches totally made that awesome lol
Thanks for making and posting that - Its much more clear to me than many other (much more technical) explanations Ive seen.
-N!
I made a box with some chamfered edges to play with, and using the supplied knowledge of this thread rendered some normal maps. The box on the right has seporate smooth groups for each face, and I broke the UVs, but left them in place (Image A). I then copied the box, and moved the pieces of the UV map apart just a little (Image
So despite the edges and UVs being broken, if the faces touch on the UV map, the edges reappear, but with the exact same smoothing, and slightly seporated UVs, its damn near perfect... Im sure theres a good reason for this, but I dont quite understand the relationship between the UV locations and the normals... any input?
-N!
The normal map problem only really arises when you have 2 or more 90-degree angles intersecting - the normal-map gets interpolated badly over edge angles like this so tends to show shading artifacts.
Adding some edges or bevelling the corners to make the faces not 90-degree angles on all sides will fix the normal map problem without having to split up your UVs (which, as you have seen, leads to different artifacts along the UV splits!).
Linking this once again (Thanks, Chai!):
http://www.svartberg.com/tutorials/article_normalmaps/normalmaps.html
The best technique IMHO is the one described at the bottom of the page, whereby if you have problems with shading artifacts and really don't want to add any more polys by bevelling or cutting "supporting edges", then you should harden the edges along the UV seams. You'd probably have to use a "Edit Normals" modifier for this in Max since Smoothing Groups are nearly impossible to manage for this kind of work. Maya or another app which uses the "soft/hard edge" method is best for this, makes it easy.
Still though, extra geometry is usually gonna be the fastest and easiest way to avoid normal map issues
Man do I wish MAX would abandon the idea of smoothing groups for the edge harden/soften method.
The other issue with that sort of gross UV splitting is the horribly bad texture seams you will wind up. It wouldn't be so bad if everything was made up of plates, but overall this method can cause for some really bad texture issues. Frankly I find the idea of splitting your faces all over the place on your UV sheet to be a horrible time-waster.
For really clean normals 100% of the time - 90 degrees or more gets a chamfer, UV it however you want to, and hope your designers know something about streaming / culling, so that memory budgets and triangle counts don't run your framerate into the ground.
Otherwise, give it separate smoothing groups, separate UV chunks, and pray the texturing gods have mercy on your soul. Also, remember that this can increase your vert count dramatically once it is in-Engine.
So with 90 degree angles you would say those edges should be chamfered 100% of the time instead of splitting the edges? Also if your trying to bake a toolbox with the toolbox having mostly 90 degree angles. The edges on that box should get chamfered all over right?
I would somewhat disagree. If you have something that's wayyy over 90 degrees, (such as the edge of a sword) chamfering shouldn't be necessary.
Personally, I would still suggest using connected UV edges and the same smooth group IF your objects edge is rounded enough for you to notice, but not round enough to affect the silhouette. If the rounding does affect the silhouette, you should bevel.
If you have a 90 degree angle that is *intended* to be sharp. you should separate your uvs for sure so you don't get that stretched pixel (as explained in the previously posted diagram) wrapping around what should be a hard edge.
The UVs of ALL of the objects below are all ONE element. no separation.
I'm not saying it's a 100% all-the-time rule, but in the case of the toolbox I would say you definitely should chamfer the edges.
I think it is also very important to understand subjects such as covered in http://boards.polycount.net/showthread.php?t=50588 this thread when deciding whether you should add a few more tris or not. Sometimes, it really...really doesn't matter that much and people need to get a better understanding of their target hardware limitations and capabilities.
Nate, regarding that render, that is the expected results, but it has nothing to do with the UVs that is creating that problem. The fact that you have multiple smoothing groups on your low is what is breaking the mesh.
The point of the discussion is that you WOULD need to split the UVs if the angles were more than 90 degrees, which none are in that object, so it doesn't matter how you UV it, only whether you flood the smoothing or not in the low poly.
Again, don't get me wrong, chamfering isn't the hard rule, as UV splitting should fix the problem. But UV splitting can really cause some issues with your texturing, so you should be careful about when to use it and when not to if you want nice smooth transitions for your surface.
Excellent. I'm starting to understand this whole picture now.
Sorry, this is incorrect. This artifact is 100% preventable and predictable. Whether it was a 40 degree angle or 120 degree angle, having a hard edge on the low poly model without splitting the UVs is what causes the problem in Nate's image. You can get rid of the artifact by either removing the hard edges on the low poly or splitting (and spacing apart) the UVs.
edit: Ah, I just realized, I think you may be talking in terms of "best practice" while I'm talking technically. Technically, Nate could space apart the UVs on the example and it would look fine, but you're right that angles less than 90 deg should almost always just be smoothed out.
It depends on how you textured it, but keep in mind that after adding bevels or chamfers there's a good chance that your UV's will go to hell. In which case, yes, you would need to "fix" your textures. It depends on your own personal Photoshop workflow as to how complex that is going to be for you.
@ ZackF - its not just your explanition - Maybe its my lack of knowledge about proper termonogoly, but I dont think ANY tut Ive seen has really explained that to make that solution work there needs to be actuall space on the UV map. Either way, thanks again for the great explination! Though I am mostly interested with the "best practice" approach, I am still very concerned with technical accuracy whenever possible.
@ natetheartist - L O L at facepalm - Never gets old. I tried a similar shape to the image you posted with 1 smoothgoup like you have, and mine seemed to have much larger dark smooth errors, like you have on the LP mesh in the back-right of your image - after you bake, do you alter your smoothing, or just apply the image?
@ OBlastradiusO - If you figure out a way to fix your toolbox without having to scrap the maps completely, Id love to hear about it. I have a bunch of models at work that id love to make normal maps for, but I dont want to have to re-unwrap them and loose the diff, spec and bump maps I already have made.
@ MoP - THATS what the normal modifier's for? For years I thought all that thing did was flip normals while keeping the stack parametric - Do you have a link to a good reference for how to use this feature you describe?
@ Ott - I had a feeling that what you were saying about the split edges would be the case - Splitting everything seems horribly impractical and time consuming. Im yet to really venture into the Unreal engine, but Ive read about the edge smoothing issue with splits. Though it kinda fixes the problem, I think Im going to file splitting under "Plan-B".
Ive been putting all this knowledge to work, and Ill have something wirth showing soon - Im building a list of some other 'problem shapes' I encounter all the time, and also some workflow questions - I cant wait to get deeper into this stuff
-N!
Mechadus: Thanks, Ill keep you in my contacts, and let you know soon about that toolbox.
http://nicholaikropat.com/NK_DEMO_2003.wmv Warning: 33mb
Sux I lost all the rendered frames... anybody think it would be worth re-rendering any of this for portfolio reasons, or is it just too dated?
-N!
I made this little hut as a test / learning project to play with more techniques that Im still shaky with. The textures need a lot of work yet. These are MAX viewport shots with diffuse maps only.
My question is about the bricks along the broken edge. I want to re-do the bricks to fix the nasty edges because of the normal projection problem I was having when I started this thread, but Im not sure the best way to go about it.
What I was thinking was to make 2 or 3 sculpted bricks, Unrwap them and align the UVs with the open spaces on the map, bake them onto lp meshes, and then clone the baked meshes around the edge of the building. Does this work flow make sense, or is there a better way to go about it? The advantage I see is that I can save a lot of space on my UV's by having duplicate bricks, but I also dont want it to look too repetitive...
Also, I really dont like the ground, and how the edge of the building terminates into the ground, but I need some feedback to really know what to do with it. any ideas, crits etc would be extremely appreciated!
-N!
1x 1024 diff and norm - no spec yet because I want to get the diff right first. The mesh weighs in at just under 3400 polys - pretty high, I know.
-N!
What is a good standard work flow for generating a spec map from a diffuse? Obviously just creating a gray scale from a diffuse is going to give poor results because it wont accurately interpret the materials (metal vs wood etc). Is it best to start with black and just paint till it looks good or are there times when its best to pull elements directly from the diffuse? Do you guys generate the spec material by material, or sorta just fudge it all together at once?
Im so out of practice with spec maps because at work everything always needs to be shiny and new. Falloff in the reflection map, play with the frensel values and presto.
-N!
-N!
http://www.scriptspot.com/3ds-max/hard-soft-edge
-N!
What you are seeing here is my 'Block model' of the level. I plan to block out every asset I am going to build using place holder meshes I can replace with final pieces one by one. Most of this geom wont make it into the final, but it all reflects the rough shape of the final product.
My thoughts and a little goofy back story are below the images. I welcome any and all comments as always.
*pre-edit* the wacky colors help me keep organized. green = columns, purp = crates and junk, red = platforms etc etc.
top down:
Bottom Level:
Third level:
I thought the TV show 'Battle Bots' never got a fair chance.
In the far future, robotic arena battles have become a major sport. Over the course of hundreds of years of competition, the sport has grown from enthusiasts building small machines for melee combat into multi-billion dollar teams pushing the state of the art to build autonomous military grade killing machines equipped with the latest in weapons technology. Set to battle on 10km square arenas, the robots fight to win their owners incredible sums of money while putting on spectacularly violent and destructive shows.
This level brings us inside the top-secret shop of the most successful team in the sports history, and the most powerful arena bot ever built... The Archer.
personal progress analysis:
What I like:
-Im very happy with how the modular construction is working so far. I have a lot of pieces that can be used for many applications, and edits are very easy. By building my final parts within my block meshes, I can focus on making quality assets, since I know they will already fit the scene properly.
-I like the U shaped arena design. The open space in the middle should make for good rocket crossfire, and a good place to put desirable powerups.
-I think the general artistic feel for the level is headed in the right direction. Im really trying to push my scifi design while keeping within the bounds of traditional architecture and I think its working well so far.
What I feel needs improvement:
-The level design itself is pretty poor. The 2 spiral staircases (not shown) provide for some good action, but overall there is too much open space / not enough cover. Im overlooking this since my goal is to learn the production process, and work on my 3d skillz, however.
-The scenes combined poly count is getting somewhat high. Im expecting in certain instances my final geom will have lower tri counts than my block meshes (sloppy vs clean geom), but overall Id like to trim some fat out of it.
-My file structure is pretty sloppy so far. For the final, I will restart my organization, but for this draft I found myself hopping all over my hard drive looking for assets constantly, and that really slowed me down.
-I feel that I spend to much time experimenting in 3d. Though I have loads of sketches of individual assets, I never planned out the level as a whole before I began making it. A solid plan in the very beginning could have saved me a ton of time by now.
Thanks for looking at my junk!
-N!
http://www.nicholaikropat.com/nixpix/kropat_dm-hangar_block.zip
-N!