Home 3D Art Showcase & Critiques

Underground Industrial Bunker

1
polycounter lvl 12
Offline / Send Message
Shogun3d polycounter lvl 12
Hey folks i've got some work I need extra eyes on, particularly to help me figure out my own creation as I have a couple ideas roaming every which way. The goal of this piece is a wall section and door to an underground tech facility, i'm going to have a separate tileable version of the wall but for this particular scene i'm not going to worry about it.

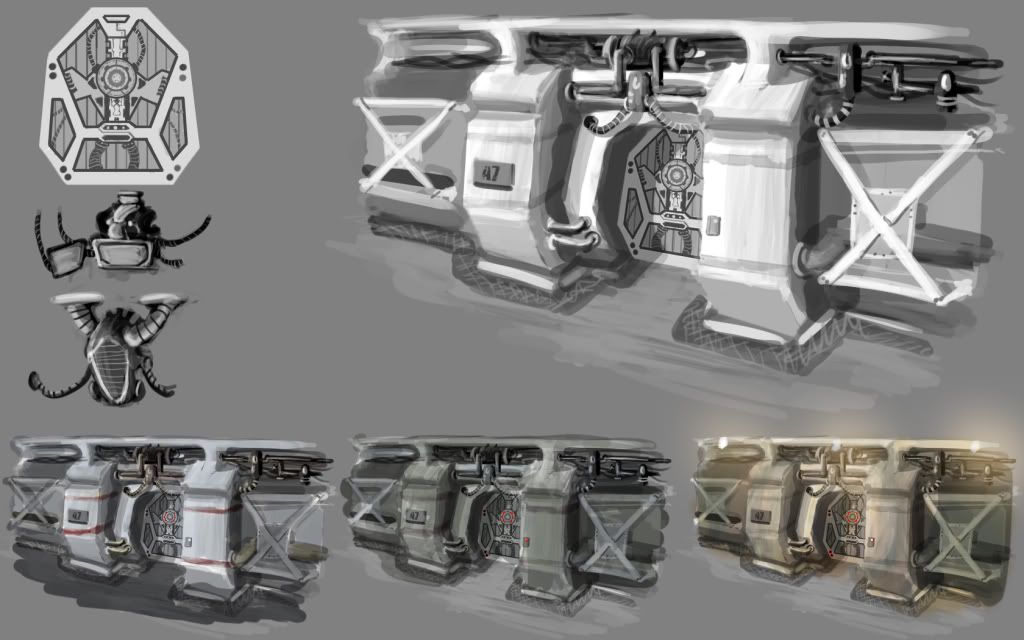
The facility is comprised mostly of concrete, copper tubing and metal electrical panels. It is futuristic underground tech facility that mix aging elements and some tech. The door is powered by a hydraulic pump which is fitted above the wall, it is the most "sci fi" piece (as its my main asset) in the scene. The columns and base of the bulkhead are possibly made of concrete (although I may make a majority of it steel or metal), they are fitted with electrical panels. I'm looking for some possible ideas on the column (if all of it should be concrete or break it up with metal plates?) and/or other elements.

C&C is welcome, thanks for your feedback. (Also, don't mind the floor it's still very wip)
_________________________________________________

Here is my concept
(As you can see I eliminated the cross beams, they didn't look great at all)
Project1_Concepts_2.jpg

(high poly isolined display, will have a completed low poly wfshaded soon)
wfshaded.jpg

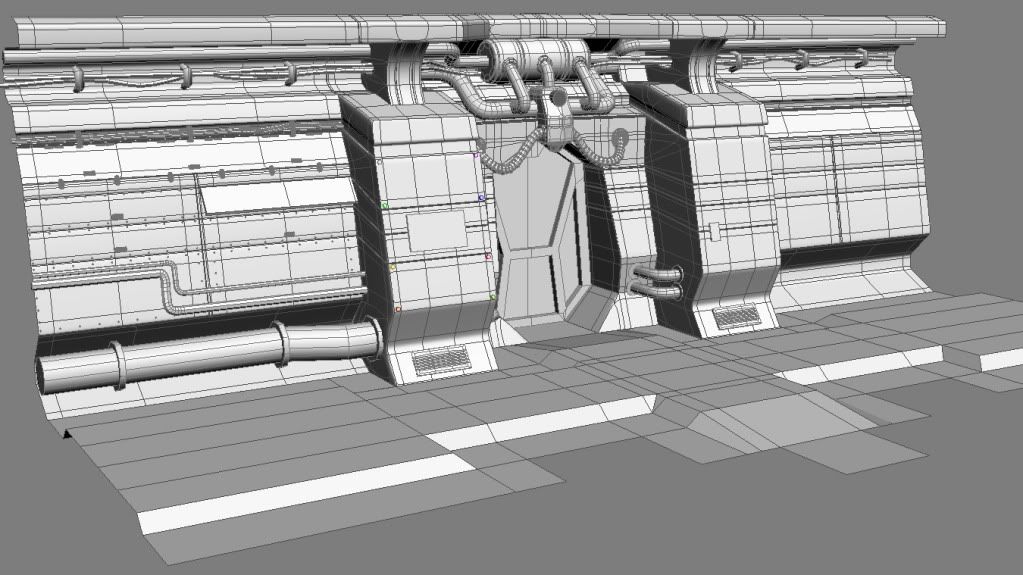
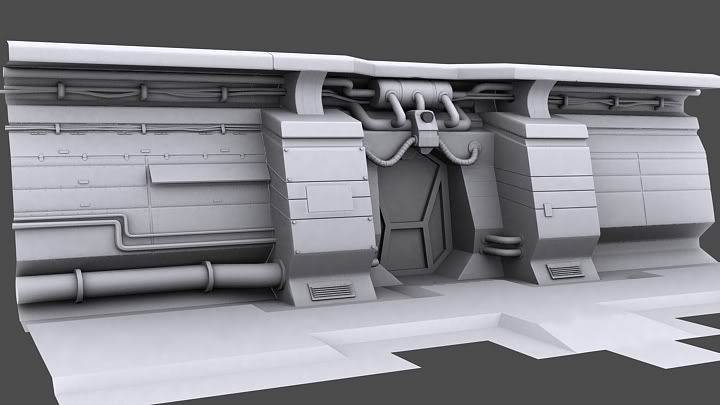
Here's where my high poly stands at the moment
underground_facility_2.jpg

Replies

  • Pope Adam
    Options
    Offline / Send Message
    Pope Adam polycounter lvl 11
    Off to a great start here Will. I really like the concept and the execution thus far.

    on this last image, the paneling on this lefthand side is a little boring right now... I like the design you have in your concept better.

    also on the main bulkheads on both sides of the doorway, I think those edges would looks a lot cooler if you cut the corners into a 45's instead of the sharp 90 degree angle you've got now. Maybe take some cuts out of it instead of having it completely straight up and down.

    I do like howevere that the bulkheads look extemely sturdy and bulky, but I think they would benefit from a bit more interesting silhouette.
  • Shogun3d
    Options
    Offline / Send Message
    Shogun3d polycounter lvl 12
    Thanks Adam,
    yeah I agree with you on that i'll set it 45 back so it doesn't block straight up. I played around with adding the crossbeam support bars on the bulkheads but they just didn't provide for any function at all other than the looks. Theyre usually used in a very cramped tunnels where they are welded on to overhead support beams that provide structural integrity.

    Im planning to have some wires hanging out of the open panel as well as a bar someone jammed to prop it up. I also plan on disecting the panels a bit more and having exposed areas where wires are clamped through, etc.

    Thanks again adam
  • Shogun3d
    Options
    Offline / Send Message
    Shogun3d polycounter lvl 12
    Adding more details to the bulkhead

    undergroundbunker_wip3.jpg
  • fast1
    Options
    Offline / Send Message
    wow, looks really great, finalized on the colors yet?clear.gif
  • Shogun3d
    Options
    Offline / Send Message
    Shogun3d polycounter lvl 12
    No the colors are not finalized i'm probably going to apply blue/grey metal style textures. I still haven't decided yet, but it's not going to be clean. It will be pretty worn.
  • Gannon
    Options
    Offline / Send Message
    Gannon interpolator
    I like the direction this is going. The piece above the door is great but I think you might be able to push it a little bit more somehow. Possibly some more pieces showing how it's being held up. It's doesn't look like there's much support other then it sitting on the ledge.

    Can't wait to see more. keep it up.
  • Shogun3d
    Options
    Offline / Send Message
    Shogun3d polycounter lvl 12
    I agree RDM, thanks I think some support beams are in place I will have latching onto the hydraulic pump.
  • Mark Dygert
    Options
    Offline / Send Message
    Hey looks great! Some great detail being packed in there =)

    Crits:
    - The sections of pipe at the bottom kind of bug me. Not sure if its the low poly-ish joints or that the sections aren't being held together by anything. Normally you'd see bolts squeezing those pieces together. Chance for some more detail maybe?
  • Shogun3d
    Options
    Offline / Send Message
    Shogun3d polycounter lvl 12
    Oh hey vig, yes for sure I still have a lot of gaskets I need to get on there secured by bolts, thanks for the reference!
  • patient09
  • Shogun3d
    Options
    Offline / Send Message
    Shogun3d polycounter lvl 12
    Thanks a ton, great concepts here! I believe theyre from Dead Space? Thanks again!
  • A.Kincade
    Options
    Offline / Send Message
    A.Kincade polycounter lvl 9
    Nice dude! This is looking sick thus far.

    I was going to say what vig said about the pipes. You have a lot of smoother looking areas, while this makes those pipes look really low poly comparatively. Where as the area just about the doorway has really nice rounded shape to it. Couldn't hurt to spare a few more polys but it looks fine as is...

    Are you planning on making the facility as well? Would be pretty badass.
    I like the detail for the door in the concept a lot. Not sure if your going to just do that extra detail just in the texture?

    Overall great start man. Keep up the good work.
  • Shogun3d
    Options
    Offline / Send Message
    Shogun3d polycounter lvl 12
    A.Kincade wrote: »
    Not sure if your going to just do that extra detail just in the texture?

    I'm doing a HP version of the door as well to be baked down, i'm working on that now as well as the pillars. Thanks Mr.Kincade :thumbup:
  • Shogun3d
    Options
    Offline / Send Message
    Shogun3d polycounter lvl 12
    Another Update

    Got some work done on the floor, but primary focus was fixing the issues with the bulkheads. Door is coming up next.


    undergroundbunker_wip5.jpg

    undergroundbunker_wip6.jpg
  • Shogun3d
    Options
    Offline / Send Message
    Shogun3d polycounter lvl 12
    Another Update, probably the last one before I do my bakes and get into texturing. Going to leave some time to make any changes i'll need before moving on.

    I worked on the hatch a bit as well as the floor. Redesigned the pathway so it blends in a bit more with the walls and doesn't distract too much.

    I'd appreciate and comments before I finally move on for the long stretch.

    (don't mind my little UT3 pal over on the side, he's aiding me in scale reference)

    door_variation_final1.jpg

    undergroundbunker_wip7.jpg
  • Ben Apuna
    Options
    Offline / Send Message
    I like where this is going so far good high poly work overall, but now that you've added in the character for scale I think that doorway might be a tad short.
  • Shogun3d
    Options
    Offline / Send Message
    Shogun3d polycounter lvl 12
    He's on roids right now, his buff should wear off within 24 hours and he'll be back to normal size :)
  • Torrrtilla
    Options
    Offline / Send Message
    That is looking pretty cool, I can't wait to see this textured and lit.
    -Neil
  • Shogun3d
    Options
    Offline / Send Message
    Shogun3d polycounter lvl 12
    Update: I've put in a solid days worth of texture work, i'm still not happy I think i've gone overboard with some grunge and scratch certain areas. I also need to work on the lighting some more. Any C&C is appreciated. Thanks folks.

    Highres_Screenshot_00001.jpg

    Highres_Screenshot_00003.jpg
  • Pope Adam
    Options
    Offline / Send Message
    Pope Adam polycounter lvl 11
    lookin good will. really impressive :P

    it's a tad bit flat though, how high do you have your normals set? I feel like you could bump them out a bit more.

    got spec's on this yet? I've got a cool shader for you if you want to throw this in unreal later on too :P
  • Shogun3d
    Options
    Offline / Send Message
    Shogun3d polycounter lvl 12
    Dude hook it up, I still need to work on the lighting to get these specs to pop. Right now everything is just hooked up standard. The normals are displaying very weak as well, I will work on it more.
  • PixelMasher
    Options
    Offline / Send Message
    PixelMasher veteran polycounter
    in your normals, go into the levels of each channel and make sure it is using the full range, a lot of the time people dont do this and you lose out on a lot of pop.

    diffuse work looks solid, just gota start getting the spec rollin' off there, dont tweak it so it looks good in max, tweak it and check the result directly in engine if you are not doing so already.
  • Shogun3d
    Options
    Offline / Send Message
    Shogun3d polycounter lvl 12
    Thanks Pixel, what do you mean by making sure each channel is utilizing its full range? You mean the actual normal channels in Photoshop?
  • Mark.N
    Options
    Offline / Send Message
    I'd say do something with that open trench running along the base of the wall. You've got a scene full of detail and then this uninteresting strip that just cuts across the shot. It just seems out of place. Something simple, like piping grate work or even some kind of floor light fixtures could help fill out that area.
  • Mark Dygert
    Options
    Offline / Send Message
    Looking good for a flat diffuse pass =)

    Really gotta work on pushing that spec, it doesn't seem to be doing much of anything, but it could be the lighting. I agree about the scratches it does seem a bit excessive in a few areas. Keep it up, its shaping up nicely!
  • salman_fas
    Options
    Offline / Send Message
    looking nice man,

    I liked the green color scheme in the concept than red/brownish texture but that's just my opinion.

    keep it up.
  • quyeno
    Options
    Offline / Send Message
    quyeno polycounter lvl 17
    kaburan wrote: »
    Thanks Pixel, what do you mean by making sure each channel is utilizing its full range? You mean the actual normal channels in Photoshop?

    yup, in photoshop use the levels tool. select the R, G and B seperately in the drop down and push the upper and lower range markers to outer range of the histogram.

    you could also sharpen the normal map as well but be careful not to blow out the finer details.

    also mind to renormalise after to prevent any weird normal issues.
  • SHEPEIRO
    Options
    Offline / Send Message
    SHEPEIRO polycounter lvl 17
    hang-on, baked normals (fromHP) are bending the normal by the correct value, changing the value will destroy the shading....wont it? , feel free to enlighten me
  • glib
    Options
    Offline / Send Message
    SHEPEIRO wrote: »
    hang-on, baked normals (fromHP) are bending the normal by the correct value, changing the value will destroy the shading....wont it? , feel free to enlighten me

    This is what I thought (and found in a couple quick tests) when I first heard people start talking about the Eat3D old pillar tutorial doing it. Your baking app should be outputting the normals needed to turn your low res into your high res... jacking those to high heaven should just make it look like you've run a 'push' modifier on your hi res?
  • Dakkon
    Options
    Offline / Send Message
    Dakkon polycounter lvl 10
    I think the thing for me is that EVERYTHING is scratched on your diffuse. That just wouldn't be the case. Try to think about the model, and scratch it in areas where stuff would be brushing up against it. Honestly, flat metal isn't a bad thing. It gives the eye time to rest, so it can focus on the important details.
  • PixelMasher
    Options
    Offline / Send Message
    PixelMasher veteran polycounter
    well when you adjust the levels if you watch its mainly upping the contrast of your highs and low values so your normals get punched in and out deeper. similar to overlaying the normal map and neutralizing the blue channel i suppose. as there isnt too much information in the blue channel, it really only needs to be done on the r and g to get some decent results. I would say simply try it and see how it works out on a quick test piece.

    obviously ideally you would want a perfect bake from your highpoly but sometimes its more time efficient to tweak that then go back and emphasize more depth in the HP. its a quick way to tune results that I have found to be super quick and effective when it comes to Unreal and losing th normal punch when you bake the lighting.

    there are other things you can do, overlay the same normal in the material editor with a vector 3 constant with zero in the b channel and tweak the r and g etc, to me its just a matter of how you want to go about getting the results in the timeframe you have.
  • quyeno
    Options
    Offline / Send Message
    quyeno polycounter lvl 17
    glib wrote: »
    jacking those to high heaven should just make it look like you've run a 'push' modifier on your hi res?

    well not quite. it improves the depth slightly...a bit more contrasty. It doesn't destroy the Normal effect if you normalise it again. I got this tip from mates at the last place I worked...apparently it was common practice to do this?! I guess not judging from the reactions here. :)

    I made a version of the pillar although I didn't have the dvd (I know I'm cheap!)

    http://boards.polycount.net/showthread.php?t=62741

    The low poly version doesn't look that different from the high poly sculpt.
  • SHEPEIRO
    Options
    Offline / Send Message
    SHEPEIRO polycounter lvl 17
    i had a really good look at that pillar, and i reakon i can see a few slight smoothing artefacts under your strong diffuse, blatently i would not know if you hadnt said, cos you had the amount of detail and strong diffuse, but if you had a cleaner object with less diffuse detail, i would suggest that the effects of your normal tweaking would be much more pronounced.

    may do some tests with this, but I think its best to create a good enough HP in the first place and make sure the engine is reading/outputting the correct strength.
  • quyeno
    Options
    Offline / Send Message
    quyeno polycounter lvl 17
    There are some artefacts cos I was mega lazy and didn't optimise the lowpoly and just smoothed it globally. The odd smoothing trasnferred to the NM when baked and i did some painting in the channels, hence some artefacts. I'm currently resculpting the damaged again and rebaking an optimised low poly with smoothing groups, this should give me a better NM. I'll definaitely be doing the levels trick again, so stay tuned for an update on my thread.

    Kaburan...sorry for unintentionally jacking your thread mate.
  • EarthQuake
    Options
    Offline / Send Message
    well when you adjust the levels if you watch its mainly upping the contrast of your highs and low values so your normals get punched in and out deeper. similar to overlaying the normal map and neutralizing the blue channel i suppose. as there isnt too much information in the blue channel, it really only needs to be done on the r and g to get some decent results. I would say simply try it and see how it works out on a quick test piece.

    obviously ideally you would want a perfect bake from your highpoly but sometimes its more time efficient to tweak that then go back and emphasize more depth in the HP. its a quick way to tune results that I have found to be super quick and effective when it comes to Unreal and losing th normal punch when you bake the lighting.

    there are other things you can do, overlay the same normal in the material editor with a vector 3 constant with zero in the b channel and tweak the r and g etc, to me its just a matter of how you want to go about getting the results in the timeframe you have.

    Adjusting the normal like this is going to a bad bad idea on anything other than a flat plane. If you're just doing it for tiling textures, then sure go ahead adjust it to your heart is content. But if you're dealing with a map baked to a unique lowpoly model, adjusting the levels is going to totally fuck your smoothing. You see the baker compensates for the smoothing on the lowpoly mesh, and adds gradiations into your normal map for that, if you're editing the values arbitraily you're going to ruin that.

    Some effects like sharpen are generally ok, because you're just increasing contrast in a very small range, like between 2 pixels. Adjust the levels of the entire image is a terrible idea tho.

    I really think that the problem with this guy's work is something entirely different than the normals just being a little weak. It looks like he's using some strange light setup, or his normals arent applied correctly(instead applied as a bump?). Or some other problem, because it looks way wrong.
  • SHEPEIRO
    Options
    Offline / Send Message
    SHEPEIRO polycounter lvl 17
    ok to ilustrate abov argument, simple mesh HP-LP, smooth meshes is where you will see the most artefacts, but they are the best way to learn how these buggers work.

    see if you can geuss which one is which

    test.jpg

    sorry for the thread jack- thought it needed explaining. these little and sometimes faint artefacts, can seam trivial, but when you see a whole scene with these everywhere it makes it that little bit harder to read and the image quality suffers, spending the time and getting rid of them is worth it
  • Shogun3d
    Options
    Offline / Send Message
    Shogun3d polycounter lvl 12
    Here are some updated screenies, The visuals are not due to funky light setups all im using is a default light and in ut3 i've got a direct and 3 omni's. Its still flat, even if I bump it up with constant 3 vector + multiply. I double checked the level ranges of all the channels and here are the results. I appreciate everyones help. Thanks a ton.

    normal.jpg

    I cleaned up the actual diffuse a bit, it should look much better now.

    wip3.jpg

    Here's how it looks in viewport. The normals pop a lot more than in like UT3.

    viewport.jpg

    kowachwj_prj2bunker_p2.jpg
  • Shogun3d
    Options
    Offline / Send Message
    Shogun3d polycounter lvl 12
    Here's how it looks after tweaking the levels and maximizing the range.

    wip4.jpg
  • gamedev
    Options
    Offline / Send Message
    gamedev polycounter lvl 12
    Can you show us a screen from UT3? Your lighting is the first culprit. Its even, flat and washed out. The second part to the puzzle is the lack of spec. If this wall is mainly metal, I'd expect a whole lot more spec in places. You can't see nice normals and edge work w/o some spec.

    At the very least, multiply your color map against a constant in Unreal and plug that into your spec channel to start to see some of your edges and normal work. Creating a quality spec map though is the solution.
  • Mazvix
    Options
    Offline / Send Message
    I still do not understand why are you using really low diffuse sizes? it looks blurry, well the pillar with the 'A7' ontop.
  • Autocon
    Options
    Offline / Send Message
    Autocon polycounter lvl 15
    I think I would have to agree on this one that your lighting is more then likely the biggest problem here. Not sure the rig you have set up for lighting but depending on the brightness and intensity of your extra 3 omi lights lights they could be the cause of your washed out normals. Your shadows from your main light could be drowned out by the extra lights in your scene.

    I would suggest checking how things look with one light in the scene and make sure its not placed directly over your object allowing your normals not to get washed out.
  • Shogun3d
    Options
    Offline / Send Message
    Shogun3d polycounter lvl 12
    Mazvix wrote: »
    I still do not understand why are you using really low diffuse sizes? it looks blurry, well the pillar with the 'A7' ontop.

    The computer I used to get this screenshot sucks. I should have waited to get back to my computer at home.

    I'll post up my next screenshots once I get a decent lighting rig set up in UT3 and lightbakes working properly.

    I'll work on the spec as well, as gamedev mentioned.

    UT3 seems to be washing out my normals, and its really frustrating me. But then again, maybe my lighting just sucks right now. Will work on it continuously till I get it looking right. Will post up once I get something worth showin' off. Thanks again guys.
  • Torrrtilla
    Options
    Offline / Send Message
    Fill it with lava or dead babies! :D
  • Shogun3d
    Options
    Offline / Send Message
    Shogun3d polycounter lvl 12
    pushed the lightings, shadows and overall mood a bit darker, nearing completion.

    I did my best to accomodate all the great crits (which thanks for taking the time to comment!) i've definitely learned a lot.

    Just about wrapping this up. Any final comments before I take final screenshots are appreciated.

    ScreenShot00006.jpg

    ScreenShot00007.jpg
  • SHEPEIRO
    Options
    Offline / Send Message
    SHEPEIRO polycounter lvl 17
    i think that you could reduce the amount of hard edges in your low, which would help with thenormal bake
  • Mark Dygert
    Options
    Offline / Send Message
    Agreed, a few bevels won't make a dent in the fps and they'll help so much. Like Shep mentioned it will help average noramals around the corner.
    This thread covers it pretty well: http://boards.polycount.net/showthread.php?t=50588

    I think there are a lot of micro scratches and noisy damage details that are kind of robbing some of the bigger shapes of their definition. Probably do one more color pass and paint back in some solid blocks of color over the top of what you have. It will pick up some variation and it will keep a grungy been used look but it will also redefine shapes which are getting lost.

    Maybe mix up the materials a bit and turn some of the metal to concrete?

    Paint Over.

    In the spec highlight the edges of things, it will help define major shapes and really sell the normal map. There are a few ways to do this, crazybump can help quite a bit but they can just as easily be painted in by hand. Tracing the outer edges with a think white line, dupe the layer bur it and you're on your way to more defined shapes. It can help to have higher spec edge detail on corners and on top. Realtime lighting needs a lot of help and highlighting edges is a big boost.

    Looking awesome! you're getting really close to perfection!
  • OBlastradiusO
    Options
    Offline / Send Message
    OBlastradiusO polycounter lvl 11
    Vig wrote: »
    Agreed, a few bevels won't make a dent in the fps and they'll help so much. Like Shep mentioned it will help average noramals around the corner.
    This thread covers it pretty well: http://boards.polycount.net/showthread.php?t=50588

    I think there are a lot of micro scratches and noisy details. Probably do one more color pass and paint back in some solid blocks of color over the top of what you have. It will pick up some variation and it will keep a grungy been used look but it will also redefine shapes which are getting lost.

    Maybe mix up the materials a bit and turn some of the metal to concrete?

    In the spec highlight the edges of things, it will help define major shapes and really sell the normal map. There are a few ways to do this, crazybump can help quite a bit but they can just as easily be painted in by hand. Tracing the outer edges with a think white line, dupe the layer bur it and you're on your way to more defined shapes. It can help to have higher spec edge detail on corners and on top. Realtime lighting needs a lot of help and highlighting edges is a big boost.

    Looking awesome! you're getting really close to perfection!


    I found this tutorial quite helpful too me!

    http://www.iddevnet.com/quake4/ArtReference_SpecularMaps

    This help me out a lot in defining my normal map especially with wide beveled edges.
    Like Vig said you cant also use crazybump, but I would do it the other way because you have more control. One more thing putting a light above that door would also help with your lighting, that also would be good for contrast. How is the space marine going to spot that door without something illuminating it?
  • Shogun3d
    Options
    Offline / Send Message
    Shogun3d polycounter lvl 12
    Vig wrote: »
    Agreed, a few bevels won't make a dent in the fps and they'll help so much. Like Shep mentioned it will help average noramals around the corner.
    This thread covers it pretty well: http://boards.polycount.net/showthread.php?t=50588

    I think there are a lot of micro scratches and noisy damage details that are kind of robbing some of the bigger shapes of their definition. Probably do one more color pass and paint back in some solid blocks of color over the top of what you have. It will pick up some variation and it will keep a grungy been used look but it will also redefine shapes which are getting lost.

    Maybe mix up the materials a bit and turn some of the metal to concrete?

    Paint Over.

    In the spec highlight the edges of things, it will help define major shapes and really sell the normal map. There are a few ways to do this, crazybump can help quite a bit but they can just as easily be painted in by hand. Tracing the outer edges with a think white line, dupe the layer bur it and you're on your way to more defined shapes. It can help to have higher spec edge detail on corners and on top. Realtime lighting needs a lot of help and highlighting edges is a big boost.

    Looking awesome! you're getting really close to perfection!

    Man i've gotta do this, nice paint over and explanation I see perfectly clear of what you mean. I'll do one more final pass of tweaking etc and get these adjustments in and I think it will pretty much be finalized.

    Thanks a ton Vig.
  • HAL
    Options
    Offline / Send Message
    HAL polycounter lvl 13
    Even if he used a additional bevel, that thingy left of the door should show up a baked normal quite well, I guess that a to hard edge on the high poly might be a problem?
    Cause in the last screen you showed us of the highpoly, the edges looked reaaallyy tight.
  • GOBEE
    Options
    Offline / Send Message
    GOBEE polycounter lvl 10
    Mark.N wrote: »
    I'd say do something with that open trench running along the base of the wall. You've got a scene full of detail and then this uninteresting strip that just cuts across the shot. It just seems out of place. Something simple, like piping grate work or even some kind of floor light fixtures could help fill out that area.

    I second that! Floor light fixtures shining a bit of light on the sides will enhance the scene and also fill up some negative space on the ground there. Maybe even show off your normal maps a bit more. Other than that, this is pretty good. Sucks about the normal map issues though.
1
Sign In or Register to comment.