Home 3D Art Showcase & Critiques

Vagesk WIP

polycounter lvl 12
Offline / Send Message
sub_roland polycounter lvl 12
Hey all-
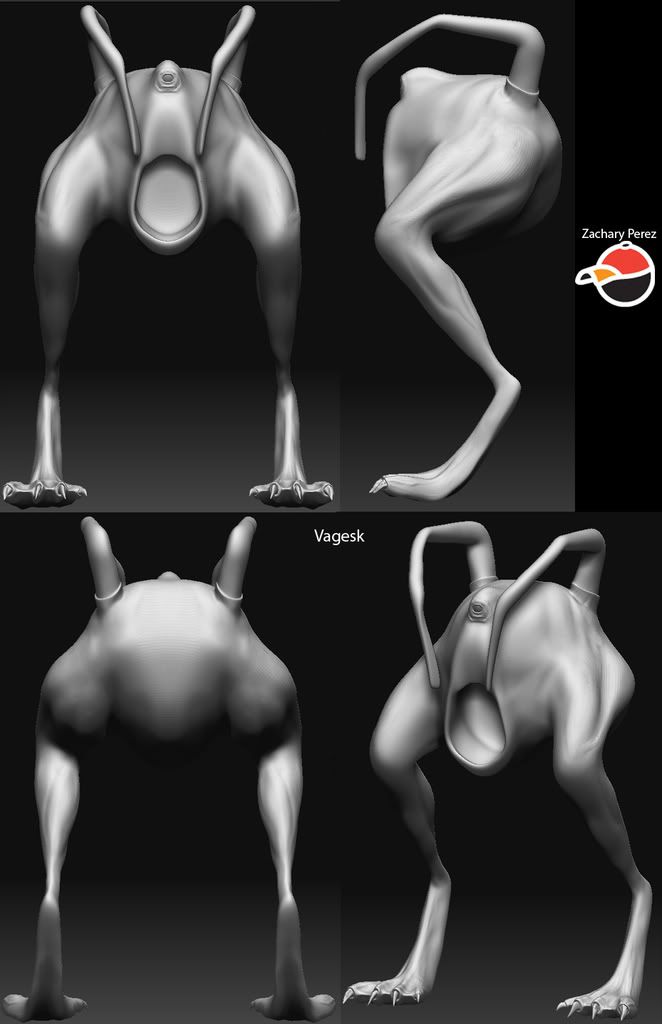
I dont really post to much of my own stuff on here but figured I should start. Here is a creature that I have started today. Hope to carry it through texturing. C&C always welcome. I've spent about 2 hours on it so far, concept and modeling. Not sure what I'm going to do with the mouth, original idea was some big teeth, kind of had angler fish in mind when first doing it. Then I started thinking maybe it could be a mount. and maybe work a saddle into the mouth. Not to sure. Would love to hear some ideas. Thanks polycounters. Perez_Zachary_Vagesk.jpg

Replies

  • Kindri
    Options
    Offline / Send Message
    Looks quite cool but I have to admit that my gut reaction was that his mouth looked mildly goatse-esque. That probably says more about me than about your model :x

    For an actual constructive crit, it seems like the feet are a touch too far forward, like he might fall backwards. Otherwise very cool :)
  • sub_roland
    Options
    Offline / Send Message
    sub_roland polycounter lvl 12
    lol, yeah i can see where you get that. my buddy said that it reminded him of a vagina, hence the name. But I might now have to change the name to something about goatse. ANd yeah I can see what your talking about in the feet/legs thanks
  • leilei
    Options
    Offline / Send Message
    leilei polycounter lvl 14
    reminds me of the ass monster from Po'ed
  • sub_roland
    Options
    Offline / Send Message
    sub_roland polycounter lvl 12
    alright last post for the night, I have yet to reposition the legs. will do that tomorrow. Lower right is what im thinking about doing for the mouth. I did have a buddy suggest having the teeth come from the sides of the mouth instead of top and bottom and I thought that was pretty funny so might go with that. Keep the C&C coming.
    Perez_Zachary_Vagesk_02.jpg
    Thanks
  • AsylumSeaker
    Options
    Offline / Send Message
    To me it looks sort of like the rear end of a dog.
    Cool creature overall.
  • sub_roland
    Options
    Offline / Send Message
    sub_roland polycounter lvl 12
    Here's a little update. Didn't get to work on it over the weekend, unfortunately. C&C always welcome.
    Perez_Zachary_Vagesk_03_wup.jpg
  • leilei
    Options
    Offline / Send Message
    leilei polycounter lvl 14
    I wonder what a male version looks like
  • sub_roland
    Options
    Offline / Send Message
    sub_roland polycounter lvl 12
    LOL, I don't know but I think I would be scared and envious of it.
  • Geezus
    Options
    Offline / Send Message
    Geezus mod
    I immediately saw Goatse, the int0rtubes has ruined me.
  • timwiese
    Options
    Offline / Send Message
    timwiese polycounter lvl 9
    I think i am going to go throw up now.
  • sub_roland
    Options
    Offline / Send Message
    sub_roland polycounter lvl 12
    Hello all, sorry I haven't updated in awhile. Been doing some other stupid shit. But I did transfer the high poly to a new anim ready mesh. got some sculpting still to do, though. c&c always welcome.
    Perez_Zachary_Vagesk-2.jpg
  • Snefer
    Options
    Offline / Send Message
    Snefer polycounter lvl 16
    this is a really disgusting creature :-P but a good sculpt... Will be interesting if the texture will be as gross... will it be slimy? ^^
  • Crumplecakes
    Options
    Offline / Send Message
    I wouldn't know whether to run from that, or get ready for some bed action.... although I would rather find one when it's older and has lost all of it's teeth... in the words of the sheriff of Rottingham from Robin Hood Men in Tights "That's going to chafe my willy"

    jokes aside, original idea, reminds me of some twisted yet more awesome version of a "Houndeye" from Half Life 1.

    great work can't wait to see it textured.
  • konstruct
    Options
    Offline / Send Message
    konstruct polycounter lvl 18
    oh man, I just threw up in my mouth a little. I hope your planning on adding some hair-
  • GOBEE
    Options
    Offline / Send Message
    GOBEE polycounter lvl 10
    Interesting creature. The last screenshot you posted reminds me of one of the creatures in Men in Black. I think it was a blue alien that was running after the MiB guys in the desert after they got pulled over by the border patrol.. anyway, the one that got blasted and exploded into a pile of goo. That guy. I like it. Can't wait to see this guy when it's all finished.

    It did kinda look like a vagina at first but you have managed to go the non-vaginal way, which in this case, is probably a good idea.

    Also, for the back end.. maybe model something more interesting? Cuz the front is just like, POW! Look at me! And then the back is like.. uhhh, what am I? It's not as defined so maybe add a crazy looking tail? Would that even out the two front angler things? Just an idea. I think a tail would look cool but it's your model, see what looks right. Good job man.
  • sub_roland
    Options
    Offline / Send Message
    sub_roland polycounter lvl 12
    Thanks for the comments all.
    konstruct- I don't currently plane on doing hair, I'm think of this as more of an amphibian.
    GOBEE- I'm not entirely sure how I'm handling the backside, that's why it's still a little blah back there, I might play around with a tail.

    Thanks for the ideas
  • Smirnoffka
    Options
    Offline / Send Message
    Smirnoffka polycounter lvl 17
    Just to make sure I'm not tripping here.

    I see many of these features.

    481px-Scheme_female_reproductive_system-en.svg.png

    Yeeeeahhh
  • AXiao
    Options
    Offline / Send Message
    that's not where i want to stick it....

    but anyhow, it'd be cool to see the front two tentacles glow, either blue or greenish maybe?
  • sub_roland
    Options
    Offline / Send Message
    sub_roland polycounter lvl 12
    here's a little update, output some normal maps from zbrush put on in maya, some hardware renders, need to start texturing but want to focus on Unearthly challenge, fricken Sophie's choice here. Not sure which route im gonna go, other then bed now. Always love c&c

    Perez_Zachary_VageskstartGamemesh.jpg
  • sub_roland
    Options
    Offline / Send Message
    sub_roland polycounter lvl 12
    i was hoping that someone would be able to help me out, I am having a problem with seams. i am generating out of zbrush into maya, so I i used the zbrush preset maya tagentspacenode best quality and set my samples all the way up. and this is how the seem looks in maya
    seam.jpg
    so I was wonderint what suggestions people might have for settings, out ways to fix this, I tryed loading in the normal map as a texture into zbrush and use zapp link but the colors in some areas are just to different to try and get a decent blend between them, and if it helps heres the normal map
    Vagesk_normalmap.jpg
    thanks for whatever help you all can offer
  • theDEAD
    Options
    Offline / Send Message
    hey man.. nice progress so far!

    Not entirely sure whats up with your seem. Although the first thing that comes to mind would be to simply use the 'soften edge' option under the 'normals' tab at the top.

    I'm still learning myself... so hope this helps.

    GL
  • Reich
    Options
    Offline / Send Message
    i've seen that come up at school a few times. Depending on what you are baking out of the major calprit is mirrored UVs.

    a photoshop trick i was shown to fix up seems and soften your normal is to copy it do a light Gaussian blur and then overlay it. Mask out the areas u want to stay sharp.
  • sub_roland
    Options
    Offline / Send Message
    sub_roland polycounter lvl 12
    Thanks for the replies
    theDead- Thanks for the thought, but I do have my edges softened.
    Reich- I tried the gaussian blur trick but it made no real changes.
    Thanks for the thoughts guys. And Im not sure that it would be mirrored uv's because the seams are on both legs. if anyone else has any ideas it would be appreciated.
  • Mezz
    Options
    Offline / Send Message
    Mezz polycounter lvl 8
    ... in the words of the sheriff of Rottingham from Robin Hood Men in Tights "That's going to chafe my willy"

    LMAO!!!! Omg, I'm sorry, that quote is just... too appropriate :D Thank you for making my day.

    But seriously... this creature is... so disturbing... or so awesome... I... I'm not even sure. I think it's amazing, but it's so painful to look close enough to tell... lol
    As for that nasty seem... wish I could help you, but the only lame way I know how to fix that kinda seam is to fade out the details in the normal map, but that's not really an option in that spot. I wonder if it could be hurt more by the placement of where the seam is... but having to re-unwrap the whole darn thing and rebake your normals and all... ... yeah hopefully someone can come up with a better solution :P
  • sub_roland
    Options
    Offline / Send Message
    sub_roland polycounter lvl 12
    Thanks for the comments mezz and yeah hopfully some will have another idea, because ive thought about re uving it but i dont want to have a shitty uv layout with having the legs sewn back onto the the body.
  • 3dTweeker
    Options
    Offline / Send Message
    Under the "Expert Pass 1" try turning down the "On Uv Seam" setting.
  • 3dTweeker
    Options
    Offline / Send Message
    Funny thing is the direction you lay out your UVs in relation to the direction of the UVs they're seemed to makes a difference in the colors on a tangent space normal map and sometimes it causes funny looking seams like that... Also make sure that none of your UVs are inverted.
  • sub_roland
    Options
    Offline / Send Message
    sub_roland polycounter lvl 12
    thanks for the tips tweeker. I had heard that I needed the uvs to face certain ways. I had at first had the legs facing up and down, so i then laid them out sideways with the proper edges facing the corresponding parts of the body, which got it a little tiny bit better, but not that much. I'm off to bed now so i'll try the expert pass setting tomorrow. Thanks for the idea.
  • BradMyers82
    Options
    Offline / Send Message
    BradMyers82 interpolator
    Personally, I have gotten seams like that due to several different scenarios.
    Is that area mirrored? It doesn't look like it from your uvs so that's probably not it.

    My guess, one of two things.
    a. When you originally baked, you might have had different smoothing groups assigned to the leg part and the body. This creates a nasty seam.

    OR

    b. Your simply not outputting the normals correctly. I know that often times if I switch from my main app, (which is 3ds max) to another program like xnormal, I have to flip the GREEN CHANNEL, in the normals output options. If I don't flip the green channel, it outputs like that on my seams. Alternately, this can be hardwired into your texture inside photoshop by flipping the green channel in the channels options.

    I'm guessing the culprit is b., which is the easiest fix of all; but then again there are a few other possibilities I am probably forgetting.

    Good luck, and I look forward to seeing the actual solution.
  • sub_roland
    Options
    Offline / Send Message
    sub_roland polycounter lvl 12
    I have now tried rotating the uv's for the leg in all posible directions and the one posted above is the least noticable seem i can get from that. I tried your suggetion Tweeker but that also didn't make much of a difference. I the tried your idea b BradMyers and tried inverting different channels and none of those worked. The one ZBrush outputs in the best, which makes sense using the preset maya_tangentspacenode_bestquality. So again if anyone has anyother ideas I would love to hear them. But I think I'm just going to move onto the texture painting for tomorrow.

    Thanks again to everyone for their ideas so far
  • GOBEE
    Options
    Offline / Send Message
    GOBEE polycounter lvl 10
    Hey again.. Sorry I'm at work right now so I don't have ZB in front of me to explain in detail but you should see your normal map settings in ZB. Look for something that says seam blur. I think that's what it says.. turn that baby up a bit until you get something that looks decent.

    If not that, I usually just take the blur tool in PS, and blur along the area of the seam. it will still be there, but not as noticable.

    Soon as I get home i'll double check my ZBrush settings I use. Hopefully what I am thinking of is the solution. If not, then I'm talking out of my ass.
  • sub_roland
    Options
    Offline / Send Message
    sub_roland polycounter lvl 12
    Hey thanks for the idea gobee, but I had tried that, and the colors are to far apart to be able to blur well, I have actually figured out a solution, I had to export out chucks from zbrush and import individual pieces into maya and generate the normal maps using maya, but i wound up with 5 maps that I now have to put together in photoshop. I'll post the results tonight at some point. Thanks for all the ideas though guys.
  • sub_roland
    Options
    Offline / Send Message
    sub_roland polycounter lvl 12
    Ok sorry it took me so long to get this up, but heres the update with no seams. YAY, though there are a couple on the bottom 8( but nothing your really see.
    noseam.jpg

    again thanks for all the comments so far. I plan on texturing her over the next week, but im a little reluctant because i kind of suck at it. I'm afraid im going to make the model look worse. ohh well well see where it goes.
  • SHEPEIRO
    Options
    Offline / Send Message
    SHEPEIRO polycounter lvl 17
    Reich wrote: »
    i've seen that come up at school a few times. Depending on what you are baking out of the major calprit is mirrored UVs.

    a photoshop trick i was shown to fix up seems and soften your normal is to copy it do a light Gaussian blur and then overlay it. Mask out the areas u want to stay sharp.

    dont do this, IMO you should be getting a good back first off, meesing with it too much after is asking for a less precise and innacurate normalmap.

    id suggestbacking out of another program, say xnormal, ive had better results out of that when zmappers fallen down, if they are flipped uvs, then make two shaders with a flipped channel. its hould work, dont hack it

    just seen your last post. IGNORE AT WILL
  • sub_roland
    Options
    Offline / Send Message
    sub_roland polycounter lvl 12
    lol, thanks anyway shep i'll probly try xnormal next time i get problems
  • sub_roland
    Options
    Offline / Send Message
    sub_roland polycounter lvl 12
    OK so sorry it has taken me so long to post on this again. But here is my texturing so far, I am only gonna spend one more day on it I do believe. C&C always welcome. Thanks

    Perez_Zachary_Vagesk_TextureStart.jpg

    texture in a 2k map, textured in zbrush
  • sub_roland
    Options
    Offline / Send Message
    sub_roland polycounter lvl 12
    I tried making an AO map in maya but it would crash every time, so I was going to try and do it in modo when I got on a machine with it later today, was wondering what other programs people make their ao's in other then maya and 3ds max
  • BradMyers82
    Options
    Offline / Send Message
    BradMyers82 interpolator
    I found I get the best results with a program called Topogun. It's still in beta, and you could probably still join.

    I also use 3ds max a lot, but I have run into a few bugs here and there, so somtimes I use XNormal as well (free software app).

    XNormal is a great alternitive if your machine cant handle the mesh. As long as your high poly isn't beyond a certain limit, xnormal can spit out the results far faster then any other app.

    Nice progress so far, by the way.
  • sub_roland
    Options
    Offline / Send Message
    sub_roland polycounter lvl 12
    Thanks for the heads up on topogun, i signed up for the beta but i have to wait a few days to see if i am accepted. In the mean time I'll give xNormal a try. I had used it once when trying to get a normal map but it kept failing on me, but I'll give it another shot this time at AOs. Thanks again Brad.
  • BradMyers82
    Options
    Offline / Send Message
    BradMyers82 interpolator
    Glad I could help. Since your going to use XNormal and not all that familiar I figured I would chime in and let you know about the tutorials page. Xnormal has a lot of options and can be confusing at first so these tutorials are imperative.
    Sometimes its easy to overlook them on the site, but here they are:
    http://www.xnormal.net/Tutorials.aspx

    The simple GPU AO tool is the least CPU intensive method there is for generating AO that I know of, and there is a easy to follow tutorial on the page I mentioned. Worth a look.
    Good luck.
  • SHEPEIRO
    Options
    Offline / Send Message
    SHEPEIRO polycounter lvl 17
    mmmm reminds me of chistmas dinner
  • sub_roland
    Options
    Offline / Send Message
    sub_roland polycounter lvl 12
    awesome thanks for the link Brad, I got a little bit more textuing that I am going to do today in terms of diffuse then I'll try out the tut for my AO. Thanks again. And Shep I don't think I ever want to go to one of your christmas dinners
Sign In or Register to comment.