Home 3D Art Showcase & Critiques

Cowboy Western Environment WIP

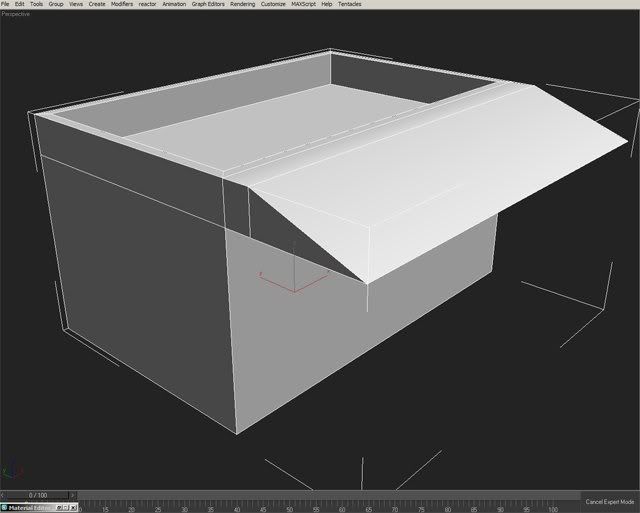
I will be modelling a western style environment with a few buildings. I have a rough basic shape and will add things like doors and windows as seperate objects so that they can be reused. I was looking for help as to how to texture the building. I have unwrapped the uvs (@1024) and was wondering if this is the correct way to do it? Will i create the textures in photoshop using the uv render as a template? Can i use tilable textures to be shared amonst other buildings? I was looking to use the same kind of wood textures on a number of buildings. Any advice, tutorials etc would be a great help.

I would like to improve my environment modelling skills but find texturing a problem since im not sure how to go about it. Thanks in advance.

buildingwip.jpg

marshalbuildinguvtemplatemax.jpg

Replies

  • pliang
    Options
    Offline / Send Message
    pliang polycounter lvl 17
    Not really seeing how that layout is working...first of all when say doing a wall you should have that take up more of the space in there insetad of randomly sizing them about.

    Keep in mind the walls are more often seeing in the camera...so other bits like the roof which you don't see up close and on camera as often you can shrink them down since you don't need all that detail.

    And yes usually people render out the templte for texturing in photoshop.


    As for modeling...before that I think it would be better to track down some actual picture references as that building seems more like a random box than actual building.
  • spideyscott
    Options
    Offline / Send Message
    I should of thought of that about the uv's. You dont see the underside so why should it be as large as the front,of course silly me. For reference i sketched out an idea based of some images of cowboy western buildings. Thanks for the help, ill keep working on it. I know i have a long way to go.

    Below is the rest of the scene, the sign and railings are separate objects so that they can be reused later. Hopefully you can see the building starting to take shape.
    buildingwip2.jpg
  • Saidin311
    Options
    Offline / Send Message
    Saidin311 polycounter lvl 11
    From my own learning basically I see this building as something you could construct modularly (if this was intended for unreal say). IE there could be 4 or 5 different parts here that could be reused. The sign, the porch, the awning. Windows and doors are a given. And then that leaves you with a square.

    That square could then be cut into 3 sections (for example). A top, middle and bottom.

    Then for texturing you use tileable and repeatable textures for the building. And then you unwrap unique objects such as the sign and windows and doors. For the porch and stuff it could be a combination of simple mapping and/or unwrapping.

    Then you could make 5 or 6 buildings just from these few meshes. A building without porch, one with only an awning. One with a broken and falling down sign on top of a porch with no awning. Etc.

    At least that would be my thinking in my short time learning about set building. I should mention that would be if I was doing this for say, importing into unreal.
  • spideyscott
    Options
    Offline / Send Message
    Its intended simply as a project not to work with a particular engine. It can use any method and be as high poly as i like. I dont want to go overboard on the polycount so trying to create the details with textures etc. I am making it modular though so pieces can be reused.

    When you say the square can be cut into 3 sections, do you actually mean to cut the polygon of each side into 3 for the top, middle and bottom or just the texture?
  • cholden
    Options
    Offline / Send Message
    cholden polycounter lvl 18
    This may be a case of premature pimping. I suggest putting together a completely building however you want to make it. THEN, post it to see if this is a valid technique.

    Is the way you're doing it now right? No, you should use tiling textures, unless this was a small, RTS piece in which it could be a single texture with all faces mapped out.

    There's lots of tutorials and examples around here, if you just look a bit, you'll find everything you need.
  • Jeremy Lindstrom
    Options
    Offline / Send Message
    Jeremy Lindstrom polycounter lvl 18
    I don't know I couldn't find many tutorials on environmental modeling when I was working on it.. O_o Other's then your's of course. laugh.gif Which are a nice start.

    Speaking of yours cholden, when making them modular, you need to unwrap them prior to putting them all together since you'd have to unwrap them all after you put a building together, so you'd need to do that first. Right?
  • cholden
    Options
    Offline / Send Message
    cholden polycounter lvl 18

    Case by case (depends), Dekard. Sometimes you do not have the luxary of completing everything all neat and clean and building it just like you want. Now, if you're wise enough, you make all those modular pieces instanced anyway so when you update one, they all update. Other times, they accept a basic tile and each piece is scaled differently resulting in somewhat custom UVs. BUT, if it were all up to me, I'd plan how each piece was going to be used and reused, modeled and textured to completion and finally placed all around the level/area.

    For anyone wondering, here's my tuts page, http://chrisholden.net/tutor/tutors.htm

    and check the 2d/3d discussion, plus archive thread for more. Saidin311 has asked and recieved some good answers as of late.
  • spideyscott
    Options
    Offline / Send Message
    Cholden thanks for the link had a look at the tutorials and they look really good. I to find there is a lack of environment tutorials out there. Also i read over the old thread about lack of environment artists as well, very helpful.

    I think your right and im best just doing it and posting the results. Its a project for uni, we start next week and have 3 months to work on it so i do have the time. Im hoping to have a few different environments completed over the next few months.
  • spideyscott
    Options
    Offline / Send Message
    Heres the building textured, its still in the early stages. Its part of a project involing an entire environment being modelled and a camera flying threw the scene. I know myself some of the areas that need improvement but wanted to hear from other people as well.
    marshalbuilding.jpg
  • Cody
    Options
    Offline / Send Message
    Cody polycounter lvl 15
    Good start on textures there. More dirt. Especially on the roof, which is way to clean. Dirty everything up.
  • cholden
    Options
    Offline / Send Message
    cholden polycounter lvl 18
    Trim EVERYTHING.

    Transition between roof tile and wood, edges of porch floor, around windows, trim around top of blue wood roof, transition between blue wood and main wood on walls, everything. It'd tedious, but it's a huge part of what makes environment art look good. Don't be scared to use polygons and prepare to spend a lot of time in the UV editor.
  • spideyscott
    Options
    Offline / Send Message
    thanks for the advice, really helpful, i know the textures need to be dirted up alot more. Im going to be researching the best way to do that, right now i used brushes and burn tools etc.

    By trim do you mean add it into the current textures and the models or to model and texture trim pieces seperate that can be reused?
  • cholden
    Options
    Offline / Send Message
    cholden polycounter lvl 18
    You may get better results from modeling the trims in. More 3d depth to the mesh and be able to reuse your textures more effectively (instead of making all new trim versions of everything).
  • spideyscott
    Options
    Offline / Send Message
    Just a quick update. Still working on the textures. Just finished my first week back at uni so might have other work that i will post up. Thanks again for the help.

    marshalbuilding-1.jpg
  • Genjix
    Options
    Offline / Send Message
    drastic improvement smile.gif
  • Cody
    Options
    Offline / Send Message
    Cody polycounter lvl 15
    Yeah. Whoa. 50 times better at least. One thing standing out to me is that the texture is really dark. I think some more lights would make it pop, like on the barred windows perhaps. Look at some old western movies for building reference. Could find something you didn't know about to really sell the feel of it.
  • Jaco
    Options
    Offline / Send Message
    Jaco polycounter lvl 17
    Nice. Small crit, the marshal text should be centered, unless you plan on adding something next to it. Fading it a bit, making it look more like old paint, would be good to.
    What surface is the text painted on, wood panels? Looks more like moldy cardboard at the moment though smile.gif
  • cholden
    Options
    Offline / Send Message
    cholden polycounter lvl 18
    About the colors

    You have 3 levels of wood here, sunbleached walls, dirty porch and fresh red trim (top). Which wood is it going to be? Considering the whole building was built at once as opposed to massive gaps of time.

    From there, the red and blue paint is too fresh/saturated to work with everything else.

    Here's a rough example of what I mean
    mb20lg6.jpg
  • spideyscott
    Options
    Offline / Send Message
    Your right about the colours have toned done the brightness but still keeping the roof a blue colour just now. Also the sign was supposed to be on old paper but looking at more reference i think its better if you can see the wood underneath.

    I am trying to aim for a building that is old and has be repainted and perhaps have parts replaced over time. Still working on the textures to create the idea of layers of paint. Right now there isnt any lighting except for the max default. The model will be added to a larger environment scene which will then be lighted.

    Thanks everyone for the help, i can really see an improvement in my work.
    marshalbuilding-2.jpg
  • Cody
    Options
    Offline / Send Message
    Cody polycounter lvl 15
    Nice. Sign looks a lot better now. Maybe a few bullet holes? smile.gif The trim is still standing out to much I think. It's too thick in places and too dark.
    Some reference for ya:
    REF
    REF2
  • stoofoo
    Options
    Offline / Send Message
    stoofoo polycounter lvl 18
    This piece has really turned around from where it started. Keep working friend!
  • spideyscott
    Options
    Offline / Send Message
    Thanks again for the comments and suggestions. Cody the 1st link didnt work for me but the 2nd one looks really good.
  • Jeff Parrott
    Options
    Offline / Send Message
    Jeff Parrott polycounter lvl 19
    I'd angle the wood slats a bit. Make it look like someone kicked a few of them or didn't nail them straight. It just looks too perfectly put together right now.
  • yeluis
    Options
    Offline / Send Message
    yeluis polycounter lvl 17
    it feels way to polygonal and symmetrical. slant some wood planks, sink sections of the floor. give it chaos over all right now it feels like a cardboard model
  • SHEPEIRO
    Options
    Offline / Send Message
    SHEPEIRO polycounter lvl 17
    agree with crits about it being too clean, just adding some concave surfaces, the odd nick and chamfered corner, and giving some of the struts a few more edge loops to bend them slighty would add a little wear to the form which would then match the textures more.
  • spideyscott
    Options
    Offline / Send Message
    Took onboard the comments, just a quick update. Also been working on other models that i will post when they are further along. Thanks again.
    marshalbuilding-3.jpg

    marshalbuilding2.jpg
  • ScoobyDoofus
    Options
    Offline / Send Message
    ScoobyDoofus polycounter lvl 19
    Careful when adding dirt overlays to not just make your entire surface darker. Darker doesn't necessarily mean dirty. I'd also love to see you start presenting this piece in some semblance of an environment, even if its just a plane for a ground and a skybox. It would really help establish the look and get you thinking about how your values, your contrast works when "in situ".
  • spideyscott
    Options
    Offline / Send Message
    Just a very quick update, wont be able to do much more on this for a few days as i have others models to finish and start texturing. Ive reduced the amount of dirt on some of the textures. Also quickly added in planes that show the basic colours for the environment. The final piece will have the lanscape model and a sky texture.

    marshalbuilding-4.jpg
    marshalbuilding2-1.jpg
  • cholden
    Options
    Offline / Send Message
    cholden polycounter lvl 18
    Here's a quick point people have been hitting at, but maybe visualization will make it more clear:

    Add a few extra cuts to the profile of your mesh, and shake up the verts. Sagging the centers, pulling out corners, making nothing "perfect". This will give it a more natural, aged look.

    I went to the extreme for this example to give you a better grasp of the point
    western_example01.jpg

    Touches like this can also add a lot of style and charm to your work. You have to be careful not to overdo it as it can become cartoony (which may not be a bad thing).
  • SHEPEIRO
    Options
    Offline / Send Message
    SHEPEIRO polycounter lvl 17
    [ QUOTE ]
    Careful when adding dirt overlays to not just make your entire surface darker. Darker doesn't necessarily mean dirty. I'd also love to see you start presenting this piece in some semblance of an environment, even if its just a plane for a ground and a skybox. It would really help establish the look and get you thinking about how your values, your contrast works when "in situ".

    [/ QUOTE ]

    good tips on the darker aint dirtier thing, in this case id say the wood struts(frame) is way too dark, look at references of sun bleached wood, id go for something just a couple of shades darker than the white painted parts
  • spideyscott
    Options
    Offline / Send Message
    Thanks for the more tips, cholden your pic was very informative. Im aiming for an anime influenced western. Ive still to work more on the railings, i might make them more uneven. I have also posted up some more wips of other buildings im working on.
    marshalbuilding-5.jpg
    marshalbuilding2-2.jpg
    Buildings2.jpg
    Buildings1.jpg
  • SHEPEIRO
    Options
    Offline / Send Message
    SHEPEIRO polycounter lvl 17
    much better dont like the way the front suport beam is modeled though it looks like its made of cloth and being propped up by one of the posts, make the distortion much less in this area
  • TheCollect
    Options
    Offline / Send Message
    marshal...nice job just looking at it gives me the creeps of returning to prison...il meet you all there at high noon...

    kidding nice job man
  • Jeremy Lindstrom
    Options
    Offline / Send Message
    Jeremy Lindstrom polycounter lvl 18
    This maybe a design choice but the door should line up with the entry right on the marshall building. I'd think you'd want to move that wooden support beam 2 feet to the right, but all is well
  • spideyscott
    Options
    Offline / Send Message
    Thanks, it was by design. I wanted so no one entering or leaving would have a straight line. Making it more awkward to both break out or in. Sorry i have not updated this in a while but been working on characters for a uni project. I might post them up in another thread depending on how they turn out.
  • morf
    Options
    Offline / Send Message
    morf polycounter lvl 11
    Looking good scott, big improvement from your 1st post. I think the door and the texture on the porch still need some work though. How are you getting on with crazybump? (it's craig from uni btw).
  • spideyscott
    Options
    Offline / Send Message
    Hi Craig. Yea they do in particular the porch. Ive used it to test it out but not actually on the models yet. I not sure how it will work with my texture since it has overlapping uvs. The side walls are using the same part of the texture map. I think that might not work when turning the texture into normals. Havent had that much time to work on it. Been doing some work on a low polyish game character.
  • PaK
    Options
    Offline / Send Message
    PaK polycounter lvl 18
    Chris is right on the money with his suggestions. Add some sag. You can afford more polys than this, this is 2008 not 1998.

    -R
  • Mark Dygert
    Options
    Offline / Send Message
    I think the model is great, really nice work!

    The textures need to be unified, none of the materials look like they have aged together. To help combat this you can overlay a color or a dirty texture and then desaturated your materials. As things get older, wood especially, they fade. The porch wood looks very brown and much newer then the rest. Try to get the age of the materials closer together =)

    Good work so far keep at it!

    EDIT: Just read what Chris posted, great crit and exactly what I was trying to say, he even gave a paint over. I think you need to work that in a little more before you can call it done.
  • Mark Dygert
    Options
    Offline / Send Message
    [ QUOTE ]
    Here's a quick point people have been hitting at, but maybe visualization will make it more clear:

    Add a few extra cuts to the profile of your mesh, and shake up the verts. Sagging the centers, pulling out corners, making nothing "perfect". This will give it a more natural, aged look.

    I went to the extreme for this example to give you a better grasp of the point
    western_example01.jpg

    Touches like this can also add a lot of style and charm to your work. You have to be careful not to overdo it as it can become cartoony (which may not be a bad thing).

    [/ QUOTE ]

    If you're using Max (I think Maya has something similar) after you make your cuts, apply a FFD modifier to your building. It gives you a control cage with points you can pull, squish and stretch your building any number of ways. Great for this type of thing.
  • Saidin311
    Options
    Offline / Send Message
    Saidin311 polycounter lvl 11
    This is coming a long pretty good! I totally missed Chris' paintover thanks for bumping that Vig hah.

    I'm always confused though with stuff like this; adding cuts after the fact to finish models. Are these types of cuts legal in a game sense? The side of the building for example is now a bazillion sided poly. When doing architecture like this do you have to run the loops all the way around the building?

    I hope that q doesn't derail the work here, hopefully the OP and me can learn a little from it! smile.gif
  • Tumerboy
    Options
    Offline / Send Message
    Tumerboy polycounter lvl 16
    All Bazillion sided polys will end up being converted to triangles when they're put into the game.

    The only reason bazillion sided polys are dangerous, is that you don't know where/how that poly will be divided up into triangles.

    If you do at least some of the work dividing it up yourself first, then you retain control over where those edges end up.

    However, on a flat plane like the side of this building, it's not likely to matter too much.
  • vertexguy
    Options
    Offline / Send Message
    The contrast on the textures of the marshal building are a little too strong for the way the scene is lit. Some of it looks like you ran it through a sharpen filter in photoshop at a high setting. Also it looks like the wood grain on the big top beams might be running the wrong way. I like that you are giving your buildings some personality by breaking up the straight lines.
Sign In or Register to comment.