Home 3D Art Showcase & Critiques

UT2004 - MakeShift Vehicles!!

So me and a friend of mine thought it would be fun to make a vehicle for UT2004. So two vehicles will be made total. The vehicles will have a makeshift theme (like mad max or waterworld).

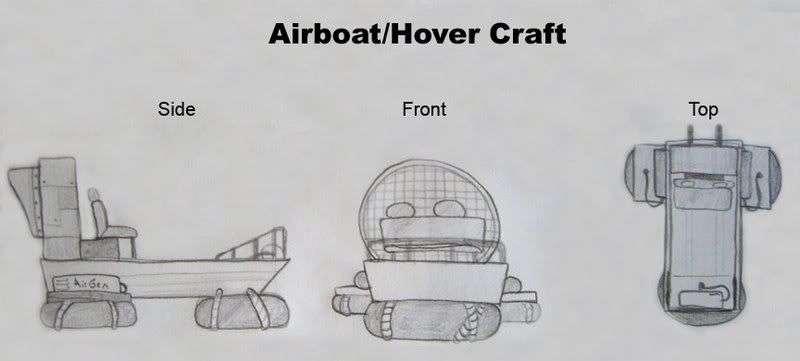
So anyway, here's my concept art. I'm no artist, just trying to get my idea on paper. It's an airboat/hovercraft. There are three air generators that lift the innertube and a big fan the propells the vehicle forward. The seat will be a car seat. and the Boat is just an old fishing boat. Anyways, please critique the concept (not the art). Thanks!

zzz.jpg

Replies

  • flaagan
    Options
    Offline / Send Message
    flaagan polycounter lvl 18
    About the only thing you'll have to worry about is having some form of steering setup in front of the driver seat. I'm pretty sure there's a way to script in a custom seating position, but you're much better off on a first go-around using the existing setup.

    Another thing to keep in mind when you're doing the uv mapping is that Unreal really doesn't like having a model alphaing itself out (totally forgot the term for that) so things like that mesh behind the driver may need to be a separate object that's merged together when you rig the vehicle (I'm assuming you're basing your starting point off of those tutorial dvd's that came with the game?)

    Best place to start after you've got it all modeled and rigged is to create a 'vehicle factory' (if I recall that being the correct game-terminology) for it based off the existing hovercraft and just call in your vehicle as a model. Also, just for testing out materials in-game you can always set up a test room with the vehicle in it just to walk around and compare it in scale to the player model and other vehicles.

    Can't think of any other lil tidbits o' wisdom to toss out from my UT vehicle creation experience right bow, but it is past midnight on sunday right now so I'm not exactly firing on all cylinders. tongue.gif Lookin forward to seeing how this progresses, should be rather amusing. smile.gif
  • The Keen
    Options
    Offline / Send Message
    Thanks for the info flaagan, I'm going to put this vehicle in the engine before texturing it to figure out how everything works. I'm going to use the UT2004 wiki for the tutorials.

    Here's my humble beginnings. It's currently 1692 tris, going to try and bring it down to 1500. C&C's are welcomed.

    Airboatv.jpg
  • OneStrangeBoy
    Options
    Offline / Send Message
    Right here we finally go! So Keen gets a massive headstart because he sabotaged my comp, causing me to lose everything. But I digress: concept art along the same lines as above, comments on style welcome! Going for a junker hover bike, all bolted on parts and belching smoke.

    JunkerConcept.jpg
  • flaagan
    Options
    Offline / Send Message
    flaagan polycounter lvl 18
    Don't afraid to spend quite a few more poly's than that on the vehicles. The original UT2k4 vehicles are somewhere between 3-5k polys, and you figure the current standard of pc could easily handle more than that. Feel free to smooth out the curved surfaces some more and add some general noise to the edges (it's supposed to be makeshift, right?... add some beat-down to that model). Also, things like the rope and hose lines could easily be added in as well.

    An (incomplete) vehicle I made up a while back was this Dune Buggy. As you can see in the wires things like the antenna and the like were easily put in and the final vehicle didn't even crack 4000 polys. Also, the windshield on that buggy and the headlight / taillight enclosures on my Dodge Magnum vehicle are examples of what I was talking about where alpha'd parts of the vehicle had to be seperated from the rest of the vehicle and reassembled when the model was rigged and exported, as they'd alpha through the rest of the vehicle model when you'd look through them otherwise.
  • The Keen
    Options
    Offline / Send Message
    Wow, I don't mean to second guess you but did you mean 3-5k polys? or tris. Cause that seems huge, but I'm no expert.

    Great advice! I will definitely try to add some wear and tear into the model before I start texturing.
  • flaagan
    Options
    Offline / Send Message
    flaagan polycounter lvl 18
    Yeah, tris, always refer to them as polys; but yah, 3-5k tris should be easy for the engine and any decent system to handle.
  • The Keen
    Options
    Offline / Send Message
    Cool, having the extra tris help a lot. I put dents in the front of the boat to make it look like it's been hit before and added more detail in other areas. Also shortened the boat quite a bit, I sat back and looked at it and realized that a row boat wouldn't be as long as I had it.

    Just about ready to texture, but wouldn't mind getting some more critiques.

    Airboatv-1.jpg
  • SHEPEIRO
    Options
    Offline / Send Message
    SHEPEIRO polycounter lvl 17
    nice design but you are spending sooooo many tris/polys on those tubes underneath i would seriously think about reducing the crossection to 10edges and the loft to 16 (or sommit) i think youd save about 300-500 tris there with little difference, spend them on the propeller gaurd which isnt as round as the tube (even though bigger and more prominent)
  • The Keen
    Options
    Offline / Send Message
    I agree with you SHEPEIRO, my brother was telling me the same thing yesterday, that my poly distribution sucked and the overall design was lacking. So I shaved poly's off the rope and inner tube and put them to better use.

    Definitely want a few last minute critiques if you got any before I start texturing, I would like to get to texturing today.

    airboatv.jpg
  • oobersli
    Options
    Offline / Send Message
    oobersli polycounter lvl 17
    maybe add a bit more detail on how the boat actually attaches to the base boards. more so the back area. maybe even make the back tubes a bit more squashed because of the weight. I would still say that those tubes have a lot of polys in them still. 20 or 22 sided tubes, I would say 15-18 maybe max. since the tops are covered, reducing the sides might not make a big visual difference.
  • The Keen
    Options
    Offline / Send Message
    Cool ideas oobersli! I did all of them. And it's less tris than before.

    Alright, I am going to start the unwrapping process and try to get some textures on this thing.

    EDIT: what is a good texture size for a vehicle in UT2004?

    airboatv-1.jpg
  • The Umbrella Man
    That's a great looking vehicle. I am going to say that the textures in 2k4 were about 512 for characters, so for the boat I would say try for 512, but if that seems to confining start at 1024 then resize if it's too big. You can always find out by opening up the unreal editor however. Also I can't see it by looking at it, but make sure the fan blades are tilted at an angle or they won't blow air anywhere. They look too flat right now to be capable of moving anything.

    Edit: one question though, I saw steering fins on the back, but no steering device, all I see is a handle next to the seat which I am assuming is acceleration. You might want to add that detail along with some engineering details on how those things pivot back and forth.

    Also as an aside, those ropes look way too thin, make the ropes a bit bulkier so they don't look like they would snap the minute you hit the gas. Also where are those ropes tying off at, they look like at the moment they run into no where. Personally I would have attached the tubes with some kind of metal fastener with rubber ribbing, but that's the wanna be engineer coming out of me, but at the same time it's those little details that help the viewer believe your props and vehicles.

    Anyway I really do like this concept and would love to see it textured.
  • EarthQuake
    Options
    Offline / Send Message
    2k3/4 used 2 1024x1024 maps for the characters, didnt it? or atleast 1 1034, and a 512 for the head.
  • The Keen
    Options
    Offline / Send Message
    Well I'm going to have to put this project on hold. Going on a ROAD TRIP for 5 days. But I will return! you wait and see. grin.gif
  • The Keen
    Options
    Offline / Send Message
    I am back!

    Great critiques The Umbrella Man! I made the ropes thicker, made them attatch to the wood, gave the propeller a curve on both sides, hinges for the steering to move back and forth. I added an acceleration handle to the steering. If you look at other airboats, it's all they need to drive so I believe it is accurate.

    EDIT: I also made the inner tubes in the back less flat.

    At this point I am quite anxious to start texturing so assuming there are no fatal flaws in the model, I'm going to move on. Thanks for all the critiques so far!

    airboatv-2.jpg
  • The Umbrella Man
    Looks good man, continue smile.gif Can't wait to see the rest of it.
  • The Keen
    Options
    Offline / Send Message
    Almost done unwrapping this beast. It's a BEAST I tell you!
    Anyways I got a noobish question here. I'm going to unwrap the crooked railing in the front of the vehicle and I was wondering what would be the best way to approach it?

    What I was thinking was planar every side and overlap a lot of it. But what would the experts of polycount do?

    Railings.jpg
  • oobersli
    Options
    Offline / Send Message
    oobersli polycounter lvl 17
    I'd just make a seperate small texture for the bars that tiles in one direction. for your uv's, just select all the faces on one side and just use a cylinder map, then you'll probably have to re-adjust the uvs a bit since the bar is all crooked.
  • flaagan
    Options
    Offline / Send Message
    flaagan polycounter lvl 18
    I agree with oobersli, don't be afraid to split up the vehicle into multiple materials, especially if you've got things like wood, metal, etc on separate parts of the vehicle, will make it easier to set up the shaders in UT if you can specify how shiny / etc parts are with individual shaders.
Sign In or Register to comment.