Nates props

polycounter lvl 17
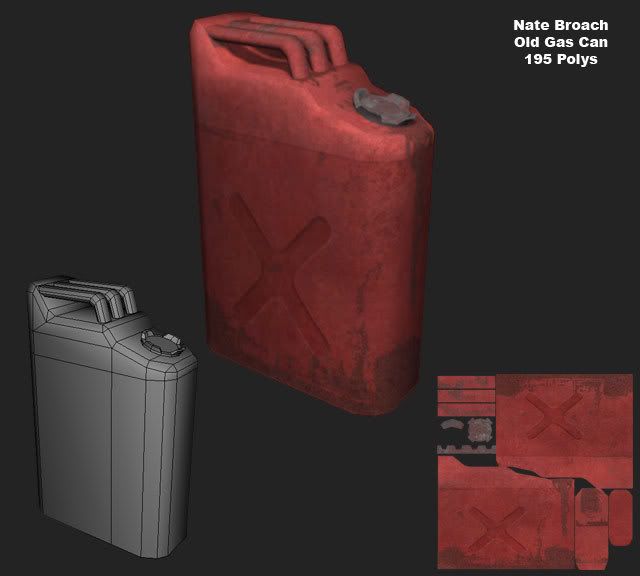
Hey everyone! Im relatively new here, Ive just posted a few works in the "what are you working on" thread. Im gonna be making a ton of props this quarter at my school and decided to post em as I make em here. So with that said! heres two that I just finished over the weekend.

Crits would be greatly appreciated!
Crits would be greatly appreciated!
Replies
As for the Can, I'm not quite sure why it changes color 3/4 of the way up. I'm assuming your ref does that, but I might go against your ref and make it all the same color. It just looks pretty weird or almost like a UV problem if someone dosn't look at the texture map.
What are the books for? And whats their texture resolution? They seem a little high poly for what they are.
Both these models are for an unreal mod, Im on a "outsourcing" team in my class so I make models for 3 different games. I realized I wasnt very poly-conscience with the books, so I went in ripped one book out, cut the polys to under 100 and put it on a 256x256. I didnt have time to finish the other three.
One of my modeling problems was that I was told at school that triangles were a big no no. So I tried to avoid them at all cost and I would normally make a whole edge loop as opposed to pinching off a section off and making a triangle. This added alot of polys. This time I did just pinch it off as you can see here in the wire frame.
Let me know if this was the right thing to do, cause Im still not sure.
Oh and hopefully the grey background I used this time makes it easier to see.
Thanks again for the feedback!
One of my modeling problems was that I was told at school that triangles were a big no no.
[/ QUOTE ]
what school do you goto? this is the biggest load of crap. game engines only draw triangles. they have to idea WTF a quad is. if you want to do game art triangles are your best friend. even if you make a model in quads you have to go back in and make sure your tristripping is all correct. i would love to personally go to your school and take a dump on your teachers face. just makes me mad that you kids pay so much money for school and they feed you BS like that.
One of my modeling problems was that I was told at school that triangles were a big no no.
[/ QUOTE ]
Not this again...you only need to keep your models mostly in quads when you need to use meshsmooth or something similar to subdivide your model (and you want as clean a meshflow as possible). Even then tris are fine in many areas. The places that you want to avoid tris and tripoles are in highdeformation areas.
Also what arsh said.
Tell your teachers to learn the basics and/or be clearer in their explanations.
EDIT:
About your work:
Make both sides of the can unique, or merge them on top of each other in the uv. Get some more clean, gray metal in there, mainly on the bottom.
Either paint in more highlights or go the whole distance and do spec, normal and relfection maps.
I like the book texture, still some stuff you can do with it.
Try to put some soft 1pixel high shadows on the pages to simulate the shadows of pages not perfectly centered in the binding.
You can try and make another layer similar to the brown grunge on top but make it alot brighter to give the book a more worn look.
Paint a very slight dent in the pages where the bookmark is.
More (very) subtle color variation. Try some dark green for a little fungus/rot look.
You can lose the a lot of tris in the segment you have on the egde of the cover and use the extra tris to round out the back and model the long indent along the cover.
Two book refs:
http://www.recreationcrawler.net/images/description/Old_book_bindings.jpg
http://www.recreationcrawler.net/images/description/Brockhaus_Lexikon.jpg
I was wondering though, is it a problem for game engines if there is intersecting geometry?
Also one other question unrelated to the rubble. where can I find info on whats "next-gen standard"? Cause when Im working on projects that arnt for unreal 2004, id rather be trying to make next-gen standard models and textures.
Thanks!
Edit:
Hey thanks Cubik for the critique, Ill definately go back and work on it some more when I get some more time.
not 100% sure about the intersecting geometry causing any problems. i wanna say no, but it's been awhile since i've messed with anything in game
btw, what school do you go to?
I was wondering though, is it a problem for game engines if there is intersecting geometry?
[/ QUOTE ]
No. But if you place all the vertices for two different in the exact same position you'll most likely get z-fighthing (quick explanation) which is damn annoying to watch and a definate immersion destroyer.
http://www.iddevnet.com/quake4/ArtReference_CreatingModels is a good start for information about "next-gen" specs and methods. Just search this forum for additional relevant information.
character: Yea Ill definately check those out. I go to the Art Institute of San Diego. And Im actually learning normal maps this quarter so Ill definately practice on the gas can.
Cubik: Hey thanks for the info man. Yea Ill probably just throw them in the engine too see if theres a problem.
Anyways! I finished the rubble. I kinda had to rush the unwrap and texture, because its due today.
Also I finally got my portfolio site up www.alter-nate.com . I still have a little over a year of school, so most (if not all) of the work in there will be replaced. But I would love to hear some feedback on it.
One thing models on your site show is poor use of geometry:
http://www.alter-nate.com/images/Toilet.jpg
That's pretty bad. I mean, it's a nice toilet but it's closer to a subdivision model than efficient game art. You shouldn't be spending triangles on edge loop upkeep or uselessly connecting peices. To go with the multiple unnecessary edge loops, the amount of bevelling is excessive. Ask your teachers to show you some sensible low poly modelling practices, or go and take a look at some examples yourself. That's not how you do it.
And I totally agree about some of the models, even now after getting some feedback from all of you, im looking back and seeing what I could do differently. Thanks for the feedback Im learning tons from all of you.
Edit:
Actually would you mind explaining what you meant by:
"You shouldn't be spending triangles on edge loop upkeep or uselessly connecting peices."? Im not following
If geometry (vertex/edge/poly) doesn't noticeably define the shape/silouette, remove it.
Case in point: the toilet has excessive edges (in loops!) that don't define the shape anymore than if they weren't there, so get rid of them. The main culprits are the seat (that surface is flat, and the main breadth of it can be defined with a singly poly) and the cistern (?) the water-holder-thingy on the back. How often is the player going to actually look into the toilet? Mostly likely very quickly, just a passing glance, so lowering the amount of polys defining the bowl shape is justified.
Since I'm sure this toilet would be replicated for use in an environment, and I'm fairly certain it's not going to play a prominent role in the outcome of the game. You don't need to invest the poly budget you had since it's mostly an object that has to be recognizable and familial enough so that the player knows what it is, and accepts that it looks correct. Any extra detail beyond what it has to imply is excessive. Perhaps I'm being harsh, don't take it that way: it's a fine toilet! but at the end of the day it's just a toilet. If it was a character model, or a FPV gun, something that is going to be seen frequently (thus prone to harsher scrutiny) then a higher poly budget is in order. The toilet though, is there to ground the player with a sense of realism, but just enough to create the illusion of it.
Active optimization, seeing what you need to retain to keep the form pure and true to the intent as you model, takes some practice. It's just another tool in your big bag of tricks as a 3D artist.
Actually would you mind explaining what you meant by:
"You shouldn't be spending triangles on edge loop upkeep or uselessly connecting peices."? Im not following
[/ QUOTE ]
Sure.
Joe's paintover nailed most of what I wanted to show, but I'll add one suggestion - the base really doesn't need to be connected to the cistern. All those edge loops define are flat surfaces, and you can define those much more cheaply with actual planes. Since it doesn't have to be connected at all, you can save polys by spanning the entire base with a handful of tris (I'd say six). Some model surface will then be hidden, but that's acceptable. Even if for some reason you had to keep everything connected then you could still do that more effectively by growing triangles from your existing corners rather than creating new cuts in the middle of an edge.
You also might try suggesting bevels by lightening/darkening edges in the texture, rather than modelling them.
Keep perservering Nate
Joe: Hey thanks for the encouragement man. Yea I definately want to start trying more for next-gen stuff. Im actually gonna be learning normal mapping this quarter and plan to normal map this clock once I learn it. And Im sure once I learn it Ill have a dozen more questions for all of you, but Im excited about it. Good luck getting back into the swing of things man, looking forward to seeing what you come up with.
Also make sure that you have removed all tris that the player will never see ie. the tris on the backside of the hinges and the ones under the feet of the clock.
Much better tridistribution than your older models.
About normalmapping: Go for it! Properly used they will only heigthen the quality of your work.
This shows what vig meant. You can save quite a bit by simply connecting all your bits to existing, necessary geometry instead of creating verts in the middle of an edge. It's a bit hard to see, but it looks like the bottom has the same problem. The middle bit could also be done as a few planes to save tris, although you could justifiably leave it as is if you want non-unique uvmapping there.
One other thing: if you are posting a flat shaded wireframe, use a paletted image format such as .gif or .png. Tiny filesize + no artifacts = win.
Edit: beaten.
It can often create triangular artifacts when the mesh gets lit. Similar to how flat terrain or flat wals are never just 2 triangles.
Try it out with lighting and see what you can get away with.
i hear this at least once a week in the studio:
"the polycount doesn't matter, it's all about the number of draw calls"
just make it look pretty without being completely wasteful.
you know you coulda just saved a heap of money and just came to polycount in the first place,, I'm Glad i did. tho its good to see you here becoming a member of an active game modeling comnity. pretty much in my exp.. students that go to school and only do the assignments, and never try and push them selves on their own time.. uusally end up with the portfolios that are passed around game companys as comic relief.
i still consier any game art programs as a 100% complete waste of money. its just my opinion and people are free to disagree. but that wont make me any less not incorrect.
your modeling sense has alrready improved just in the few posts you made here,,
also get some more complex objects in that portfolio, games are full of mundane things such as mop buckets and toilets, and if you get a job you will be making the crap out of that stuff.. but in a portfolio, you want to catch someones eye. that clock looks like a good start, if you bust out a really sweet texture,
so far your texture work is not showing a lot, its mostly flat textures, nothing painted with any forms or shapes,
don't be afraid to be an artist,, let yourself get wild heres some inspitation
http://www.unrealtechnology.com/screens/p_embry3.jpg
http://electronicarts.fr/images/images/76420-BF2142pcSCRNannouncement1_p.jpg
also learn how to utilize normal maps and other such next gen stuff.. just do some searches online for tutorials.
i'm not saying put normals on everything. but at least have an understanding.. and when i say learn normals.. DO NOT just convert your base texture to a normal map or i will mutha fucking stab you in your fucking eye.. thats how passionate i am about that subject.
i would also advise putting a few models up in varying styles, some cartoony, some serious, some fantasy some sci fi.. good to show range.
well thats all for now,, keep up the stuff
Black Dog and Cubik: thanks for the paintovers, I went back and fixed it. And SouL I kept a copy with the quads still in place so I can test the lighting and see if theres a difference.
One thing you brought up blackdog, you said I could probably change that one area in blue (refer to your paintover) to just one plane. But that would make it an 8 sided poly. Are 8 sided polys ok? Thats another thing Ive always been told to steer away from.
Killingpeople: Probably a lame question but what are draw calls?
RhinoKey: Hey man thanks for the feedback. Most of the objects I have in my portfolio were all done at school and I was assigned to do them, I didnt have much of a choice. During my breaks though I definately plan on making something cooler and more interesting then toilets and brooms. And yea I know what you mean about the textures. Ill make bigger effort on my next one. And I too wish I joined with polycount earlier. So far the help Ive gotten from everyone has been incredible.
Anyways, I had alot of models due this week (untextured). So heres two couches I had to make. The assignment is to model the inside of a pullman train, and Im doing a sleeper car.
This ones 134 polys
And this ones 53
I took a few creative liberties by adding the curve in the couch, but I still think they look a little bland, Im gona keep working on it, but in the mean time feedback would be appreciated!
Edit:
Made one of those old foldout desks 288 polys
[ QUOTE ]
Draw submission (generally) requires a ring switch in the driver, among other factors.
[/ QUOTE ]
[ QUOTE ]
The "draw call" is the API call you make to submit vertices and state for rendering.
[/ QUOTE ]
as far as i can speculate, it's a drawing routine for a graphic's engine - like a cycle or something. and a drawing routine would be some coded procedures that creates the images you see in a game in real time. when you import shit into the game, you've created a texture and model which must be translated into a readable formate for a game engine using a shader which assigns properties to it which defines a game asset's mesh and textures appearance in the game.
so a certain amount draw calls can be running at one time before it begins to hinder a game's performance.
my guess is that because computers are becoming so powerful, your polycounts will eventually not matter. i throw in my two cents here especially nothing you're currently in school because by the time you're out? my guess is you'll barely have any constraints at all. naturally, you should just focus your efforts on making good looking models - and in my opinion, that would mean placing an emphasis on unwrapping, and texturing skills. always implement clever concepts, fun experimentation, and at the least clean modeling.
thats just my understanding, i know the things to do for our engine to cut back on draw calls, but as i said difrent engines handle them difrently to my exp
The furniture models look sensibly constructed, good to see you have a handle on that. I do think you could throw some tris at them and see improvement. The issue people brought up with your previous models wasn't the high polycount per se, but the fact that there was heaps of geometry that wasn't contributing anything to the appearance of the model. So if you think that chair looks pretty blocky and boring, feel free to add tris to improve the shape.
As for draw calls...the details can be a bit technical and complicated. As a modeller, if you try and minimise the number of texture sheets and/or materials you will usually be doing the right thing.
I modeled this in max (598 polys), but I have to take it to maya and unwrap it since I made it in a maya class (we were alowed to model in max but we have to texture in maya). Any tips on exporting obj's properly? Whenever I do it the smoothing groups look terrible.
And I also had to model and texture four objects in two days. These two are the only ones I thought were worth showing.
Its just the diffuse texture on those. I would have liked to have had more time on the textures... Anyways, any feedback would be appreciated!
/
793 polys
I do like the moss you added at the base of the trunk. I'd suggest using more reference pictures when you work this one over again (if you do). also, dont render with that ugly black background, and get yourself a better light setup!
good luck!
On a side note, I modeled a locker for one of the UT mods.
hopefully its a better lighting setup. Though it is a little dark inside the one locker...
266 polys 1024 texture (but it will sized down)
And heres the unwrap
http://i38.photobucket.com/albums/e117/SkepticalNate/LCVPUnwrap.jpg
Heres a forklift Im currently working on. I really want to take this one to the end with spec and normal maps for my portfolio. So I would love some critiques on this one. So far its 755 polys.
Spark
Anyways I got the forklift textured.
And heres the 1024x1024 texture
http://i38.photobucket.com/albums/e117/SkepticalNate/nb_anywhere_forklift_textur.jpg
It dosnt look like Im gonna get to normal mapping this anytime soon. Im having alot of trouble figuring out how to build and unwrap my models for normal mapping. Ive only had a week to play around with zbrush, and I think this might be a little too ambitious for me as of now. One question though, is zbrush used much for inorganic objects like this forklift I modeled? Or would they use other methods to create a normal map?
The texture looks pretty good. I would defiantly recommend maybe adding some shadows, possibly with an ambient occlusion texture on top of your diffuse.
Spec maybe would defiantly help sell the metal texture more.
Also, black background renders = bad. If you have to use white or grey, or render it on top of at least a plane or something.
And with the ambient occlusion texture, do you mean just bake one on top of it?
And Ill definately get to the spec. I made this for UT2004 so Spec wasnt a priority but Ill put one in there for my portfolio when I get some time.
And with the background being black. Ive been trying to stay clear of that. I dunno maybe my monitor is too bright, but it looks just dark grey to me, Ill make it brighter next time.
and the texture
http://i38.photobucket.com/albums/e117/SkepticalNate/nb_statue_texture01.jpg
Give it a try and see what results you can come up with.
Diffuse
http://i38.photobucket.com/albums/e117/SkepticalNate/ClockTexture.jpg
Normal
http://i38.photobucket.com/albums/e117/SkepticalNate/Clocktexturenormal.jpg
Spec
http://i38.photobucket.com/albums/e117/SkepticalNate/ClockTextureSpec.jpg
Also this is the first time Ive added a normal map to one of my props. All I used was the Nvidia filter. I would love to hear some tips on whats the best method for normal mapping props like this is. Thanks!
You basically gotta play with it to figure out the best settings. Ben Mathis has a decent tutorial on this.
Unless you're going for the current look that is.