Home 3D Art Showcase & Critiques

Old hand drill

polycounter lvl 8
Offline / Send Message
Doxturtle polycounter lvl 8
I am modelling from an old hand drill I have in my room, I am using this as a reference for texturing too.

I am done with the low poly and the high poly, I have a low poly that is around 3000 tris, and still looks pretty decent in my opinion.

Low poly:

[SKETCHFAB]50fd0c71af85447f95a486f1109d5713[/SKETCHFAB]

High poly:

[SKETCHFAB]f692bc7fb7d241cd8c4fbf02292403b9[/SKETCHFAB]

Here are some pictures of the drill I am modelling from:

9052968704_9536a79cf4.jpg

$_35.JPG

images?q=tbn:ANd9GcRNII9ovUfzwkhVKwXkLMz98b4PWpq6fao3GdtFC9H8IwD3M34W

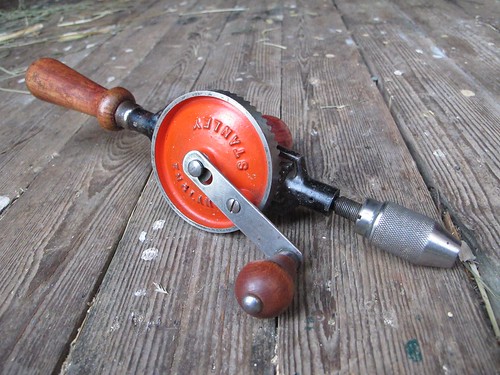
My goal is not to make this a perfectly matched model, but to get better at texturing, as this is my weakest point.

This will hopefully be part of my university application portfolio once its finished

Replies

  • Doxturtle
    Options
    Offline / Send Message
    Doxturtle polycounter lvl 8
    I managed to get the high poly low enough to be able to upload to sketchfab, just removed a few iterations of turbo smooth

    [SKETCHFAB]f692bc7fb7d241cd8c4fbf02292403b9[/SKETCHFAB]
  • Bummer6
    Options
    Offline / Send Message
    Bummer6 polycounter lvl 13
    This area deffinately needs more work. I know it's not the most visible area on the drill, but I think you can do much better than this. Just have another look at your topology and see if you can't get it to smooth properly.
    wibblywobbly.png
  • Doxturtle
    Options
    Offline / Send Message
    Doxturtle polycounter lvl 8
    Ah that, I mean't to fix it but I forgot, thanks for reminding me.

    If I remember correctly, that was caused by the fact that I used a cylinder to cut a hole, then extruded the edge up and for some reason it didn't hold its shape properly.

    This will be easy to fix on the low poly, because I made it a separate piece, it might be a bit trickier on the high poly.
  • Doxturtle
    Options
    Offline / Send Message
    Doxturtle polycounter lvl 8
    I had a go with set flow and it fixed the cylindrical shape of it, however I still experiencing some wierd shading on the base of the cylinder which I need to fix.

    jbRhUwQ.png

    j6cAeAP.png
  • Bummer6
    Options
    Offline / Send Message
    Bummer6 polycounter lvl 13
    As I'm sure you know, triangles and subdividing don't exactly go together all that well, so you should try to use only quads whenever possible. Of course there are exceptions where triangles are acceptable, but as a general rule you should atleast try to have as few triangles as possible. It's way better now though, so you're deffinately improving it..
  • Doxturtle
    Options
    Offline / Send Message
    Doxturtle polycounter lvl 8
    Managed to get it all quads, still not smooth perfectly, but its barely noticable. The rings I added are now causing some issues, so I might just make them run as single loops around the cylinder, until they get to the area of the cylinder, so it doesn't causing pinching.

    FT2X2Wt.png
  • Doxturtle
    Options
    Offline / Send Message
    Doxturtle polycounter lvl 8
    I baked a normal map in 3ds max, however for some reason when I apply it in sketchfab it does not have a difference to my model.

    it looks crap, mainly because its rendered at low res and I haven't changed any of the settings on the renderer, but I would still like to atleast be able to test it.

    Anyone how any idea why its not working?

    FrmKl9E.jpg
  • ZacD
    Options
    Offline / Send Message
    ZacD ngon master
    Can you post a picture of what happens in SketchFab?
  • Doxturtle
    Options
    Offline / Send Message
    Doxturtle polycounter lvl 8
  • ZacD
    Options
    Offline / Send Message
    ZacD ngon master
    I wonder if your model is missing it's UVs for some reason, what does a checkboard texture look like in the diffuse channel?
  • Doxturtle
    Options
    Offline / Send Message
    Doxturtle polycounter lvl 8
    I re-exported after collapsing the unwrap modifier, now it works.

    The normal map is really low res at the moment, so it looks quite ugly.

    [SKETCHFAB]d946bde0bb81417a848150da5da92681[/SKETCHFAB]

    There is also a small error with the part at the front which I need to fix, but overall it seems to be doing its job nicely.
  • Bummer6
    Options
    Offline / Send Message
    Bummer6 polycounter lvl 13
    Same area you had trouble with before didn't bake properly for some reason. Not sure why, but you should probably spend some time troubleshooting it.
  • Doxturtle
    Options
    Offline / Send Message
    Doxturtle polycounter lvl 8
    I did this bake in max but I might try taking it over into xNormals

    I tried doing this in xnormals but I keep this getting this problem where it just produces the default purple, with no details
  • Doxturtle
    Options
    Offline / Send Message
    Doxturtle polycounter lvl 8
    Starting to look better now.

    [SKETCHFAB]d946bde0bb81417a848150da5da92681[/SKETCHFAB]

    Ill get some pictures up of my set up for the problem area, I think I might be doing something wrong :D
  • Doxturtle
    Options
    Offline / Send Message
    Doxturtle polycounter lvl 8
    Heres is the setup, I went to sleep and forgot to post pictures.

    I think the issue is that in my high poly, the whole thing is one piece, in my low poly the cylinder is seperated.

    So when I add the projection the cages intersect.

    Im not sure how to fix this issue

    OOgdQ3X.png
  • Bummer6
    Options
    Offline / Send Message
    Bummer6 polycounter lvl 13
    Doxturtle wrote: »
    Heres is the setup, I went to sleep and forgot to post pictures.

    I think the issue is that in my high poly, the whole thing is one piece, in my low poly the cylinder is seperated.

    So when I add the projection the cages intersect.

    Im not sure how to fix this issue

    OOgdQ3X.png

    There's a really simple way to fix that issue... just make it part of the same mesh. What's the problem? Just use boolean like I'm guessing you did with the high poly.
  • Doxturtle
    Options
    Offline / Send Message
    Doxturtle polycounter lvl 8
    I was hoping there would be a way to do it without having to redo the UV's, I guess not.

    I initially avoided it because its waste and I thought it would show bad practices

    I will do that then
  • Bummer6
    Options
    Offline / Send Message
    Bummer6 polycounter lvl 13
    You don't have to redo all the UVs. Joining that cylinder with the other mesh would literally only mess up two UV islands. You can redo that stuff in less than 5 minutes and get a perfect bake out of it. Totally worth it in my opinion.
  • Doxturtle
    Options
    Offline / Send Message
    Doxturtle polycounter lvl 8
    Do you have any idea how I can fix the end section of my bake, I might aswell get two problems out of the way at once.

    rf9OHzw.png
  • Bummer6
    Options
    Offline / Send Message
    Bummer6 polycounter lvl 13
    Hard to tell what the problem is without seeing both the high and low poly versions. From experience I'd say your problem is either that your high poly doesn't match your low poly, or something is seriously wonky with your UVs. If the tip is a separate mesh in both the high and low poly versions, you might want to bake that part separately and combine the normal maps in photoshop rather than baking it all in one go.
  • Doxturtle
    Options
    Offline / Send Message
    Doxturtle polycounter lvl 8
    By what I can only describe as a miracle, the UV automatically fixed itself when I did the bollean, so I didn't have to redo it and fit it in again. Saved me a minute or two :)

    Here are some pictures of the problem area:

    YevZeUU.png

    BWdfZyy.png

    The cone was slighty over by a tiny amount, I moved it, this is how it looks now, I will try rebaking and see if this fixes it. The UV's look fine, so they should not be the issue.

    ko55JCs.png
  • Doxturtle
    Options
    Offline / Send Message
    Doxturtle polycounter lvl 8
    hmm

    There seems to be more errors in this bake than my other ones.

    There are quite a few small areas that look a bit wierd and also still having problems with the front.

    [SKETCHFAB]497ce741dc7a4089ba3fb0d93e45475a[/SKETCHFAB]
  • Bummer6
    Options
    Offline / Send Message
    Bummer6 polycounter lvl 13
    Doxturtle wrote: »
    By what I can only describe as a miracle, the UV automatically fixed itself when I did the bollean, so I didn't have to redo it and fit it in again. Saved me a minute or two :)

    Here are some pictures of the problem area:

    YevZeUU.png
    The cone was slighty over by a tiny amount, I moved it, this is how it looks now, I will try rebaking and see if this fixes it. The UV's look fine, so they should not be the issue.


    I think the problem is the ngon at the end of the low poly... You should make it so it's either tris or quads before you bake. If that's not the problem then I don't know what is.
  • Doxturtle
    Options
    Offline / Send Message
    Doxturtle polycounter lvl 8
    I will try that. By the way, thanks for your continued help :)
  • Bummer6
    Options
    Offline / Send Message
    Bummer6 polycounter lvl 13
    Doxturtle wrote: »
    I will try that. By the way, thanks for your continued help :)

    No problem. I know this kind of troubleshooting can be a pain.
  • Doxturtle
    Options
    Offline / Send Message
    Doxturtle polycounter lvl 8
    It still didn't work :/

    I fixed the Ngon, I checked the UV's, the cage looks correct, it should be fine.. but for some reason it isn't.

    I would try baking it in xnormals but that does not seem to work at all for me anymore.
  • Bummer6
    Options
    Offline / Send Message
    Bummer6 polycounter lvl 13
    could you post the normal map and highlight the UV island that's causing problems? I have a feeling the UVs might be stretched or deformed somehow.
  • Doxturtle
    Options
    Offline / Send Message
    Doxturtle polycounter lvl 8
    Sorry for the slow reply, I am 99.9% sure this is a UV problem.

    This is a basic cylindrical map that has been scaled slightly to make it less stretched. It produces this weird mess:

    8c5eNTJ.png
  • Bummer6
    Options
    Offline / Send Message
    Bummer6 polycounter lvl 13
    Pretty sure you found the problem. Just relax those UVs and rebake, then you should be alright I think. It's been years since I used 3ds max, but I think pelt map is what you'd use to relax UVs.
  • RashedAlmetrami
    Options
    Offline / Send Message
    RashedAlmetrami polycounter lvl 10
    Relax each UV island; if you have done that and it persists then reset the Xform of the object and then relax again :)
  • Deathstick
    Options
    Offline / Send Message
    Deathstick polycounter lvl 7
    It might have to do with the fact that your model is tapering, yet your UV map is untapered/straight, causing the distortions.
  • Doxturtle
    Options
    Offline / Send Message
    Doxturtle polycounter lvl 8
    Still broken, even with the relaxed UV's.

    I am really not sure what is causing this..

    U9yJ6Oc.png
  • ZacD
    Options
    Offline / Send Message
    ZacD ngon master
    Are you using a cage? What application are you baking with? What does the cage for that part look like?
  • Phong
    Options
    Offline / Send Message
    Phong polycounter lvl 3
    Are your uvs still laid out in a rectangle for the sides of the cone? To get no bending in textures, cones need to be laid out either curved or in a circle. The error you are seeing is being caused by textures getting squished to fit into the smaller space of the tip with the same pixel density as the base.
  • Doxturtle
    Options
    Offline / Send Message
    Doxturtle polycounter lvl 8
    Phong wrote: »
    Are your uvs still laid out in a rectangle for the sides of the cone? To get no bending in textures, cones need to be laid out either curved or in a circle. The error you are seeing is being caused by textures getting squished to fit into the smaller space of the tip with the same pixel density as the base.

    My UV's are now curved properly for this part, the UV's are all nicely straight when I checked using a checkered texture.
  • Phong
    Options
    Offline / Send Message
    Phong polycounter lvl 3
    strange. I would do the baking in xNormal IMO. The problem you are having with no detail showing up probably has to do with the ray distance you have set up. did you use a cage or anything in xnormal?
  • Darksaint
    Options
    Offline / Send Message
    Darksaint polycounter lvl 4
    Doxturtle wrote: »
    My UV's are now curved properly for this part, the UV's are all nicely straight when I checked using a checkered texture.

    Maybe its just the angle you to the picture mixed with weird viewport shading, but your smoothing looks a bit wonky. Maybe you have an unwelded verts.

    What you see in this image http://i.imgur.com/8c5eNTJ.png doesnt appear to be from non-relaxed uvs, it looks as though somethign is messed up with the triangulation.

    What I would recommend doing is separating this piece out from the rest of the mesh, select everything in vertex mode and doing a weld. Then reset the xforms and collapse down to an edit poly. Add on a projection modifier and rebake just that piece. If it works, combine it in photoshop and then merge the meshes once you are done baking. Also, are you using a super sampler in your render settings when baking (out of Max)?
  • Doxturtle
    Options
    Offline / Send Message
    Doxturtle polycounter lvl 8
    strange. I would do the baking in xNormal IMO. The problem you are having with no detail showing up probably has to do with the ray distance you have set up. did you use a cage or anything in xnormal?

    Yeah, I set up a projection and exported the cage, I set it up to the use the cage but it did not work. I also just tried it without a cage, and calculated the distance or something like that, that didn't work either.
    Maybe its just the angle you to the picture mixed with weird viewport shading, but your smoothing looks a bit wonky. Maybe you have an unwelded verts.

    What you see in this image http://i.imgur.com/8c5eNTJ.png doesnt appear to be from non-relaxed uvs, it looks as though somethign is messed up with the triangulation.

    What I would recommend doing is separating this piece out from the rest of the mesh, select everything in vertex mode and doing a weld. Then reset the xforms and collapse down to an edit poly. Add on a projection modifier and rebake just that piece. If it works, combine it in photoshop and then merge the meshes once you are done baking. Also, are you using a super sampler in your render settings when baking (out of Max)?

    I checked, there are no unwelded verts. I reset the xforms, rebaked, still messed up. I am baking in max, I am not sure if I am using a super sampler.

    Would you like me to upload the file so you can take a look at it? That might be easier than posting on here.

    I agree with your comment about the shading, when looking at it in max it seemed like there were faint lines going across some of the polygons. I used textools smooth by UV shells, so it shouldn't be wrong.
  • Darksaint
    Options
    Offline / Send Message
    Darksaint polycounter lvl 4
    Doxturtle wrote: »
    Yeah, I set up a projection and exported the cage, I set it up to the use the cage but it did not work. I also just tried it without a cage, and calculated the distance or something like that, that didn't work either.


    I checked, there are no unwelded verts. I reset the xforms, rebaked, still messed up. I am baking in max, I am not sure if I am using a super sampler.

    Would you like me to upload the file so you can take a look at it? That might be easier than posting on here.

    I agree with your comment about the shading, when looking at it in max it seemed like there were faint lines going across some of the polygons. I used textools smooth by UV shells, so it shouldn't be wrong.

    Sure, if you want to upload it I'll take a look at it. I'm actually rather interested in seeing whats going on since whats being showed on your uv layout is different than whats being displayed in the checkered material in the viewport. The newest version of Max I have is 2013 so if you have a newer version you'll have to do a legacy save as.
  • Doxturtle
    Options
    Offline / Send Message
    Doxturtle polycounter lvl 8
    Here is the download link, I saved it for max 2013, so it should work.

    http://www.mediafire.com/download/ho0sqbiwsfl4k40/drillforupload.max
  • Darksaint
    Options
    Offline / Send Message
    Darksaint polycounter lvl 4
    Okay so the issue is that the normals on your high poly are flipped. If you were not aware, you are able to distinguish between front and back of the faces by the color/shading in the viewport. This is how it was when I opened the file

    http://i.imgur.com/dLAgyVX.png

    This is what it looks like when flipped (and correct)
    http://i.imgur.com/iUEa0E4.png

    And here is the baked result
    http://i.imgur.com/B8HtaIQ.png

    Judging by how the bake turned out, you may want to increase the size of the parts on the uvs as well as exaggerate the indents on the high poly piece to get a better bake. Is there also a reason when you included the back part of the drill bit on the uvs? From what I can tell in the sketchfab upload, its not ever going to be seen and ends up being a waste of geo and uv space (even if it is small those things can add up for larger assets).

    Also, if your baking out of Max, definitely turn on supersampling, you get a cleaner bake (it does take a bit longer though)
    http://i.imgur.com/R4RlLcI.png

    From my experience, Hammersley at quality of 1.0 provides the best results.

    Hope this helps ya out man, good luck
  • Doxturtle
    Options
    Offline / Send Message
    Doxturtle polycounter lvl 8
    Thanks for taking the time to help

    I will remove that back face and give the front piece a bit more room.

    Now once I have done this I can finally get on to texturing :D
  • Doxturtle
    Options
    Offline / Send Message
    Doxturtle polycounter lvl 8
    Thanks with the help so far guys. This is my 'final' bake for the moment. There are some minor issues that I need to fix, there is waviness on the main gear, but I might just fix that by replacing it in photoshop with an older bake that did not have that in it.

    The front worked out decently this time aswell.

    [SKETCHFAB]dd9874e8f6934d10a76e98360ed992af[/SKETCHFAB]
  • St4lis
    Options
    Offline / Send Message
    St4lis polycounter lvl 7
    Good job so far. You might want to dilate your normals a bit more; you can see the edges when they mip-out at a distance. Are you going to texture it?
  • Doxturtle
    Options
    Offline / Send Message
    Doxturtle polycounter lvl 8
    Im not really sure what you mean by that, sorry.

    I am going to texture it, I rendered a UV template but for some reason things seem really pixely, even at 2048.

    I made sure I left plenty of room in the UV editor, but some of the lines touch eachother in the template, which makes it very difficult to texture.

    St6VagT.png
Sign In or Register to comment.